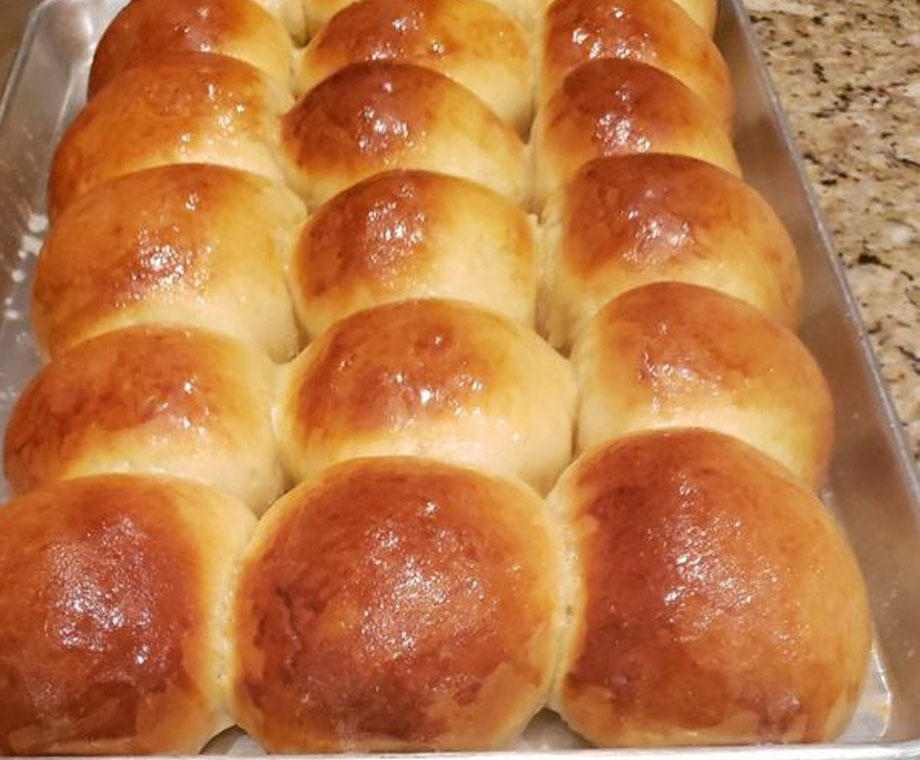
These quick hillbilly hot rolls are pillowy soft and light and fluffy. They have a rich buttery smell and flavor. The recipe is very straightforward, and you can make these super-soft rolls with only seven basic ingredients. Another good thing about this recipe is that we can make fresh homemade hot balls in less than two hours.
INGREDIENTS:
1/2 C melted shortening or oil
1/2 C white sugar
2 eggs
2 C warm water
2 packages dry yeast
6 1/2 C all-purpose white flour
1 tsp salt
INSTRUCTIONS:
1 ) Lightly grease a large mixing bowl, and dissolve 2 packages of yeast in 2 cups warm water in it.
2 ) Add 2 cups of flour, 1/2 C sugar, and 1 tsp salt. Beat with a mixer for 2 minutes or so.
3 ) Add melted shortening and eggs, and beat again. Slowly add 4 1/2 cups of flour and mix until well mixed. Let it rise in a warm place, and until the dough is doubled in size.
4 ) Punch it down and make it into rolls. Let them rise for about one hour in a warm place.
5 ) Bake for about 30 minutes or until golden brown in a 350-degree oven. Gently rub tops of your hillbilly hot rolls with butter. Serve warm and enjoy!
In a mixing bowl, beat together butter, 1 cup sugar, juice and eggs. Combine flour, baking powder and salt; stir into egg mixture alternately with milk. Fold in lemon zest, nuts, and blueberries. Pour batter into greased loaf pan. Bake at 350 for 60 to 70 minutes.
GLAZE
Combine all ingredients mix well. Drizzle over bread.
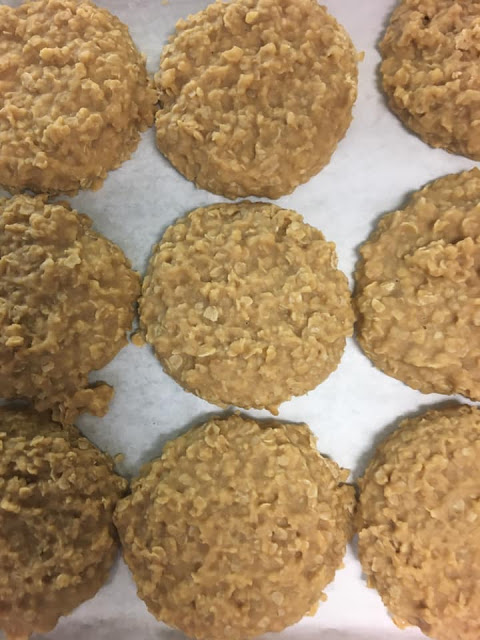
1/2 Cup Peanut Butter 1/2 cup butter 2 cups of granulated sugar 1/2 cup cold milk 3 1/2 cups quick cooking oats 1 tablespoon vanilla extract
How to make it :
1. Add your butter, sugar and milk to a heavy bottomed pot, bring to a rolling boil and boil for 1 minute while stirring. 2. Take your pot off the heat and mix in your peanut butter, vanilla and oats. 3. Use a spoon to scoop and drop your cookie mixture onto a piece of parchment paper and let cool until firm.
1 pound chicken gizzards, rinsed 2 stalks celery, cut into chunks 1 onion, cut into chunks 2 eaches bay leaves 1 ½ teaspoons celery salt, divided 1 teaspoon seasoned salt ½ teaspoon ground black pepper ½ teaspoon dried Italian herb seasoning 1 teaspoon garlic powder ¼ teaspoon ground cumin ½ teaspoon Louisiana-style hot sauce 3 cups oil for deep frying 1 cup all-purpose flour
Directions
Step 1 Place the chicken gizzards, celery, onion, bay leaves, and 1 teaspoon of celery salt into a saucepan, and pour in enough water to cover the gizzards by 1 inch. Bring the gizzards to a boil, reduce heat to low, cover, and simmer until tender, about 2 1/2 hours. Pour in more water during simmering, if needed, to keep gizzards covered. Remove the gizzards to a bowl, discard the celery and onion, and reserve the broth. Step 2 Season the gizzards with 1/2 teaspoon of celery salt, the seasoned salt, pepper, Italian seasoning, garlic powder, cumin, and hot sauce, stirring to combine well. Pour 1/3 cup of the reserved broth over the seasoned gizzards, and refrigerate for 30 minutes or more, stirring often. (Save or freeze the remaining broth for another use, if desired.) Step 3 Heat oil in a deep-fryer or large saucepan to 375 degrees F (190 degrees C). Step 4 Place the flour in a plastic bag, and pour in the gizzards with their seasoning. Shake the bag to thoroughly coat the gizzards with flour. Gently lower about 1/4 of the gizzards per batch into the hot oil, and fry until golden brown, about 5 minutes per batch. Drain the gizzards on paper towels, and serve hot
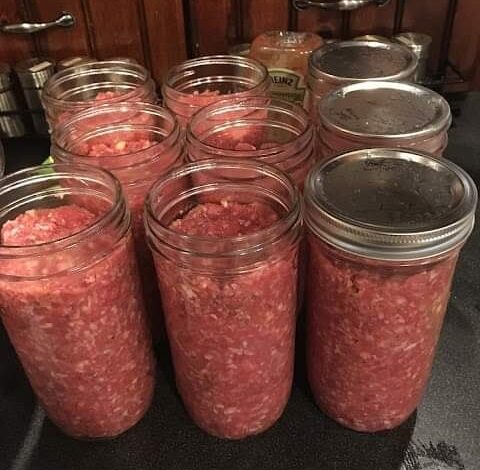
Are you looking for a unique way to preserve meatloaf and enjoy its savory goodness even when it’s not freshly cooked? Canning meatloaf might just be the answer. In this article, we’ll guide you through the process of canning meatloaf, ensuring that it remains safe to eat and delicious for an extended period. Let’s dive into the details!
Ingredients
Before we get started, let’s gather all the ingredients you’ll need for canning meatloaf. These ingredients are essential for creating a flavorful and safe canned meatloaf:
INGREDIENT
QUANTITY
Ground beef (hamburg)
10 lbs
Garlic cloves
3 (no more, to avoid overwhelming flavor when pressure-canned)
Onion
1/2
Light brown sugar
2-3 tablespoons
Tomato ketchup
1 and 1/4 cups
Saltine crackers
1 plastic package (from a box of saltines)
Parsley
1 tablespoon
Yellow mustard (powder)
1 teaspoon
Pepper
1 teaspoon
Salt
2 teaspoons
Eggs
8
Now that we have our ingredients ready, let’s proceed to the instructions.
Instructions
Canning meatloaf requires careful preparation and the right steps to ensure its safety and flavor are preserved. Follow these instructions:
Prepare Your Jars and Lids: Begin by preparing your canning jars, lids, and bands following the instructions for canning principles. Keep the lids submerged in hot water to soften the rubber seal.
Combine Ingredients: In a large bowl, combine all the listed ingredients. Make sure to mix them thoroughly to create a well-blended meatloaf mixture.
Pack Tightly: Pack the meatloaf mixture tightly into clean canning jars. You can do this by adding a little at a time and gently stomping it down to eliminate air pockets. Leave about 1 and 1/4 inches of headspace at the top of each jar.
Wipe Rims: To ensure a proper seal, wipe the rims of the jars to remove any residue. Apply the bands to the jars, screwing them on just finger-tight. This allows air to escape while preventing liquid or pieces from getting through.
Start Canning: Place the jars in the pressure canner with cold water to prevent shock. Turn on the heat and close the canner tightly without the weight. After steam escapes for about 10 minutes to create a vacuum, put the weight on the “nipple” to increase pressure.
Maintain Pressure: Let the pressure reach 10 psi before turning down the heat. Maintain this pressure for a minimum of 90 minutes. Ensure that the pressure stays constant throughout this time.
Cool Down Naturally: After canning, turn off the heat and let the canner cool down naturally. Do not remove the weight immediately; let it sit for at least 24 hours before checking the seals.
Check the Seals: Test the seals by removing the bands and lifting the jars by the lids. The lids should not come off; they should be concave, indicating a proper seal.
Enjoy Your Canned Meatloaf: When you’re ready to enjoy your canned meatloaf, you might find that the juice has solidified. To make it easier to slide the meatloaf out of the jar, reheat it slightly in the microwave or hot water.
Storage Tips: Store your canned meatloaf in a dark, cool, and dry room. If a jar doesn’t seal properly and the lid pops up, refrigerate it and consume the contents within two weeks. Once you open a sealed jar and have leftovers, remember to place the lid back on and consume the leftovers within two weeks as well.
Sweet potatoes have long been cherished for their natural sweetness and versatility in the kitchen. In this article, we introduce you to a unique and delectable way to enjoy sweet potatoes, known as the Sweet Potato Out of This World recipe.
Ingredients:
Before we embark on our culinary adventure, let’s gather the ingredients we’ll need. Here’s a handy table to help you:
INGREDIENTS
QUANTITY
Sweet Potatoes
4-5
Olive Oil
Generous Drizzle
Pink Salt/Kosher Salt
To Taste
Dried Thyme
To Taste
Baking Sheet
1
Parchment Paper
1 Sheet
Step-by-Step Instructions:
Now, let’s walk through the steps to create the Sweet Potato Out of This World masterpiece:
Preheat your oven to 400°F (200°C).
Cover a baking sheet with parchment paper for easy cleanup.
Clean and cut the sweet potatoes crosswise into halves.
Drizzle olive oil generously on each sweet potato half, ensuring they are well-coated.
Sprinkle pink salt or kosher salt and dried thyme to taste on each half.
Place the sweet potato halves cut side down on the prepared baking sheet.
Drizzle a bit more olive oil on top for that extra touch.
Bake in the preheated oven for approximately 40 minutes or until the bottom is caramelized and the sweet potatoes are tender.
Once done, remove from the oven and savor the delightful aroma.
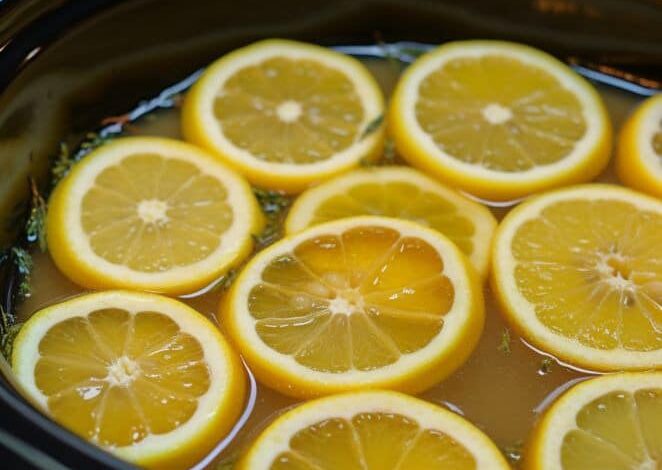
In times of distress, many of us have cherished memories of our grandmothers soothing our discomfort with a special homemade remedy. For me, it was a unique elixir that my grandmother used to prepare whenever I felt unwell. To this day, I continue to prepare and savor this recipe, finding solace in its comforting taste and the warmth it brings to my soul. In this article, we’ll delve into the magic of this time-honored remedy and how it can be a source of wellness for you too.
To recreate my grandmother’s soothing elixir, you’ll need the following ingredients:
INGREDIENT
QUANTITY
8 lemons
Cut into slices
Ginger root
Half a serving
Honey
1/2 cup
Apple cider vinegar
1/4 cup
Water
As needed
Directions
Now, let’s follow the step-by-step process to create this healing elixir:
Begin by adding the sliced lemons, coarsely chopped ginger root, honey, and apple cider vinegar to your slow cooker.
Fill the slow cooker with water until it reaches the top rim, ensuring all ingredients are well-submerged.
Gently stir the mixture to blend all the ingredients together, creating a harmonious infusion.
Set your slow cooker to a low heat setting and cover it with a lid to trap the aromatic vapors. Allow the elixir to simmer for 4-6 hours, or until the flavors have melded beautifully.
Once the simmering time has elapsed, carefully strain the mixture through a fine-mesh sieve or cheesecloth to remove any solids. This will give you a clear, smooth liquid.
Transfer the filtered liquid to a clean container, such as a jar or bottle, allowing it to cool to room temperature before refrigerating.
The Healing Power
This elixir has been a trusted companion for generations due to its remarkable healing properties. When you’re feeling under the weather, simply take a small quantity of this elixir and mix it with warm water to create a calming drink. Sip on it as needed, and you’ll experience relief from various symptoms, helping you recover and regain your vitality.
In a world filled with fast-paced remedies and over-the-counter medicines, it’s heartwarming to know that some of the best healing elixirs can be found in our own kitchens, passed down through generations. My grandmother’s recipe has been a source of comfort and wellness for me, and I hope it becomes the same for you.
So, the next time you’re feeling unwell or simply in need of a warm, nurturing beverage, consider making this elixir. Let it soothe your body and soul, just as it has done for generations in my family.
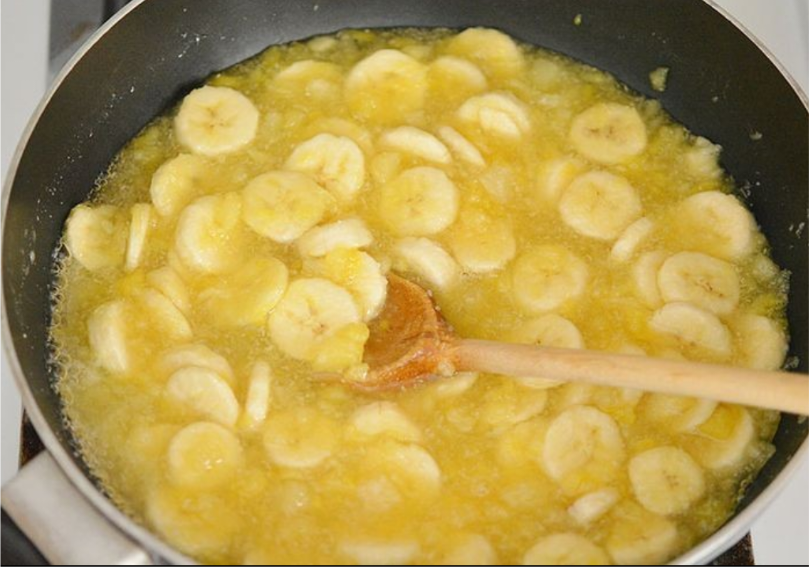
Monkey Butter is a sensational spread that brings together the sweetness of ripe bananas, the tanginess of crushed pineapple, and the exotic aroma of coconut. This tropical delight is a versatile addition to your culinary repertoire, perfect for spreading on toast, topping ice cream, or using as a flavorful ingredient in various recipes. In this comprehensive guide, we’ll take you through the process of creating your own batch of Monkey Butter, along with tips, serving ideas, and answers to frequently asked questions. Let’s dive into the world of Monkey Butter!
Ingredients
INGREDIENTS
QUANTITY
Crushed pineapple, with juices
1 (20 oz.) can
White sugar
2 3/4 cups
Ripe bananas, thinly sliced
4-5 bananas
Coconut
1/4 cup
Lemon juice
1/4 cup
Toast or ice cream, for serving
As desired
Glass jars
For storage
Instructions:
Follow these simple steps to create your own batch of delicious Monkey Butter:
Place the sliced bananas in a large pot or Dutch oven over medium-high heat.
Top the bananas with sugar, crushed pineapple (and its juices), coconut, and lemon juice.
Bring the mixture to a boil, then reduce the heat to medium-low.
Stir frequently and cook until the mixture thickens and reduces down. The banana slices will break down into smaller pieces.
The mixture is ready when it coats the back of a spoon.
Remove the pot from heat and transfer the Monkey Butter to glass jars.
Allow the mixture to cool before refrigerating. Your Monkey Butter is ready to use!
Creative Ways to Enjoy Monkey Butter
Monkey Butter is a versatile treat that can be enjoyed in various ways:
Spread it on warm toast for a delightful breakfast.
Drizzle it over pancakes or waffles for a tropical twist.
Use it as a filling for crepes or pastries.
Top your favorite ice cream with a spoonful of Monkey Butter.
Incorporate it into smoothies or yogurt bowls for added flavor.
Indulge in the tropical goodness of Monkey Butter – a luscious spread that combines the richness of ripe bananas, the tanginess of crushed pineapple, and the allure of coconut. Creating this delightful treat is a rewarding experience that brings the flavors of the tropics to your table. From spreading on toast to enhancing your culinary creations, Monkey Butter adds a burst of flavor to every bite. Try this recipe and explore its versatile uses, all while savoring the essence of paradise in each mouthful.
SO simple and satisfying 🎄 !! These peanut butter cup Christmas trees would make a great dessert or treat, and can even be wrapped up to give as a party favour! Definitely a keeper !!
YOU’LL NEED :
– Creamy peanut butter: 1 cup – Unsalted butter, melted: ¼ cup – Brown sugar: 2 Tablespoons – Vanilla extract: 2 teaspoon – Salt: ¼ teaspoon – Powdered sugar: 2 cups – Chocolate chips: 10 to 12 oz. (I always use half of semi-sweet and half of milk chocolate, but you can also use chocolate chopped in small pieces if desired)
PREPARATION :
1. In the beginning, line 8 x 8 inch dish with parchment paper, and leave the paper overhang the sides to easily lift it later; set aside.
2. Pick a mixing bowl and stir in peanut butter, melted butter, brown sugar vanilla and salt together, until sugar dissolve then mix in powdered sugar gradually.
3. Afterwrads, you’ll want to press the mixture into prepared dish, smoothing the top with spatula or simply press it with your palms so to flatten into about ½ inch thick layer.
4. Make sure to place it in the freezer until firm enough for cutting.
5. Now that the mixture is firm enough, you can line a tray with parchment paper; set aside.
6. Then, using Christmas tree cookie cutter, ct out the trees and place them on the tray. Immediately place them in the freezer for 45-60 mins, or until completely firm.
7. At this point, you should melt the chocolate and line another tray with parchment paper.
8. Once done, dip each tree into melted chocolate with a fork to cover completely. And please tap the fork gently to drip of the excess of chocolate. (The trick is to take just a few trees at the time from the freezer, beacause the peanut butter mixture softens really fast at the room temperature, which make it easier to work with the firm trees!!!)
9. The chocolate covered Christmas trees should be placed on the parchment paper lined tray and refrigerate until chocolate has set.
10. All that need to be done now is to store in the fridge or freeze for longer storage.
Recipe Notes :
The number of Christmas trees you’ll made depends on the size of your cookie cutter. I made 18 since mine was about 1 ¾ x 2 ¼ inches. One more thing, instead of wasting batter, you may pick up leftovers, kneed, press with your palme; end result is you will be able to cut out at least 2-3 more trees.
In the midst of the Great Depression, when resources were scarce and creativity was essential, a humble yet delicious dessert emerged – Depression Era Water Pie. This simple yet scrumptious pie has stood the test of time, offering a taste of history with every bite. Join us on a journey to discover the secrets of this delightful treat, complete with a detailed recipe and intriguing insights.
Depression Era Water Pie takes us back to a time when people had to make the most of what they had. It’s a pie that embodies resourcefulness and the ability to find joy in simplicity. Let’s delve into the details of this intriguing dessert.
Ingredients:
For the Crust:
INGREDIENT
AMOUNT
All-purpose flour
1 ½ cups
Vegetable shortening
½ cup
Salt
1 tsp
Ice-cold water
3-4 tbsp
For the Filling:
INGREDIENT
AMOUNT
Granulated sugar
1 cup
All-purpose flour
2 tbsp
Salt
1 pinch
Water
2 cups
Vanilla extract
1 tsp
Butter
1 tbsp
Ground nutmeg
A pinch
Instructions:
Prepare the Crust
In a mixing bowl, combine the flour and salt.
Cut in the vegetable shortening with a pastry cutter or fork until the mixture resembles coarse crumbs.
Gradually add the ice-cold water, 1 tablespoon at a time, mixing until the dough comes together.
Form the dough into a ball, wrap it in plastic wrap, and refrigerate for at least 30 minutes.
Roll Out the Crust
Preheat your oven to 425°F (220°C).
On a floured surface, roll out the chilled dough into a circle to fit your pie dish.
Gently place the dough in the pie dish, trimming any excess and crimping the edges decoratively.
Prepare the Filling
In a saucepan, combine sugar, flour, and a pinch of salt.
Gradually stir in the water.
Cook the mixture over medium heat, stirring constantly until it thickens and comes to a boil.
Remove from heat and stir in the vanilla extract and butter.
Assemble and Bake
Pour the hot filling into the prepared pie crust.
Sprinkle a pinch of ground nutmeg over the top.
Bake
Place the pie in the preheated oven.
Bake for 10 minutes at 425°F (220°C), then reduce the temperature to 350°F (175°C).
Continue baking for an additional 30-35 minutes or until the pie is set and the crust is golden brown.