Category Archives: Recipes

Drunken Pork Tenderloin

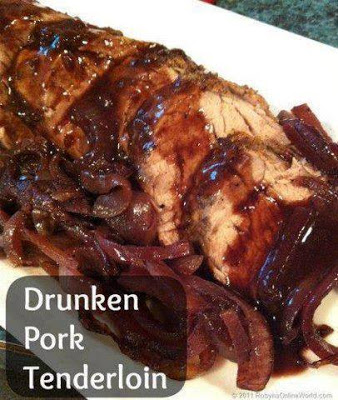
Everyone LOVES this dish and it is easy! – serve with mashed potatoes and a favorite green vegetable.

Ingredients:

2 lb (or so – I use one package which has two pieces in it) pork tenderloin
1 tablespoon garlic powder
salt and freshly ground black pepper
1 large white onion, thinly sliced
1 bottle red wine of choice (Moscato, merlot, burgundy, zinfandel, or whatever wine you have on hand)
1 package brown gravy mix

Directions:

Preheat oven to 350°. Remove the pork from the package and trim off any silver skin – this is a shiny fat type piece that may (or may not) be on part of the tenderloin. Honestly though if you don’t take it off now it is not a big deal, you can cut it off as you are eating it if you need to. Sprinkle the garlic powder, salt and pepper (to lightly cover) over all sides of each piece of pork. Heat a large skillet over medium-high heat and add the pork tenderloins. Let them sit without moving them for about 3 minutes. Before that it will seem like they are “stuck” to the pan, but after 3 minutes or so they should release. Rotate the pork so that you get each of the outside surfaces browned nicely. Remove meat from pan and place in a rectangular baking dish.

Now add the onions to the same pan and sauté them for about 5 minutes. Then carefully add about 1/4 bottle of the wine to deglaze the pan. It will steam up a lot and you need to take a wooden spoon and scrape the bottom of the pan right away to loosen up all of those nice browned bits – they are full of flavor! Once you have the bits scraped up, add the rest of the bottle of wine and bring to a boil. Let simmer for 3 minutes and then poor the onion and wine mixture over the pork tenderloins in the baking dish. Now place in the oven and bake for approximately 35-40 minutes. Use your meat thermometer to make sure the meat is at 145° in the thickest part. Remove from the oven and place meat on cutting board to rest. Now pour the liquid from the baking dish into your skillet on high heat and whisk in one package of brown gravy mix. Cook on medium for about 3 minutes to thicken and reduce. Slice your pork tenderloin, after it has rested for about 10 minutes, into about 1/4” thick slices and serve with the onions and top with the red wine gravy.

This recipe is wonderful with mashed potatoes (the way I normally serve it), but you could also serve it over rice, quinoa, noodles, orzo, or whatever you like. Make sure to have some fresh bread to sop up any extra sauce on your plate too. This is a very hearty and satisfying dish. Simple enough for everyday, but nice enough for company also.

Enjoy

Made this for Sunday football and it was a major hit! No leftovers!

Egg rolls, an iconic component of Chinese-American takeout, encapsulate a fascinating history deeply rooted in East Asia. While their precise origins remain a subject of debate, there’s no disputing that these savory delights embody a delectable fusion of cultural culinary influences. Encased in a crispy, golden shell, each egg roll encapsulates a flavorful amalgamation of cabbage, pork, and aromatic seasonings, serving as a symbol of a robust and plentiful filling. Beyond being a delightful snack, egg rolls narrate a culinary odyssey that spans continents and traditions, making them an enticing endeavor for cooking enthusiasts who relish crafting and sharing homemade delicacies.

Crafting the Perfect Chinese Egg Rolls: A Step-by-Step Guide

QUANTITYINGREDIENT
12Egg roll wrappers
1 poundGround pork
2 cupsShredded cabbage
1 cupShredded carrots
4Thinly sliced scallions
2 clovesMinced garlic
1 tablespoonFinely grated ginger
2 tablespoonsSoy sauce
1 tablespoonOyster sauce
1 teaspoonSesame oil
1/4 teaspoonWhite pepper
1 tablespoonCornstarch
2 tablespoonsWater
As neededVegetable oil for frying

Directions:

  1. Prepare the Filling: Heat a skillet or wok over medium-high heat. Cook the pork until it’s no longer pink, breaking it apart as it cooks. Add cabbage, carrots, scallions, garlic, and ginger, stir-frying for 3-4 minutes until the vegetables soften.
  2. Season and Cool: Stir in soy sauce, oyster sauce, sesame oil, and white pepper. Cook for an additional 2 minutes, then remove from heat to cool.
  3. Create the Slurry: Mix cornstarch and water to form a slurry for sealing the wrappers.
  4. Assemble and Seal: Place the filling on each wrapper, fold, tuck in the sides, roll tightly, and seal with the slurry.
  5. Fry to Perfection: Heat oil to 350°F (175°C). Fry the egg rolls in batches until they achieve a golden brown color, approximately 2-3 minutes per side. Drain excess oil on paper towels.

Stuffed Chicken Breast with Asparagus

Mediterranean-Style Stuffed Chicken Breast with Asparagus, Sun-dried Tomatoes, and Fresh Mozzarella

Ingredients:

4 Boneless skinless chicken breasts
Olive Oil
1 tsp. Italian seasoning mix
1 tsp. Garlic Powder
1 tsp. Smoked Paprika
½ tsp. Salt
¼ tsp. Cracked Pepper
1 Tbsp. Lemon zest
3 tsp. garlic – minced and divided (2 tsp. and 1 tsp.)
⅛ tsp. red pepper/chili flakes – optional
12 Asparagus stalks – ends trimmed
1 oz. Sun-dried Tomatoes – chopped
4 slices Fresh Mozzarella Cheese
2-3 Tbsp. fresh lemon juice
2 Tbsp. butter

Directions:

Preheat your oven to 400° F.
In a small bowl, combine the Italian seasoning, garlic powder, paprika, salt, and pepper.
Place the chicken on a clean chopping board, cut a pocket on the underside about ¾ of the way through – Be careful not to cut all the way through – (See Notes). Pat each chicken breast with a paper towel to dry.
Lightly coat each chicken breast with olive oil all over then sprinkle the herbs and spice mixture on all sides of, including in the pocket, each piece of chicken.
Sprinkle the lemon zest and 2 tsp. minced garlic in the pockets of each piece of chicken.

Toss the asparagus with 2 tsp. olive oil, 1 tsp. minced garlic, and red pepper flakes if using.
Place 3 sprigs of asparagus, a couple of pieces of sun-dried tomatoes, and 1 slice of fresh mozzarella in the pocket of each chicken breast.
Close each pocket with 2-3 toothpicks.
Heat 1-2 Tbsp. olive oil in a large cast iron skillet (or oven-proof skillet) over medium-high heat.
When the pan is hot, add the chicken and sear it until nicely golden brown, about 5 minutes per side but it may take longer.
Remove from heat. Pour the lemon juice and 1 tsp. minced garlic in the skillet and cover the skillet with the lid or foil.
Place the skillet in the preheated oven (if not cast iron, skillet must be oven-proof).
Bake the chicken for 10-15 minutes covered then remove the lid or foil and bake for about 5 minutes more – use a meat thermometer to ensure the internal temperature of each breast has reached 165° F.

Remove skillet from oven, cover and let rest for 5-10 minutes.
Be sure to remove toothpicks before serving.
Spoon a little of the pan juices over the chicken when serving.
Prep Time: 20 minutes | Cooking Time: 25 minutes | Total Time: 45 minutes | Kcal: 330 kcal | Servings: 4 servings.

BAKED LEGS WITH CREAM OF MUSHROOM

Ingredients

  • 1/4 cup flour you can use gluten-free flour
  • 1/2 teaspoon salt
  • 1/4 teaspoon ground black pepper
  • 2 lb chicken legs about 3-4 large chicken legs
  • 2 tablespoons olive oil
  • 10 oz mushrooms each sliced in half
  • 3 garlic cloves minced
  • 1 tablespoon olive oil if needed1 cup chicken stock
  • 1/4 teaspoon salt
  • 1/2 cup heavy cream

How To Make BAKED LEGS WITH CREAM OF MUSHROOM

In a small bowl, combine the flour, 1/2 teaspoon salt, 1/4 teaspoon ground black pepper.   On a large plate, dredge chicken legs in this seasoned flour mixture

Heat 2 tablespoons of olive oil in a large skillet on medium-high heat.

Add chicken legs skin side down and brown for about 4 minutes until the skin turns a nice golden color.

Flip chicken legs over to the other side and brown the other side for about 3 minutes.

Remove browned chicken legs and set them aside. Also, remove those parts of olive oil that got too dark from browning the chicken with flour mixture.

To the same, now empty skillet, add mushrooms (sliced in half) and minced garlic, add an extra tablespoon of olive oil (if needed) and saute them together on medium heat for 2 minutes.

Add chicken stock to the skillet, scraping up the browned bits at the bottom of the pan.  Add 1/4 teaspoon of salt and stir.

Place chicken legs back in the pan.

Bring the chicken stock to boil, cover, and reduce heat to simmer on low-medium.

Simmer chicken legs for 25-30 minutes, until the chicken is completely cooked through and the juices run clear when chicken is cut in the middle.

Remove the cooked chicken legs to a plate and keep warm.

Turn the heat under the skillet to medium-high, and simmer the mushroom sauce for about 4 minutes until it is reduced by about a third.

Stir in the 1/2 cup heavy cream into the mushroom sauce and simmer for another 2 minutes on low-medium heat, constantly stirring and scraping from the bottom of the skillet, until the sauce gets thicker.

Add chicken legs back to the skillet to warm them up.

Enjoy

The Best Potatoes DelMonico Recipe

Potatoes Delmonico is a classic potato dish that’s rich, creamy, and full of flavor. It’s a perfect side dish for special occasions or a hearty family meal. Here’s how you can make this delicious recipe:

Ingredients:

  • 4 large russet potatoes, peeled and sliced into thin rounds
  • 1 cup heavy cream
  • 1/2 cup whole milk
  • 1/2 cup grated Parmesan cheese
  • 1/2 cup grated Gruyere cheese
  • 2 cloves garlic, minced
  • 2 tablespoons unsalted butter
  • 1 teaspoon dried thyme
  • Salt and black pepper to taste
  • Chopped fresh parsley (for garnish)

Instructions:

  1. Preheat the Oven:
    • Preheat your oven to 375°F (190°C).
  2. Prepare the Potatoes:
    • Place the potato slices in a large bowl of cold water to prevent browning. Drain and pat them dry with a paper towel.
  3. Make the Cream Mixture:
    • In a saucepan, combine the heavy cream, whole milk, minced garlic, dried thyme, butter, salt, and black pepper. Heat the mixture over medium heat until it’s warmed through and the butter is melted. Do not let it boil.
  4. Layer the Potatoes:
    • Grease a baking dish with butter or cooking spray. Place a layer of potato slices on the bottom of the dish, slightly overlapping them.
  5. Add Cheese and Cream:
    • Sprinkle a portion of the grated Parmesan and Gruyere cheeses over the layer of potatoes. Drizzle some of the cream mixture over the cheese.
  6. Repeat the Layers:
    • Repeat the process of layering potatoes, cheese, and cream until you’ve used up all the ingredients. Make sure to finish with a layer of cheese and cream on top.
  7. Bake:
    • Cover the baking dish with aluminum foil and bake in the preheated oven for about 45-50 minutes. Then, remove the foil and continue baking for an additional 15-20 minutes, or until the top is golden brown and the potatoes are tender when pierced with a fork.
  8. Serve:
    • Remove the Potatoes Delmonico from the oven and let it cool slightly before serving. Garnish with chopped fresh parsley for a burst of color and added freshness.

Enjoy the creamy, cheesy goodness of Potatoes Delmonico as a comforting and indulgent side dish that’s sure to please your taste buds.

Enjoy

5-Ingredient Sriracha Chicken

If you’re a fan of the spicy kick of Sriracha chicken but find the sweetness of traditional recipes a bit overwhelming, this revamped version is for you. In my culinary exploration, I’ve experimented with honey, maple syrup, and plain sugar, but the secret to achieving the perfect balance lies in the addition of orange marmalade. The result? A delightful blend of sweet and spicy that won’t leave you with an overly sugary aftertaste.

The Perfect Harmony of Ingredients

Discover the simplicity and convenience of this 5-ingredient Sriracha chicken recipe. No need for browning or pre-cooking – everything effortlessly goes into the slow cooker. In just four hours, you’ll have a mouthwatering dish that perfectly showcases the bold flavors of Sriracha.

Ingredients for 5-Ingredient Sriracha Chicken

You’ll need:

  • 2 pounds boneless, skinless chicken thighs
  • 1 cup all-purpose flour
  • 1 cup orange marmalade
  • 1/4 cup Sriracha sauce
  • Juice of 2 limes

Easy-to-Follow Instructions

1. Prep the Chicken

Start by coating the chicken thighs in all-purpose flour, ensuring to shake off any excess. This step sets the foundation for a crispy and flavorful coating.

2. Create the Flavor Fusion

In a separate bowl, create a tantalizing mixture by combining the orange marmalade, Sriracha sauce, and the fresh squeeze of lime juice. This combination brings out the best in each ingredient, providing a symphony of flavors.

3. Assemble and Slow Cook

Place the floured chicken at the bottom of a 6-quart slow cooker, forming the base for the deliciousness to come. Pour the crafted marmalade and Sriracha mixture over the chicken, ensuring every piece is coated in the delectable sauce.

4. Let It Simmer

Cover the slow cooker with its lid and set it to low heat for 4 hours. During this time, stir once or twice to guarantee an even coating of the sauce. The end result? Tender, perfectly cooked chicken with a vibrant orange hue.

5. Plate and Savor

Once the cooking process is complete, plate and serve this delightful dish. The harmonious blend of flavors in this 5-ingredient Sriracha chicken will undoubtedly make it a staple in your quick and flavorful recipe repertoire.

Embrace the simplicity, enjoy the boldness of Sriracha, and indulge in a delightful culinary experience with this revamped recipe. It’s a quick and easy way to elevate your chicken game while savoring the perfect balance of sweet and spicy.

Enjoy

German Pancakes

Are you looking for a mouthwatering breakfast option that’s easy to make and oh-so-delicious? Look no further than the German Pancake, also known as a Dutch Baby Pancake. In this comprehensive guide, we’ll walk you through the steps to create this fluffy, oven-baked pancake perfection. From preheating the oven to enjoying the final result, we’ve got you covered. Let’s dive into the world of German Pancakes!

Ingredients:

Before you start whipping up your German Pancake, it’s crucial to have everything in place. Here’s a handy table outlining the key ingredients and initial steps:

INGREDIENTSINSTRUCTIONS
6 eggsPreheat the oven to 425 degrees Fahrenheit.
1 cup milkMelt 5 tablespoons of butter in a large cast iron skillet or cake pan in the oven.
1 cup flourWhile the butter is melting, gather your ingredients and equipment.
Dash of salt
1 teaspoon vanilla extract

Once your oven is preheated and your butter is melted, you’re ready to embark on a culinary adventure!

Instructions:

Now, let’s create the batter that will make your German Pancake unforgettable. The next table will guide you through the mixing process:

INGREDIENTSINSTRUCTIONS
BatterIn a blender, combine 6 eggs, 1 cup of milk, 1 cup of flour, a dash of salt, and 1 teaspoon of vanilla extract.

Blend these ingredients until you achieve a smooth, lump-free batter. This is the heart of your German Pancake, so take your time to ensure it’s perfectly mixed.

Baking to Perfection

With your batter ready, it’s time to bake your German Pancake to golden-brown perfection. Follow these steps:

INSTRUCTIONS
Pour the batter into the hot, melted butter in your skillet or cake pan in the oven.
Bake for 22-25 minutes or until the pancake has puffed up and turned a beautiful golden brown.

During this time, you’ll be treated to the tantalizing aroma of your German Pancake as it bakes to perfection.

Serving and Enjoying

The final touches are crucial to a delightful German Pancake experience. Here’s how to finish and serve your creation:

INSTRUCTIONS
Sprinkle the pancake with powdered sugar.
Serve with your favorite syrup or topping of choice.
Cut into 6 servings and enjoy!

Your German Pancake is now ready to be savored. Whether you prefer traditional maple syrup, fruity toppings, or a dollop of whipped cream, the choice is yours.

FAQs: Your German Pancake Queries Answered

What is a German Pancake? A German Pancake, also known as a Dutch Baby Pancake, is a large, oven-baked pancake that puffs up as it cooks. It’s typically served for breakfast or brunch and can be customized with various toppings.

Is a cast iron skillet necessary for making German Pancakes? While a cast iron skillet is commonly used for making German Pancakes, you can also use a cake pan. The key is to ensure the pan can withstand high oven temperatures.

Can I prepare the batter in advance? Yes, you can prepare the batter ahead of time and store it in the refrigerator. Just give it a good stir before using it in your recipe.

How can I make my German Pancake even fluffier? To achieve an even fluffier German Pancake, ensure that your oven is properly preheated, and your batter is well-mixed. Additionally, avoid opening the oven door while it’s baking.

Are there variations of German Pancakes? Absolutely! You can experiment with different flavors by adding ingredients like cinnamon, lemon zest, or fresh fruit to the batter.

Can I reheat leftover German Pancake? Yes, you can reheat leftover German Pancake in the oven or microwave. However, it’s best enjoyed fresh from the oven.

Creating a delicious German Pancake is a rewarding experience that can brighten up your breakfast table. With its puffy texture and endless topping possibilities, it’s a crowd-pleaser for all ages. Whether you’re a seasoned cook or a novice in the kitchen, this recipe is sure to impress.

Orange peels and salt: At home they are worth their weight in gold if you use them like this

In the current economic landscape, the buzzword in Italian households is “save.” Rising expenses and bills make it imperative to capitalize on every opportunity to save money and repurpose everyday items. By embracing DIY solutions, often reminiscent of ‘Grandma’s remedies,’ individuals can sidestep expensive chemicals and opt for natural alternatives, achieving household cleanliness without breaking the bank.

Recycling Orange Peels: A Household Game-Changer

The philosophy of recycling extends to every corner of our homes, and orange peels are no exception. When employed strategically, these peels transform into versatile assets, serving various purposes beyond the compost bin. From imparting a delightful aroma to your wardrobe to acting as a natural moth repellent, orange peels have myriad applications.

Crafting Your Homemade Dishwashing Detergent

One outstanding way to harness the potential of orange peels is by creating an effective dishwashing detergent. By following a simple recipe, incorporating common kitchen ingredients, you can produce a magical cleaning solution that rivals store-bought alternatives.

Ingredients You’ll Need:

  • 1 liter of water
  • Orange peels to your preference
  • 2 tablespoons of salt
  • 1 tablespoon of baking soda
  • 500 ml of detergent
  • 150 ml of alcoholic vinegar

Step-by-Step Guide:

  1. Begin by combining a liter of water and your desired amount of orange peels in a pot.
  2. Add two tablespoons of salt and one tablespoon of baking soda to the mix, stirring thoroughly.
  3. Place the pot on the stove, allowing the concoction to heat until the water adopts an orange hue.
  4. Once heated, strain the mixture into a new bowl, introducing the detergent and alcoholic vinegar as per the specified quantities.
  5. Thoroughly mix the ingredients, resulting in a potent 1.5 liters of homemade dishwashing liquid suitable for pots and dishes.
  6. Transfer the final product into bottles for convenient use in deodorizing, cleaning, and disinfecting even the grimiest of dishes.

Revel in the Benefits of Your DIY Dishwashing Detergent

After completing this straightforward yet effective DIY project, your home will emanate a fresh, orange-scented ambiance. Not only does the homemade detergent tackle the most stubborn grease stains and crusts, but it also adds a touch of nature-inspired freshness to your cleaning routine.

Banana Pudding

INGREDIENTS
14 oz pack of sweetened condensed milk
1 1/2 cups ice water
1 package 3.4 oz instant vanilla pudding mixture
3 cups heavy cream
1 packet of 12-ounce Nabisco Nila wafer
4 cups chopped ripe bananas (about 3 medium bananas)

Instructions:

  1. Blend the condensed milk and cold water until well combined. Add the pudding mixture, continuing to blend until the pudding dissolves (approximately two minutes).
  2. Allow the mixture to set in the refrigerator for about 3 hours or overnight.
  3. Whip the heavy cream until peaks form using an electric or hand mixer.
  4. Gently mix the pudding and whipped cream until pale yellow and streak-free.
  5. In a large glass bowl, layer Nila wafers, bananas, and cream, repeating the process twice.
  6. Refrigerate for a few hours or overnight until the wafers soften.

Pro Tips for Enjoyment

  • If stored beyond overnight, the bananas may change color. Chop fresh bananas to adorn each serving for a visual and flavorful delight.

Savor the perfection of Magnolia Bakery’s Banana Pudding, a timeless dessert that brings the heart of New York to your doorstep or kitchen. Indulge in the magic that has captivated taste buds for generations.

Enjoy

Garlic Steak Foil Packets

Ingredients

  • 2 pounds sirloin steak, cut into 1 inch pieces
  • 2 tbsp olive oil
  • 2 cups of cauliflower florets
  • 12 spears asparagus, cut into 1 inch pieces
  • 2 cups broccoli florets
  • 1 yellow onion, sliced
  • 1 tsp thyme
  • 1 tsp rosemary
  • 1 tsp Basil
  • Salt and pepper to taste
  • 4 cloves of garlic, minced well
  • Aluminum Foil for wrapping

Instructions

FIRST STEP:

Preheat the oven to 400*

Prepare all the food items, cutting into bite size pieces

SECOND STEP:

Place the sirloin steak into a bowl and add the thyme, rosemary and basil, stir to combine well

Add the salt and pepper to the mix and combine well.

THIRD STEP:

Heat 1 tbsp of oil in a skillet. When hot, add in the meat to sear.

Remove the meat from the heat.

FOURTH STEP:

In a bowl combine the cauliflower, asparagus, onion and broccoli.

Pour a tablespoon of olive oil over the vegetables.

FIFTH STEP:

Add salt and pepper to taste and stir to combine well.

Place a large piece of aluminum foil on the counter

SIXTH STEP:

Scoop a large spoonful of vegetables into the center

Top the vegetables with some of the seared meat, add salt and pepper to taste

SEVENTH STEP:

Fold the horizontal sides to touch edges,then roll one or two times,

Fold in the sides to form a closed packet.

EIGHTH STEP:

Repeat these steps until you have six packets

Place in oven and bake for 15 to 20 minutes

Remove from the oven, open and serve.

Nutrition Information:

 YIELD: 12 SERVING SIZE: 1
Amount Per Serving: CALORIES: 180TOTAL FAT: 24gSATURATED FAT: 14gTRANS FAT: 10gCHOLESTEROL: 180mgSODIUM: 44mgCARBOHYDRATES: 320gSUGAR: 20g

Enjoy