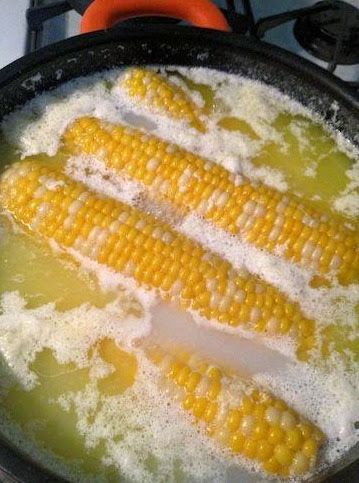
I love corn on the cob! Whether it’s grilled, smoked, or otherwise, and this Milk Butter Boiled Corn on the Cob is the best hands down! It’s just as easy as boiling or steaming corn on the cob, but this version is so superbly sweet and soft that you will make it your new ‘go-to’ method of cooking your corn!
Nothing can compare to fresh corn on the cob, cooked quickly, coated with sweet butter, and sprinkled with salt.Eating two corn on the cob per person seems to be the right meal, but when the corn is just harvested, the appetite will increase.
What you will need :
° Sparkling corn in the cob, peeled and clean ° water ° 1 m. milk 1/2 stick butter ° 1 T. Sugar
How to make it :
Place the corn in a large bowl and load enough water to submerge the corn. Add milk, butter and sugar and stir to mix water and milk. Bring to a boil on the med. Overheat, once boiling, reduce heat to medium and put a lid on the saucepan. Cook for 25 minutes to get crisp and bland, or longer as desired.
Place chicken pieces in a large bowl or ziptop bag. Cover with buttermilk, stir in salt, pepper and garlic powder and marinate 2 hours to overnight (this is optional but definitely recommended).
Remove from buttermilk and pat dry with a paper towel. Sprinkle lightly with salt, pepper and garlic powder. Set aside.
Place a rack over a rimmed baking sheet and set aside. Whisk together the eggs, water and hot sauce. In another bowl, whisk together the flour, salt, pepper, paprika and cayenne pepper.
Dredge the chicken in the flour mixture then coat it in the egg mixture. Return to the flour mixture and coat. Place chicken on the rack. Once all pieces are coated, place in the refrigerator for 30 minutes. This step helps the coating stick to the chicken.
Meanwhile, heat the peanut oil to 350 degrees F. Working in batches, fry chicken for about 15 to 18 minutes, or until no longer pink and cooked through. Keep in mind that dark meat will take a little longer to cook than white meat. Watch the wings as they may cook in less than 15 minutes. Place chicken on a clean rack to help keep it crispy as you cook another batch.
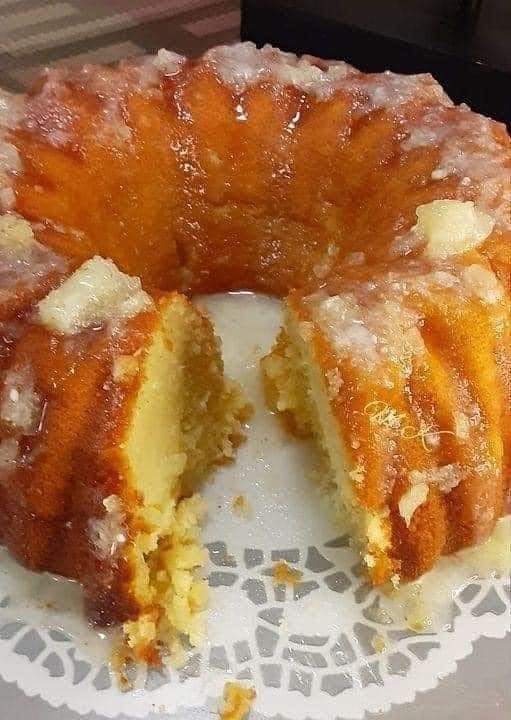
Welcome to the delightful world of baking, where we explore the magic of creating a Pineapple Cream Cheese Pound Cake. This heavenly dessert is a symphony of flavors, blending the richness of cream cheese with the tropical sweetness of pineapple. Let’s embark on a culinary journey and master the art of baking this mouthwatering delight.
Ingredients:
INGREDIENT
QUANTITY
Unsalted Butter
1 1/2 cups, at room temperature
Cream Cheese
1 (8 oz) package, at room temperature
Granulated Sugar
3 cups
Large Eggs
6
All-Purpose Flour
3 cups
Baking Powder
1/2 tsp
Salt
1/2 tsp
Vanilla Extract
1 tsp
Crushed Pineapple (drained)
1 (20 oz) can
Instructions:
Preheat Your Oven:
Set the oven to 325°F (165°C).
Grease a 10-inch bundt pan with non-stick cooking spray.
Prepare the Batter:
In a large mixing bowl, beat together the unsalted butter, cream cheese, and granulated sugar until the mixture is light and fluffy.
Add Eggs Gradually:
Add the large eggs one at a time, beating well after each addition.
Prepare Dry Ingredients:
In a separate bowl, whisk together the all-purpose flour, baking powder, and salt.
Combine Wet and Dry Ingredients:
Gradually add the dry ingredients to the butter mixture, mixing until just combined.
Add Vanilla and Pineapple:
Stir in the vanilla extract and the drained crushed pineapple, ensuring an even distribution of ingredients.
Pour into Bundt Pan:
Pour the batter into the prepared bundt pan, smoothing the top with a spatula.
Bake:
Bake for 1 hour and 30 minutes or until a toothpick inserted into the center comes out clean.
Cool the Cake:
Let the cake cool in the pan for 10-15 minutes.
Invert and Serve:
Invert the cake onto a wire rack to cool completely.
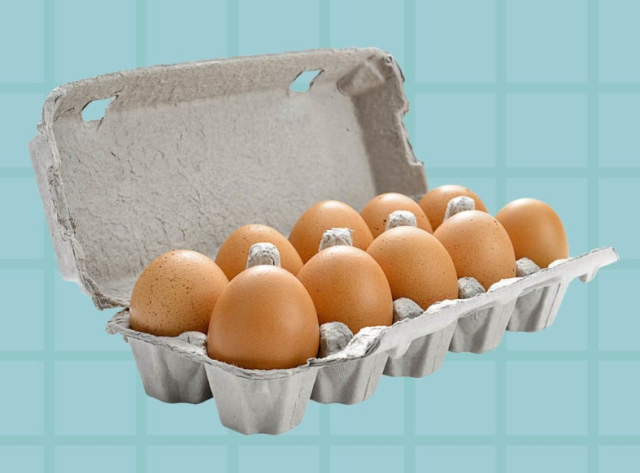
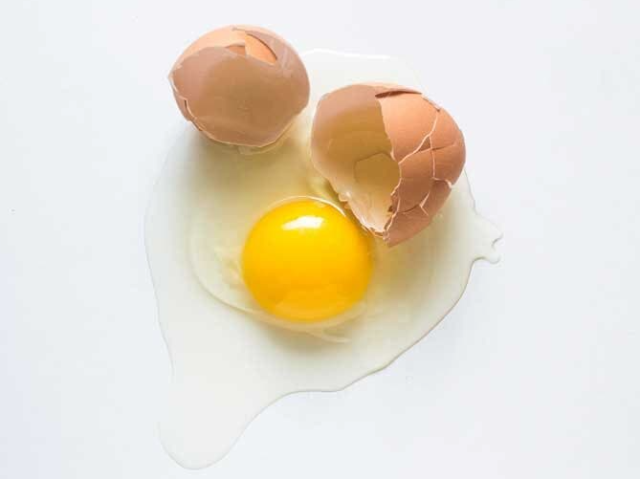
How many times have you cracked an egg into a bowl of other ingredients, only to question whether the egg has gone bad or not? Unfortunately, eggs are not the easiest ingredient to determine the freshness of as the protective opaque shell hides the condition of the white and yolk.
But there are a few easy ways to tell if an egg is fresh and there are plenty of things you can do to prevent your eggs from going bad in the first place.
In this article, let’s go over some tips that will help you know if an egg is still good to eat or if it’s expired.
In France, there are nearly 10 million tonnes of food that end up in the trash every year.
People often prefer to throw away food when the expiration date has passed.
Although in France, the number of eggs that end up being wasted remains unknown, the British media The Guardian, which cites the work of the anti-waste community Too good to go, reports that in the United Kingdom, there are 720 millions of eggs that end up in the trash every year.
The main reason for this waste is the fact that 77% of Brits struggle to know if an egg is fresh after it has passed its use-by date.
Do you want to prepare a brunch but you don’t know how long your eggs have been in the fridge? Do not panic. There are ways to know if they are consumable or not:
1. Check expiration dates
The eggs you buy at the supermarket all have a recommended use-by date which is indicated on their packaging.
In addition, French regulations require the distributor to no longer sell eggs 7 days before the minimum durability date (Ddm) written on the packaging, as explained on the Femme Actuelle website.
But if you stock up on eggs from the henhouse, the recommended use-by date is not indicated. Therefore, you should know that the use-by date (Dlc) is a maximum of 28 days after the day of laying.
However, eggs can be stored in the refrigerator for one month past the recommended use-by date, which is 58 days after the day they were laid, if the shells are not cracked or broken. Storing food in optimal conditions helps maintain its freshness, avoid mold and actively fight against food waste.
Compliance with the cold chain and deadlines is necessary to avoid pathogenic organisms that pose a health risk. Thus, putting eggs in the refrigerator helps preserve their taste and nutritional qualities and prevents the growth of bacteria.
However, you should definitely not wash eggs that are not going to be eaten immediately, as this risks causing them to lose the protective film that the hen leaves on them. But if the dates are not on the packaging, it is necessary to find other ways to find out if they are expired.
2. Smell the egg
Like fresh products such as cheeses, desserts, crème fraîche, or even yogurts, eggs can have a suspicious smell once the deadline has passed.
So, if you notice that the egg is past the expiration date and you want to keep the product for later consumption, start by smelling it. Expired food often has an unpleasant odor and should not be eaten. They may have lost their vitamins and have an altered taste.
In addition, perishable food products have a limited shelf life and can be dangerous for your health if the expiration dates are not respected. Expired eggs, whether cooked or raw, may give off a distinctive odor.
If you can’t decipher the label and the smell isn’t enough to tell you something, you can crack the egg into a bowl or salad bowl and smell it, says registered dietitian Taylor Jones. And if the smell puts you off, throw the egg away and wash the container with hot water.
If the smell seems normal to you, you should consume the egg quickly by preparing an omelette for example.
3. Check the appearance of the shell
Your eyes can also help you identify whether an egg is expired or edible.
Before consuming a product, it is best to visually inspect it to avoid any risk. According to the specialist, it is necessary to check whether the shell is not powdery, viscous or cracked.
Any questionable appearance may reveal the presence of mold. Additionally, if the shell is dry and appears to be in good condition, crack the egg into a bowl and identify any suspicious discoloration.
Typically it is a blue, pink, black or green color in the egg white or yolk. In fact, it can reveal the growth of bacteria that can cause food poisoning.
As confirmed by Dr. Julia Roux, gastroenterologist, salmonella are bacteria that can be found in eggs and preparations made from raw or undercooked eggs, as well as in dairy products.
These germs can cause salmonellosis, an intoxication which causes symptoms such as fever, diarrhea, vomiting and even abdominal pain.
Additionally, if the egg yolk or white is leaking, this may indicate that the egg is aged but may not have reached its usage limit.
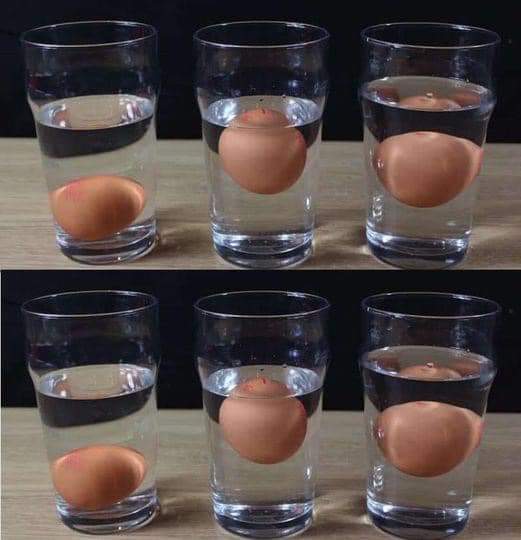
4. Dip the egg in water
According to LCI, another technique can be effective in determining whether the egg is still edible.
To do this, you must immerse the egg in a saucepan or salad bowl filled with water. If it sinks to the bottom of the container, it is still good for consumption.
But if it remains erect, that means it needs to be eaten quickly. If it rises to the surface, it is expired.
In fact, the older the egg gets, the more moisture evaporates through microscopic pores and the air pocket gets bigger. Therefore, the older the egg is, the more it floats.
However, if you want to consume eggs immediately, do not repeat this experiment.
This dip can cause loss of the cuticle on the shell. However, the latter protects the egg from bacteria such as salmonella.
5. Use the mirage technique
Candling is a technique for assessing egg quality or chick development in a fertilized egg.
Generally, this technique is carried out in the industrial environment using specialized equipment allowing table eggs to be classified before labeling and packaging them.
But you can still do the method at home, if you want. To do this, you need a cool place with little light.
Have a light source like a candle or a small flashlight. Hold the light source towards the end of the egg then tilt the egg and turn it from left to right. The contents of the egg should be visible.
This technique allows you to see if the air bubble is small or large. As the egg ages, the water evaporates and is replaced by gases. Thus, the larger the air pocket becomes, the more the egg is aged.
Can we eat food after its expiration date?
Some foods can be consumed several days after the expiration date stated on the package. However, a person who consumes raw fish, eggs or even expired meat takes health risks.
Although we are all against food waste, it is necessary to carefully check the packaging of the products we buy in supermarkets to ensure that their consumption is safe. In fact, passing the expiration date of a perishable product exposes you to various illnesses.
Here is a list of foods that can be consumed after the expiration date, relayed by our colleagues at Femme Actuelle:
Foods that never expire:
Certain foods like real honey which has many health benefits, salt, sugar or even vinegar never expire and can be kept forever.
Foods that do not expire, except in certain cases:
Cans, rice, pasta, cornstarch, flour, cereals or even dried vegetables can remain intact well after the marked expiration date on the packaging. However, these products can be infested with food moths and undergo spoilage.
Foods that can be consumed after the expiration date
Mustard, ketchup, pickles or even spices can be stored and consumed well after the expiration date. In reality, the expiration dates of these foods may have passed. However, their taste can change over time.
Other foods that can be consumed after the expiration date include dairy products such as crème fraîche, cheese, milk and yogurt. These, if unopened, can be consumed one to two weeks after the date mentioned.
To know if they are good, check the packaging. If it has swollen, potentially dangerous bacteria has developed and it is best to throw the products away. In addition, a pungent, acidic smell may indicate that they have gone bad.
Furthermore, frozen products can be consumed after the date mentioned on the packaging, if the cold chain has been respected. If stored properly, raw fish can be kept for 6 to 9 months past the expiration date. For poultry and fruits and vegetables, the period extends to one year. However, frozen meals keep less well than packaged products.
Foods you should definitely not eat after the expiration date
Bacteria are more likely to reside in particular foods. This is the case for vacuum-packed raw meats, eggs and fish as well as cold meats.
Therefore, to protect your health and avoid a potential food infection, you must scrupulously trust the expiration date mentioned in these foods.
Additionally, if the packaging swells, this may indicate that bacteria such as salmonella, listeria or escherichia coli are proliferating in the food. Additionally, if you open these bacteria-contaminated products, you will observe a gelatinous appearance and notice an off-putting odor.
Furthermore, fresh fruit juices can contain bacteria if you do not respect the expiration date, as can raw milk cheeses. And for good reason, fresh cheeses are vulnerable to bacteria and it is necessary to pay attention to any suspicious color and odor.
Finally, salads sold in bags may contain bacteria. In this sense, it is essential to respect the expiration date displayed on the packaging.
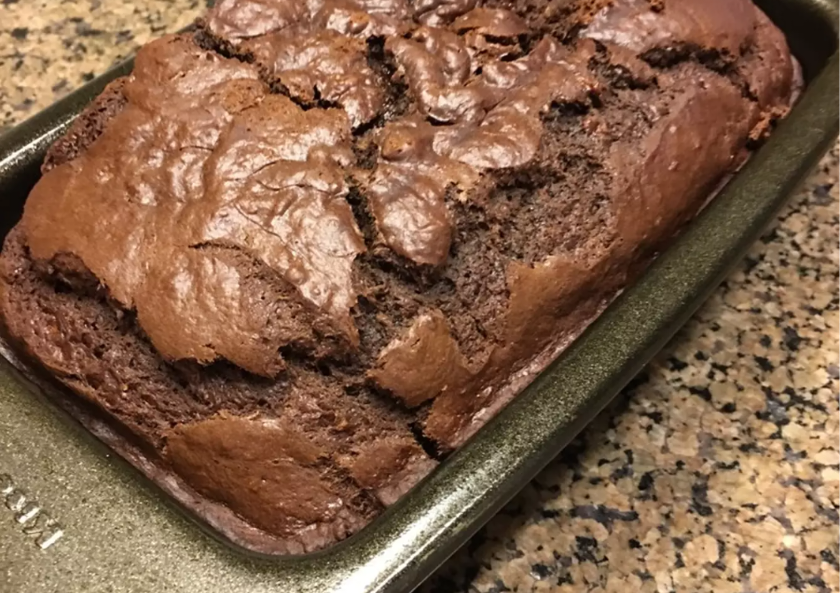
Imagine sinking your teeth into a slice of warm, moist brownie bread, oozing with velvety hot fudge sauce. If that sounds like a dream come true, then you’re in for a treat with our Hot Fudge Brownie Bread recipe. This delectable dessert is a fusion of classic brownies and irresistible hot fudge sauce, resulting in a delightful indulgence that’s perfect for any occasion.
Hot Fudge Brownie Bread: A Fusion of Flavors
There’s something truly magical about combining the rich, chocolatey goodness of brownies with the gooey decadence of hot fudge sauce. In this recipe, we’ll guide you through the process of creating this heavenly treat step by step.
Ingredients
3-4 very ripe bananas
1/3 cup melted butter
1 teaspoon baking soda
1/4 teaspoon salt
1 1/2 cups granulated sugar
1 large egg beaten
1 teaspoon vanilla extract
1/2 cup corn oil
1 1/2 cup all purpose flour
3/4 cup Hershey’s Cocoa
1/2 cup Hershey’s chocolate syrup
Cooking Instructions
Step 1Preheat oven to 350 and butter a 4×8 loaf pan
Step 2Mash banana and add melted butter
Step 3Mix in baking soda, salt, sugar, egg, vanilla extract, flour, oil, and cocoa
Step 4Add chocolate syrup and mix well
Step 5Put into loaf pan and bake for 50-60 minutes
Step 6Serve warm or let cool.
Step 7OPTIONAL: Add nuts if desired
Step 8Serving suggestion: Slice banana over each slice and dust with powdered sugar for a decadent dessert
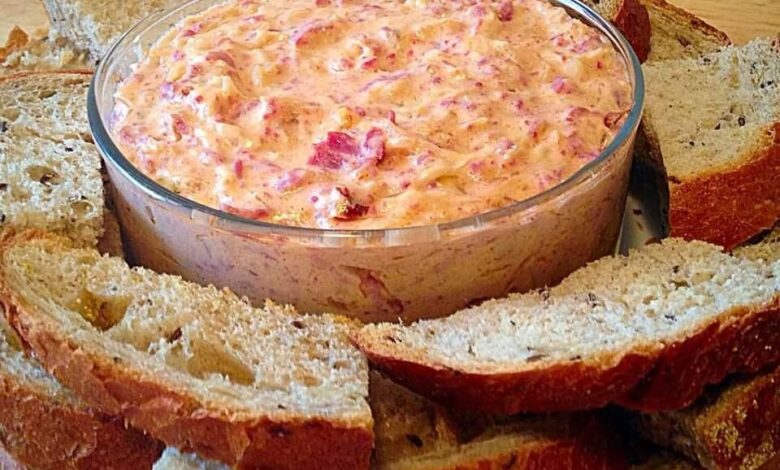
Slow Cooker Reuben Dip is a tantalizing twist on the classic Reuben sandwich, offering all the flavors you love in a convenient, dippable form. Whether you’re hosting a game day get-together or a cozy evening with friends, this dish is sure to impress your guests. In the following sections, we will guide you through the process of creating this culinary masterpiece.
Ingredients:
To start, gather the following ingredients:
INGREDIENT
QUANTITY
Cream cheese, softened
8 ounces
Shredded Swiss cheese
1 cup
Sauerkraut, drained and squeezed dry
1 cup
Thousand Island dressing
1/2 cup
Chopped corned beef
1/2 cup
Worcestershire sauce
1 teaspoon
Rye bread or crackers, for serving
–
These ingredients are the building blocks of your Slow Cooker Reuben Dip and will deliver a medley of flavors that will leave your guests craving for more.
Instructions:
Now, let’s get cooking:
In your slow cooker, combine the softened cream cheese, shredded Swiss cheese, sauerkraut, Thousand Island dressing, chopped corned beef, and Worcestershire sauce. Stir until well combined.
Cover the slow cooker and cook on low heat for 2-3 hours, or until the cheeses are melted and the dip is heated through. Stir occasionally to ensure even heating.
Once the dip is hot and bubbly, reduce the slow cooker to the warm setting to keep the dip warm during serving.
Serving Your Reuben Dip
When it’s time to serve, get creative with your presentation. Slow Cooker Reuben Dip pairs wonderfully with rye bread or crackers for dipping. You can also consider adding some fresh vegetables like celery or bell peppers for a refreshing contrast. Your guests will appreciate the effort you put into making this dish both delicious and visually appealing.
Probably due to the fact hat it is far different from other non-prescription treatments, Vicks VapoRub is incredibly popular over-the-counter medicine, which treats ailments with vapors.
According to Bridie Cavanaugh at eHow, its three main ingredients, menthol, camphor, and eucalyptus oil relieve a cough and congestion through inhalation. Additionally, it also acts as an effective topical analgesic.
Yet , this product offers various other benefits, and can provide surprising effects in the following cases:
1. Earaches
In most cases, the earache is a result of an ear infection or a common cold. Yet, the pain in the ear is debilitating and makes it very hard to fall asleep. However, you can use Vicks VapoRub to soothe the pain, All you need to do is to rub a little on a cotton ball, put it in the ear, and leave it to act overnight.
2. Muscle aches
You should massage the painful area with this product, and wrap it in a dry, warm towel for dome time, to improve the positive effects.
3. Headaches
In the case of a common headache, just apply some Vicks to the temples to soothe the headache fast, In the case of a sinus headache, put a bit of this ointment under the nose and breathe in slowly and deeply.
4. Cracked heels
To make your heels soft again, just apply Vicks in the evening, and massage the problematic areas. Leave it to act overnight, and in the morning, rinse with warm water and exfoliate with a pumice stone.
5. Heal bruises and minor cuts
To accelerate the healing process, just run it around smaller cuts, but avoid its use in the case fo open wounds and damaged skin. For bruises, apply a thin layer of Vicks and salt, which will improve blood circulation and heal them fast.
6. Toenail fungus
Rub the infected areas with VapoRub 2-3 times daily for several weeks or even a few months, and you will fight the fungus.
7. Keep animals at bay
If you want to avoid the scratches of your cat on the doors, couch, and curtains, just dab the furniture with it.
8. Repel bugs
Rub some of it on the insect bites o relieve the itching, and apply a bit of Vicks to your clothing and skin to protect yourself from bugs.
Kentucky Butter Cake is a beloved dessert that has captured the hearts and taste buds of many dessert enthusiasts. With its rich, buttery flavor and moist texture, this cake is a true indulgence. In this article, we will dive into the world of Kentucky Butter Cake, exploring its history, ingredients, baking techniques, and variations. So, get ready to satisfy your sweet tooth and embark on a journey through the delectable realm of Kentucky Butter Cake.
The Origins of Kentucky Butter Cake Every mouthwatering dessert has a story to tell, and Kentucky Butter Cake is no exception. This delightful treat originated in the heart of the Bluegrass State, Kentucky, where it quickly became a local favorite. The cake’s origins can be traced back to the Southern culinary traditions that emphasize rich flavors and comforting textures. Over the years, the recipe has been passed down through generations, gaining popularity and acclaim.
Ingredients that Make the Difference Kentucky Butter Cake owes its distinctive taste and texture to a unique combination of ingredients. Let’s take a closer look at the key components that make this cake an absolute delight:
All-Purpose Flour: The foundation of any cake, all-purpose flour provides structure and stability to the batter.
Granulated Sugar: Sweetness is essential in any dessert, and granulated sugar adds the perfect amount of sweetness to the cake.
Butter: As the star ingredient, butter lends its rich, creamy flavor to the cake, giving it a melt-in-your-mouth texture.
Eggs: Eggs play a crucial role in binding the ingredients together and adding moisture to the cake.
Buttermilk: Buttermilk not only enhances the cake’s flavor but also contributes to its moistness and tenderness.
Vanilla Extract: A touch of vanilla extract elevates the overall flavor profile of the cake, providing a subtle yet delightful aroma.
Baking Powder: This leavening agent helps the cake rise, resulting in a light and fluffy texture.
Salt: A pinch of salt is added to balance the sweetness and enhance the flavors.
Baking Techniques for Perfect Results To achieve the best results when baking Kentucky Butter Cake, it’s essential to follow certain techniques that bring out the cake’s full potential. Here are some tips to ensure your cake turns out perfect every time:
Prepare the Bundt Pan: Grease the Bundt pan generously with butter and dust it with flour, ensuring every nook and cranny is coated. This step ensures that the cake comes out of the pan easily after baking.
Creaming Method: Start by creaming the butter and sugar together until light and fluffy. This step creates air pockets in the batter, resulting in a tender and moist cake.
Slow Incorporation: Gradually add the dry ingredients and buttermilk to the creamed butter mixture, alternating between the two. This slow incorporation prevents overmixing, which could lead to a dense cake.
Patience is Key: After baking the cake, resist the temptation to remove it from the pan immediately. Allow it to cool for about 10-15 minutes before carefully inverting it onto a wire rack. This step ensures that the cake retains its shape and doesn’t break apart.
Variations to Savor While the classic Kentucky Butter Cake is undeniably delicious, there are several variations that add exciting twists to this beloved dessert. Here are a few mouthwatering variations to savor:
Lemon Kentucky Butter Cake: Add a refreshing burst of citrus by incorporating lemon zest and lemon juice into the batter. Top it off with a tangy lemon glaze for an irresistible treat.
Chocolate Kentucky Butter Cake: Chocolate lovers rejoice! Infuse the cake with rich cocoa powder and drizzle it with a decadent chocolate ganache for an indulgent twist on the original recipe.
Pumpkin Spice Kentucky Butter Cake: Embrace the flavors of fall by adding pumpkin puree and warm spices like cinnamon, nutmeg, and cloves to the batter. A dollop of whipped cream completes this seasonal delight.
In conclusion, Kentucky Butter Cake is a dessert that brings together the perfect combination of rich flavors, moist texture, and indulgence. Its origins in the Southern culinary traditions and the use of quality ingredients make it a true delight for anyone with a sweet tooth. Whether you savor the classic version or explore the various tantalizing variations, Kentucky Butter Cake is sure to please even the most discerning dessert connoisseur. So, roll up your sleeves, preheat your oven, and embark on a culinary adventure as you bake your very own Kentucky Butter Cake.
HOW TO MAKE ITALIAN CREAM STUFFED CANNONCINI? With its wide range of pasta and pizza meals as well as seasonal vegetables, meat, and fresh seafood, we all agree that Italian cuisine is one of the most fascinating in the world. There is also a large selection of sweet desserts so that even if you skip one, the meal isn’t complete. Whatever the season, everyone enjoys a delicious tiramisu, a creamy panna cotta garnished with fresh fruits, or a great large scoop of gelato, whether it’s summer or winter. Then there are the “pasticcini,” which are little bite-size sweets like Italian cream puffs, tartlets, and so on. The “cannoncino,” which is a sweet delicacy in this category and a particular favorite of mine, is one such sweet delight.
This traditional Piedmontese dessert, which is also very popular in many Northern and Central Italian areas, is filled with cream and baked. It is possible to get Cannoncini filled with various pastry creams while visiting an Italian pastry store, but the most popular filling is without a doubt the Vanilla Pastry Cream, which can be found in most pastry shops across the country. The recipe for the delectable Cannoncini is provided below! A few hours before serving, or at the very least a few hours before serving, the pastry horns are often filled with cream. Some cooks like to put a little dusting of powdered sugar on top of the Cannoncini before serving.
INGREDIENTS NEEDED:
CANNONCINI INGREDIENTS:
A sheet pastry dough; measure 9X9-inches square.
12 Cannoncini molds.
200 grams.Of caster sugar.
An egg.
PASTRY CREAM INGREDIENTS:
4 large egg yolks
200 ml.Of whole milk.
45 ml.Of heavy cream.
70 grams.Of caster sugar.
25 grams.Of cornstarch.
Lemon Zest, I used a quarter lemon.
vanilla extract; half a small spoon.
DIRECTIONS:
THIS IS HOW TO MAKE THE ICE CREAM WITH PASTRY:
Step 1:
Pour the milk into a large saucepan along with the heavy cream, the lemon peels, and the vanilla essence and bring to a simmer.
Step 2:
Preheat the pot over medium heat until the liquid reaches a temperature of 165 to 170 degrees Fahrenheit, then turn off the heat and cover with a lid.
Step 3:
Then, beat the yolks and sugar together until light yellow and fluffy, then gradually add the cornstarch, a tablespoon at a time, whisking constantly until the mixture is thoroughly combined.
Step 4:
The hot milk and cream infusion (without the lemon peels) should be added at this stage and whisked until well incorporated.
Step 5:
Finally, pour the mixture back into the saucepan and cook it over medium heat, stirring constantly, until it becomes thick, for about 5 minutes.
Step 6:
Fill a bowl with the pastry cream and cover with plastic wrap until it reaches room temperature, then keep in the refrigerator for up to 48 hours before serving.
AND TO MAKE THE SHELLS OF CANNONCINI, FOLLOW THESE TWO AESY STEPS:
Step 1:
If you’re using pastry dough sheets, the most important thing to remember is to keep them cool; otherwise, the dough will start to lose its consistency.
Step 2:
So work fast and keep the pastry in the freezer for no more than 3 minutes (no more than that) if it becomes necessary later on.
Try this Italian recipe as soon as you can, and please don’t forget to leave your feedback about it below, this action helps us to improve our cooking skills, and of course, reading your comments makes us very happy!!!