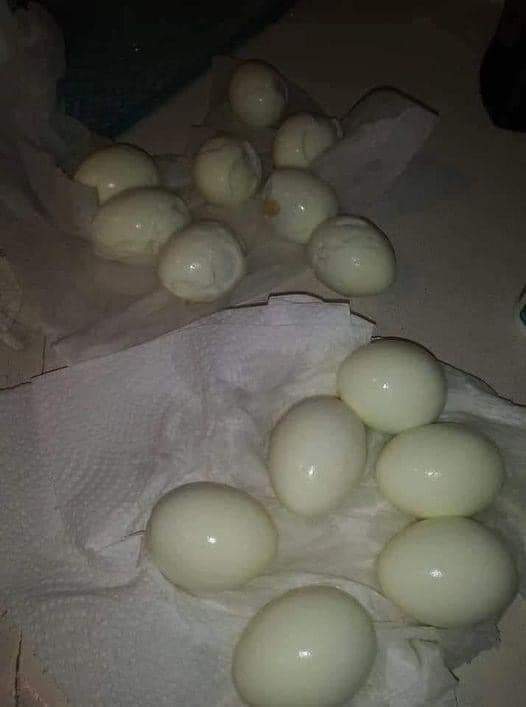
If you’ve ever found yourself struggling with the tedious task of peeling hard-boiled eggs, worry not; you’re certainly not alone. While hard-boiled eggs are a popular and nutritious snack, their stubborn shells can turn a simple kitchen chore into a messy affair. Renowned French chef, cookbook author, and TV personality, Jacques Pépin, offers a brilliant solution to elevate your egg-peeling experience.
The Common Dilemma: Sticky Shells and Messy Peeling
The challenge with hard-boiled eggs often centers around their shells, which tend to stick stubbornly to the egg whites, resulting in a less-than-appetizing appearance. Pépin’s approach introduces a simple yet highly effective tweak to the cooking process that can revolutionize your egg-peeling routine.
The Game-Changing Hack: Poking a Hole for Seamless Peeling
Pépin’s ingenious method involves a subtle modification—poking a small hole in the wider end of the egg before boiling. This uncomplicated adjustment allows the air pocket inside the egg to escape gradually during the cooking process, making the eggshell effortlessly removable. Unlike when the air pocket is trapped, causing the white to adhere to the shell, this method ensures a smooth and easy peeling experience.
Simple Tools, Big Impact: How to Execute Pépin’s Technique
You don’t need any fancy tools or culinary expertise to implement this game-changing hack. A basic pin or thumbtack is all you require. Gently puncture the eggshell at the wider end, ensuring the hole is large enough to release air but small enough to maintain the egg’s structural integrity. Once the hole is made, proceed to boil the egg as usual. The released air pocket makes the peeling process a breeze post-cooking.
Accessible to All: Pépin’s Technique for Every Kitchen Enthusiast
What makes this method truly remarkable is its accessibility. It doesn’t demand advanced culinary skills or specialized equipment, making it suitable for everyone, from seasoned chefs to kitchen beginners. This hack proves especially handy on busy mornings when a speedy, protein-rich breakfast or snack is a necessity.
Effortless Peeling for Impeccable Results
By incorporating Pépin’s tip into your routine, you can effortlessly peel hard-boiled eggs, resulting in perfectly shaped egg whites. This technique not only streamlines the peeling process, making it cleaner and faster, but also imparts a touch of professional culinary wisdom to your kitchen repertoire.
A Culinary Pro’s Secret for Your Kitchen Success
The next time you embark on preparing hard-boiled eggs, keep Jacques Pépin’s straightforward yet transformative advice in mind. A small hole in the eggshell can turn a potentially frustrating task into a quick and easy one, elevating the quality of your breakfasts, salads, and snacks.
A classic southern recipe, cornmeal hoecakes are little pan fried cornmeal medallions that are at home as breakfast, as much as they are as a side dish with a mess o’ greens, and just about anything else! Fried Cornbread – Southern Cornmeal Hoecakes
Fried cornbread, is also known as cornmeal hoe cakes and corn cakes, and sometimes Johnnycakes, is a sort of fried cornmeal flatbread – kind of like if you took cornbread batter and skillet fried it like a pancake. The inside puffs up like cornbread, while the outside gets nice and crispy from frying it in the oil. It’s the perfect companion to a mess o’greens, or for breakfast or as a sweet treat when drizzled with a bit of syrup.
I have read that hoecakes likely started with Native Americans who apparently cooked these on hot rocks inside an open fire. The method was later adapted by cooking the bread on the blade of a hoe, and that is how it got its name, though some folks dispute that.
This was a reader request from one of our Facebook family members Sarah, and since The Cajun brought me home a literal armload of collard greens, I thought I would bump up the request since I clearly had greens in my near future … and everybody knows, you gotta have either cornbread or else some hoecakes to go with! Course these little hoecakes are pretty good all on their own too.
{Southern Hissy Fit Warning} One thing I have learned since blogging and getting to meet and talk with folks from all over the south is that when it comes to cooking and recipes, there is no one south. You will have some stodgy southerners who want to insist that the way they grew up is the only way things are done. Makes me crazy! It’s just not true y’all.
The way you learned receipts (recipes) and how to cook, likely came from your mama and was influenced by the way she learned from her mama. Regional aspects also have to be considered because I’ve noticed that folks here on the Coast cook a whole lot different from, say, folks in north Alabama. We are in close proximity to south Louisiana and our cooking is heavily influenced by Creole and Cajun cooking. We also have an abundant supply of fresh seafood here, so our diets are heavy in fresh Gulf seafood. That ain’t happening in north Alabama.
Texans cook far different from Mississippians as do the folks of the Appalachian Mountain region. The coast of Georgia cooks a good bit different from the Gulf Coast. So, there is no one south y’all, but it’s all good, so how about let’s just stop arguing about what we think is right or wrong about our southern foods and cooking, embrace our differences, eat and enjoy fellowship! {soapbox tucked away}
Now that said… cornmeal hoe cakes are also not hot water cornbread.
Are they similar? Yes, somewhat. Hot water cornbread in its purest form is simply plain ol’ yellow all-purpose cornmeal (not cornmeal mix, not self-rising cornmeal), a pinch of salt, and boiling water. The boiling water is added to the cornmeal which starts the cooking process of the meal. Once the boiling water is mixed in and the mixture is just cool enough to handle, but still very hot, it is hand-formed into a small pone in the palm of the hand, which gives it that classic oval shape it’s known for. It’s then usually fried in hot oil, though also is added to top of things like greens and steamed.
Hoe cakes, like this recipe, are more like a cornbread batter, that’s dropped in a skillet of hot oil in little medallions, similar to pancakes, and fried. Apples and oranges folks!
And while I’m at it, please also understand this isn’t a historical page. We aren’t trying to recreate recipes from The Great Depression, nearly 90 years ago, where folks had limited supplies of things. This blog is a current blog of my recipes, and this recipe is a modern version of fried cornmeal hoe cakes, an adaptation of Paula Deen’s Hoecake recipe, which is a signature feature at her Savannah restaurant that comes to your table like a bread basket does elsewhere.
I think it makes a just perfect vehicle for sopping up some pot likker from a big ole pot of greens, with some pintos or a big bowl of soup, though they make a great bread dish for just about any meal really, especially in the heat of the summer when you want bread but don’t want to turn on the oven.
Now… how about let’s make some hoe cakes!
The batter can be made up and stored in the fridge for a couple of days, since we all know as those greens set up in the fridge, they don’t get nothing but better. Or treat yourself and drizzle a bit of cane, sorghum or maple syrup over one. Yummy. Just look at that crispy loveliness with a drip of syrup on it, would ya?
The sugar is optional. I like it in these, but leave it out if you don’t. Now, if you like and you have a well seasoned cast iron skillet, you can skip the oil or butter to brown them, but you won’t get that lovely, crispy outside either, so really, why would you want to do that?
Ingredients:
1 cup of self rising flour 1 cup of all purpose cornmeal 2 teaspoons of baking powder 1/2 teaspoon of salt 1 tablespoon of sugar, optional 2 eggs 3/4 cup buttermilk 1/3 cup water 1/4 cup of cooking oil (vegetable, canola, melted bacon fat etc.) 1 tablespoon of fat, for frying, or oil combined with a bit of butter
Instructions:
Line a rimmed baking sheet with paper towels and place a rack on top; set aside. In a medium bowl, whisk together the flour, cornmeal, baking powder, salt and sugar. Measure out the buttermilk in a liquid measuring cup, and add to that the water and oil; blend well. Add eggs and mix well; combine with dry ingredients. Heat oil and butter in a cast iron skillet over medium to medium high and drop batter by about 1/8 cup measures into the hot skillet to form small medallions. Fry until brown and crisp, turn and brown the other side. Remove and let drain on rack. Serve immediately with warm syrup for breakfast or as a snack, or dip ’em in a mess o’ greens to sop up that pot likker (juice from the greens)! Variation: When corn is at peak and in-season, add about 1 cup of corn cut and scraped off the cob. You’ll need about 1 large ear of corn. Can also make this into a pan hoecake. Add only enough buttermilk to make a stiff batter. You may not need the additional water. Pour into a screaming hot, well greased 8-inch cast iron skillet over medium high heat. Reduce heat and let brown underneath about 10 – 15 minutes. Run a metal egg turner underneath and turn to brown the other side. Can also bake in a well preheated 425 degree F oven for about 15 to 20 minutes (no turning needed). Tip: If you spray the measuring cup with a bit of non-stick spray before scooping, the batter will slip right out. If you don’t happen to have that 1/8 cup measure, just do about 2 tablespoons of batter in one pile and push it around to form a medallion.
This Slow Cooker Vegetable Barley Soup recipe couldn’t be easier. Just throw everything in the crockpot and walk away! Healthy, delicious and packed with nutrients.
Ingredients
1 yellow onion, chopped 2 carrots, cut into ½-circles 2 stalks celery, chopped 1 medium sweet potato, peeled and cut into ¾-inch pieces 4 garlic cloves, minced 1 ½ cups frozen green beans ¾ cup pearl barley 1 tsp paprika 1 tsp dried oregano ¾ tsp dried thyme ½ tsp salt ½ tsp ground pepper 1 (14 oz.) can petite diced tomatoes 6 cups low-sodium vegetable broth 2 cups water ¼ cup minced flat-leaf parsley
Instructions
Combine all of the ingredients, except for the parsley, in a large (6-quart) slow cooker. Cook on LOW until the barley is tender, about 8 hours. Stir in the parsley. Serve
In the world of comfort food, few dishes can match the sheer satisfaction of a well-prepared plate of Sliced Baked Potatoes. This simple yet indulgent dish combines the earthy goodness of potatoes with the richness of cheese and bacon, all crowned with a dollop of sour cream. It’s a culinary delight that’s easy to make and even easier to enjoy. In this article, we’ll walk you through the process of creating these delectable Sliced Baked Potatoes and explore why they’re a favorite among food lovers.
Ingredients:
Before we dive into the cooking process, let’s gather the ingredients you’ll need
INGREDIENTS
Baking potatoes
Cheddar cheese, grated
Bacon, cooked and crumbled
Green onions, sliced
Sour cream
These five simple ingredients are the building blocks of your Sliced Baked Potatoes. Now, let’s move on to the directions.
Instructions:
Preheat your oven to 400°F.
Brush both sides of potato slices with butter.
Place the potato slices on a cookie sheet.
Bake for 30 to 40 minutes, or until the slices are lightly browned on both sides, turning them once during the process.
When the potatoes are ready, top them with crumbled bacon, grated cheddar cheese, and sliced green onions.
Return the cookie sheet to the oven and continue baking until the cheese has melted.
Add a generous dollop of sour cream when done.
Your Sliced Baked Potatoes are now ready to be served and savored!
Tips for Perfect Sliced Baked Potatoes
To ensure your Sliced Baked Potatoes turn out perfectly every time, consider these tips:
Uniform Slicing: Aim for uniform potato slices to ensure even cooking.
Baking Temperature: Maintain the recommended baking temperature for that perfect golden brown color.
Microwave Shortcut: If you’re short on time, you can microwave the potatoes for six minutes instead of baking them.
Experiment: Feel free to add your own twists, like a sprinkle of herbs or a dash of hot sauce, to customize the flavor to your liking.
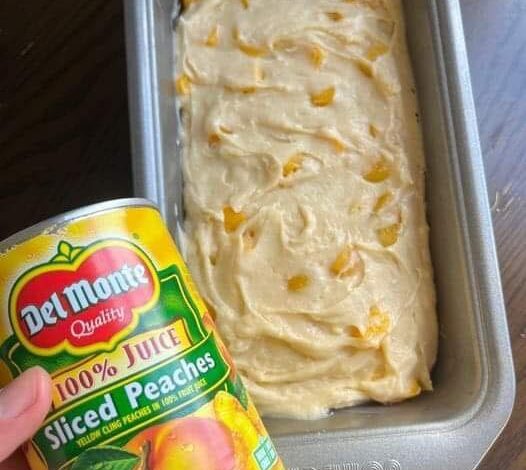
Are you craving a delicious and moist loaf that combines the sweet and juicy flavors of peaches with the creamy goodness of cream cheese? Look no further! In this article, we’ll dive into the wonderful world of Peaches & Cream Cheese Loafand explore a delightful recipe that will leave your taste buds begging for more. From the rich combination of ingredients to the step-by-step instructions, we’ll guide you through the process of creating this delectable treat. So, let’s get started and indulge in the irresistible flavors of Peaches & Cream Cheese Loaf!
Ingredients:
To create this mouthwatering treat, you’ll need the following ingredients:
INGREDIENTS
AMOUNT
All-purpose flour
2 cups
Baking powder
1 teaspoon
Baking soda
1/2 teaspoon
Salt
1/2 teaspoon
Unsalted butter, softened
1/2 cup
Granulated sugar
1 cup
Large eggs
2
Vanilla extract
1 teaspoon
Sour cream
1 cup
Fresh or canned peaches, diced
1 cup
Cream cheese, softened
4 ounces
Powdered sugar
1/4 cup
Lemon juice
1 tablespoon
Lemon zest
1/2 teaspoon
Instructions:
Step 1: Preheat and Prepare
Preheat your oven to 350°F (175°C). Grease a loaf pan and set it aside for later use.
Step 2: Combine Dry Ingredients
In a medium-sized bowl, whisk together the all-purpose flour, baking powder, baking soda, and salt. Set the mixture
Step 3: Cream the Butter and Sugar
In a large mixing bowl, cream together the softened butter and granulated sugar until light and fluffy. This can be easily done with an electric mixer.
Step 4: Add Eggs and Vanilla
Beat in the eggs, one at a time, ensuring each egg is fully incorporated before adding the next. Then, stir in the vanilla extract.
Step 5: Alternate the Flour Mixture and Sour Cream
Gradually add the flour mixture to the butter and sugar mixture, alternating with the sour cream. Begin and end with the flour mixture, stirring well after each addition. This will ensure a well-blended batter.
Step 6: Fold in the Peaches
Gently fold in the diced peaches, ensuring they are evenly distributed throughout the batter.
Step 7: Prepare the Cream Cheese Filling
In a separate bowl, combine the softened cream cheese, powdered sugar, lemon juice, and lemon zest. Mix until smooth and creamy.
Step 8: Layer the Batter and Cream Cheese Filling
Pour half of the batter into the greased loaf pan. Spread the cream cheese filling evenly over the batter. Top with the remaining batter, making sure to cover the filling completely.
Step 9: Bake to Perfection
Place the loaf pan in the preheated oven and bake for approximately 55-60 minutes, or until a toothpick inserted into the center comes out clean. The top of the loaf should be golden brown.
Step 10: Cool and Serve
Remove the loaf from the oven and let it cool in the pan for about 10 minutes. Then, transfer it to a wire rack to cool completely. Once cooled, slice the Peaches & Cream Cheese Loaf and serve it to your eager guests.
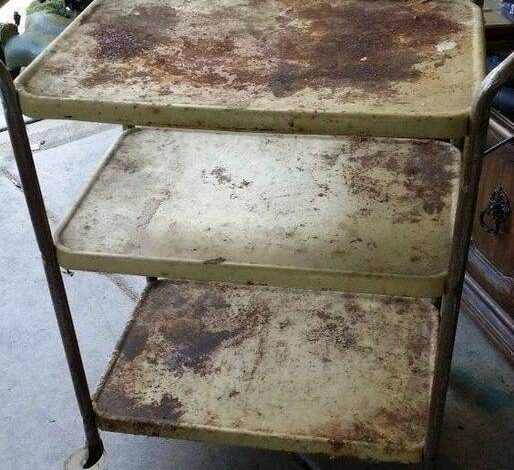
Are you enchanted by the allure of bar carts but find the price tags a little too steep? Well, you’re in luck! This article will guide you through the process of crafting your very own DIY bar cart that exudes both style and functionality, all without breaking the bank. Follow along as we take you step by step through the process of repurposing and transforming an old cart into a chic mobile bar that’s sure to be the envy of your guests.
Unveiling the Hidden Treasures: Finding the Perfect Cart
Embarking on your DIY bar cart journey requires a keen eye for hidden gems. Often, thrift stores, garage sales, or even forgotten corners of your own home hold the potential to house your future bar cart. As a bar cart aficionado, my own journey began when I stumbled upon a rust-covered cart at a garage sale, priced at a mere $2.00! A diamond in the rough, this cart was destined for a glamorous transformation.
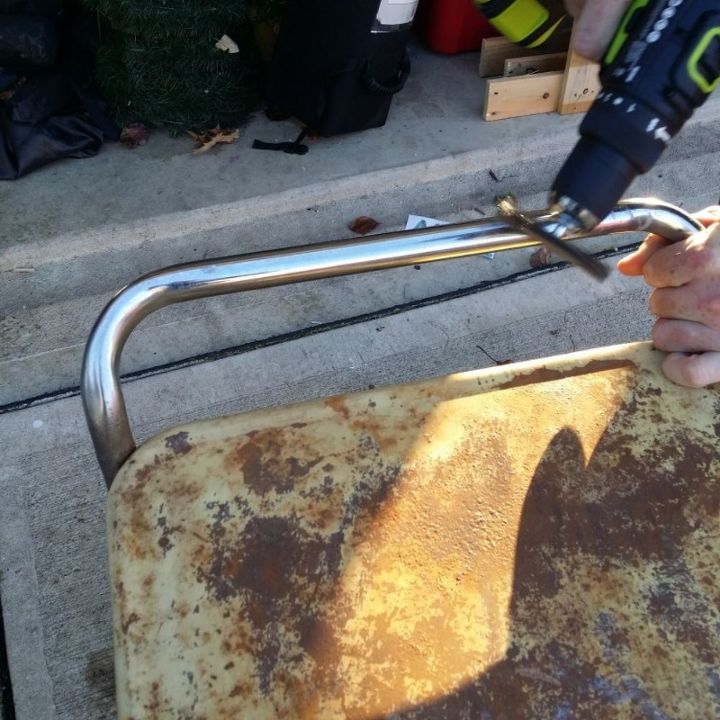
Rust Be Gone: Preparing Your Canvas
Before the magic happens, a little elbow grease is required. Rust removal is the first order of business. Armed with an electric drill and a wire brush attachment, the majority of the rust was removed, revealing the cart’s underlying potential. While a few bumpy spots remained, they posed no challenge that couldn’t be handled.
Priming and Painting: A Palette of Possibilities
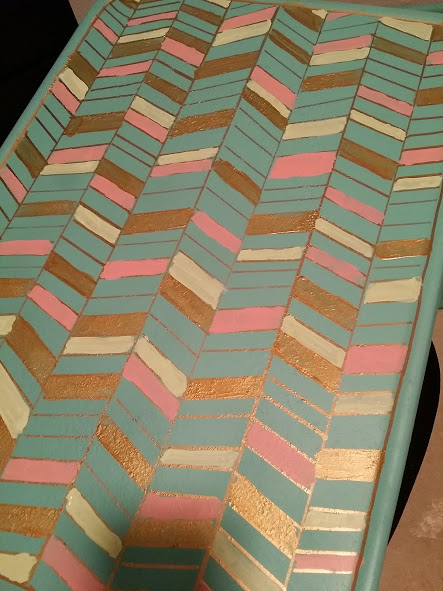
With the rust banished, it’s time to give your cart a fresh new look. Start by priming the surfaces, ensuring the paint will adhere smoothly. A quick spray paint session on the handles and trays follows, and here is where your creativity takes center stage. My personal touch involved adding a herringbone pattern to the trays using a gold paint pen.
Adding a pop of color further elevates the cart’s charm. Splashes of gold, pink, and mint were painted onto select spaces, embracing an eclectic and whimsical aesthetic. Remember, there’s no right or wrong way to approach this step – let your personal taste guide you.
The Grand Assembly: Bringing Your Bar Cart to Life
With the paint dried and the colors harmonizing beautifully, it’s time to put the pieces together. Assemble the cart with a sense of excitement and anticipation, knowing that each element has been lovingly curated to create a masterpiece. And voila! In a few simple steps, your DIY bar cart is complete, exuding sophistication and style.
Cover with lid, simmer on medium low for 30 minutes. Adjust heat so it’s bubbling a nice amount, but not crazy energetically or super slowly. Skim off excess foam build up once or twice (not critical, just makes broth clearer).
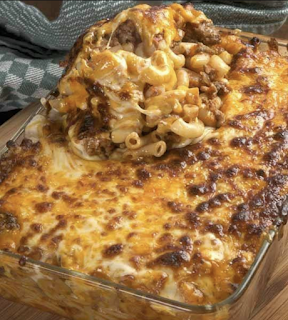
2 28-ounce cans pureed tomatoes (the original recipe called for one so I think this is what made mine more “tomatoey”)
2 pounds lean ground beef
1/2 box macaroni
1 cup each grated cheddar and mozzarella cheeses
DIRECTIONS:
Sweat the onions in the oil with salt.
Add the beef to the onions and cook.
Add salt oregano, black pepper and garlic.
Add the tomatoes and bring to a simmer, then reduce the heat to low and cook for an hour. (This is where I added the second can of tomatoes because if I had let the thick meat paste simmer for an hour it would have burned dry within 10-15 minutes. So I added the tomatoes here.)
Cook the macaroni in boiling water till it’s half done.
Drain it and add it to the tomatoes. Remove pasta from heat. Add more salt and other seasonings as needed, and cover.
When it’s cooled, about 20 minutes to 30 minutes and the pasta has absorbed the tomato juices, transfer it to a large baking dish and cover it with foil. It can sit out for several hours like this, be refrigerated for up to two days, or frozen a few weeks.
Bake it in a 400 degree oven till it’s piping hot (about 45 minutes if it’s cold to room temperature). Just before you’re ready to eat, remove the foil, cover macaroni with the cheese and broil till it looks beautiful.
Please make sure to Like and share this Recipe with your friends on Facebook to get our latest Yummy Recipes.
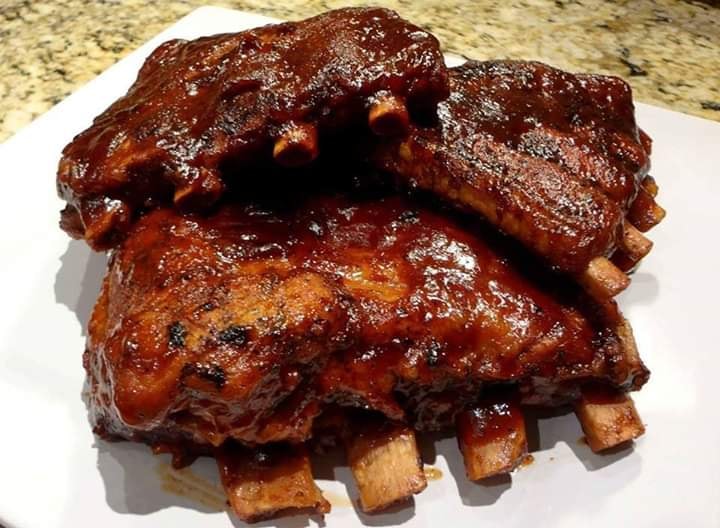
“This recipe came out terrific. I seasoned the ribs with salt and pepper then seared them on all sides before adding them to the Slow Cooker. The searing made for a nice, caramelized crust on the outside of the ribs. Cooked these for 7 hours on Low. There was some grease so I simply absorbed it off the top using tongs and a paper towel. Super!”
To Make this Recipe You’ll Need the following
Ingredients : 1 cup water 1 cup ketchup 1 (6 ounce) can tomato paste 3/4 cup brown sugar 1/2 cup vinegar 2 tablespoons prepared mustard 1 tablespoon salt 2 pounds beef back ribs
Directions : 1. Mix water, ketchup, tomato paste, brown sugar, vinegar, mustard, and salt in a slow cooker, stirring to dissolve brown sugar and salt. 2. Place short ribs into the sauce and stir to coat. Set cooker on Low, cover, and cook for 8 hours.
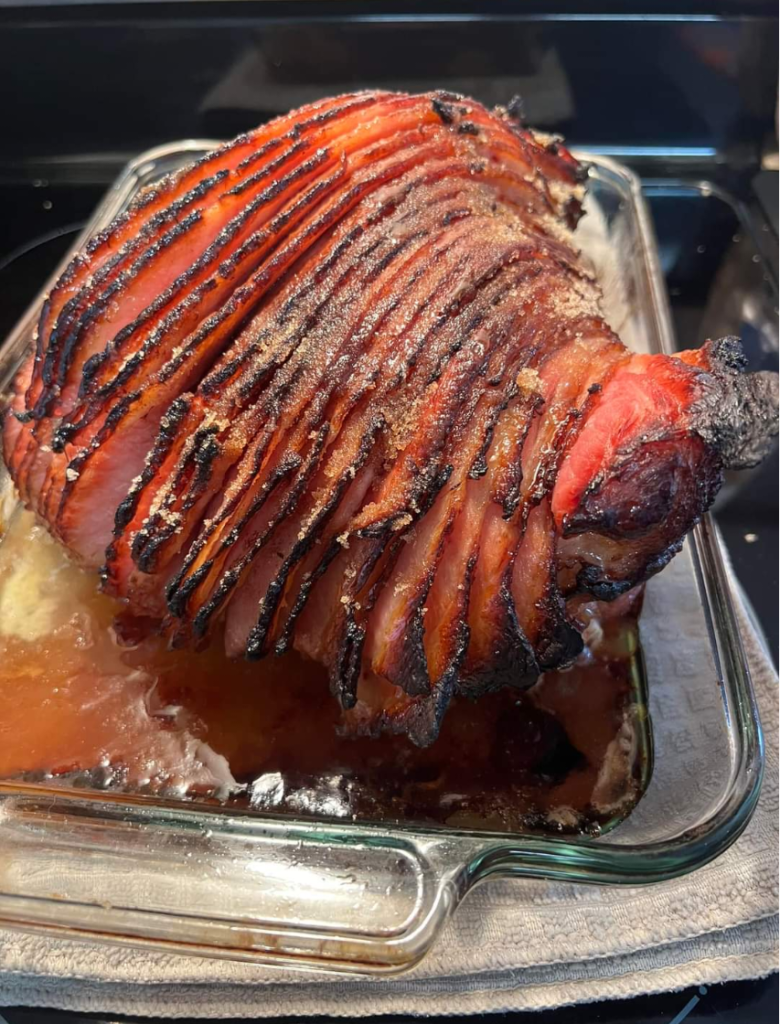
7 pound fresh bone-in ham , rinsed under cold water (see blog section above: “Select a Ham”) NOTE: If selecting a ham with the skin on, cut a criss-cross pattern into the skin about 1/2 inch deep
For The Brine:
6 quarts cold water , divided in half
2 cups brown sugar
1 cup kosher salt
1 1/2 tablespoons Prague powder (curing salt #1)
2 teaspoons black peppercorns
2 bay leaves
For The Glaze:
1 batch Brown Sugar Glaze (click link for recipe)
FOR THE RUB (Optional – see NOTE):
1/4 cup packed brown sugar
1 tablespoon paprika
1 1/2 teaspoons salt
1 teaspoon freshly ground black pepper
1 teaspoon garlic powder
1 teaspoon onion powder
1/2 teaspoon ground mustard
wood chips (popular choices included maple, pecan, hickory, and apple)
INSTRUCTIONS
To make the brine: Place half of the water and the remaining brine ingredients in a large stockpot that’s big enough to fit your ham and deep enough to allow the ham to be fully covered by the brine. Alternatively you can use any clean bucket.Bring the brine to a boil and stir until the sugar and salt is dissolved. Turn off the heat. Pour in the remaining water to cool down the brine and then let it cool completely.Place it in the brine and ensure that it is completely submerged under the brine. If it keeps floating to the top, weigh it down. Cover and refrigerate. Let the ham cure for 7 days.Once the curing period is over, remove the ham from the brine, thoroughly rinse it under water, then blot the ham with paper towels and place on a rack to continue drying in the fridge for at least a couple of hours or overnight.Optional: At this point you can apply the rub to the ham if you wish.
Prepare your smoker according to manufacturer instructions and get it to a temperature of 250 degrees F.Place the ham in the smoker. Plan on about 4-5 hours but start checking for doneness sooner. Add about one cup of wood chips roughly every 45 minutes throughout the smoking process or less frequently for a milder smoke flavor.Smoke the ham until it reaches an internal temperature between 130-140F (use an instant read thermometer). It’s now time to apply the glaze.Once the ham reaches an internal temp between 130-140 degrees, apply some of the glaze.Brush the ham all over with a coating of the glaze.After 20-30 minutes brush the ham all over with some more of the glaze until the internal temperature reaches 165 F Periodically check the internal temperature towards the end so that you do not exceed 165 F.
As soon as the internal temperature reaches 165 F, remove the ham from the smoker and wrap it in aluminum foil.Place the wrapped ham in a warm place to let rest until ready to serve. At this point you can also let it cool completely, refrigerate, and then gently reheat in the foil when ready to serve.Slice the ham against the grain in 1/4 inch slices and serve with the remaining glaze.