This cabbage soup is welcome right now not only with the winter cold but also it does the greatest good for the body after pancakes and pancakes :).
The benefits of cabbage are multiple, a vegetable difficult to beat in a diet, low in calories, economical, good source of vitamin C, folic acid and fiber, simple and easy to cook. Other benefits like preventing cancer of the lung and digestive system.
Ingredients
4 cups beef broth
8-ounce cans tomato sauce
1/2 cup uncooked long-grain rice
1 bay leaf
3 tsp brown sugar
2 tsp parsley
2 small spoon olive oil
A pinch of salt & pepper
1 pound ground beef
1 onion diced
2 tsp small garlic
4 cups chopped green cabbage
2 carrots sliced
Directions
In a large pot, heat the olive oil and add the ground beef and season with pepper and salt. Cooked, divided the meat with a spatula until beef is browned, about 6 min. Add the garlic and onion cook about 4 min
Add in the pot the carrots/cabbage/beef broth/rice/tomato sauce/bay leaf /and sugar, and add salt/pepper. Bring and cook about 26 min until rice.
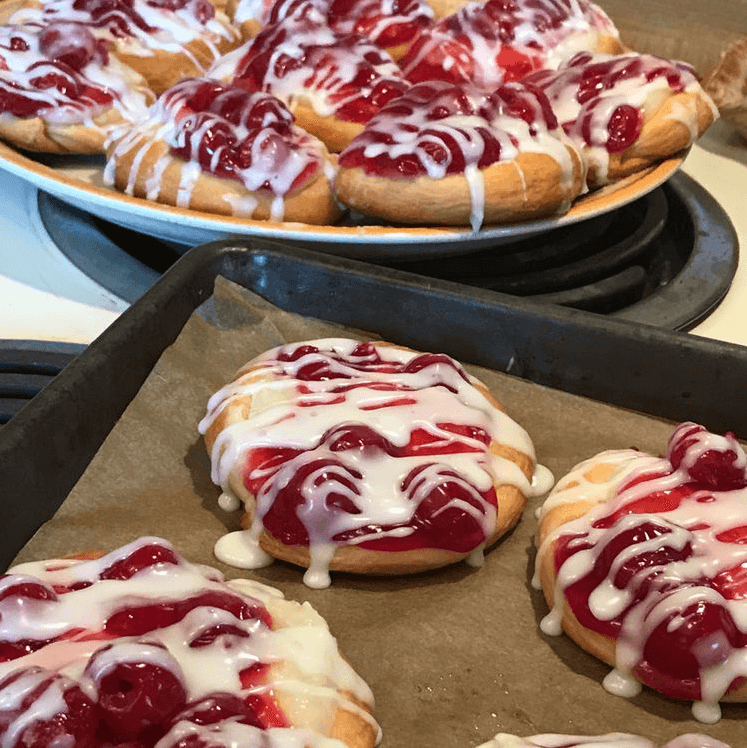
This recipe was born from the leftovers I had when making my chocolate cherry cream cheesecake. I still had some of the cream cheese mixture and cherry pie filling left over and I really didn’t want to throw it away. I looked online to see if I could get some ideas and I found something similar and I thought, I’m going to make mini cheesecakes. Apparently a lot of people use refrigerated dough to make these kinds of recipes. I was surprised to find “rounds” of croissant dough. I had never seen them before. I thought maybe I should take the traditional croissant dough and pinch the seams to get the rounds I needed. I was glad I didn’t have to do this work, that it was already done for me.
Ingredients
1 Pillsbury Crescent Rolls flour, just for dusting Filling 4 ounces of soft cream cheese ⅓ cup of sugar vanilla splash 1 box of cherry pie filling Icing ⅓ cup powdered sugar 2 teaspoons of milk
Instructions
Open the roll container and do not unroll the rolls. Use a sharp, serrated knife to cut them like cookie slices. Make 10 slices. Place each slice on a cookie sheet lined with parchment paper. Use a measuring cup to flatten each roll and build a small wall around it. Use a drop of flour to keep it from sticking and press with your fingertips. Filling Electrically mix the cream cheese, sugar and vanilla until smooth. Pour a small amount into each “Danish”. Add a teaspoon of cherries. Bake in the oven at 350 for 18-20 minutes. Allow to cool and add a drizzle of icing. Icing Mix the milk and sugar and sprinkle over the Danishes. You can use a piping bag if you wish.
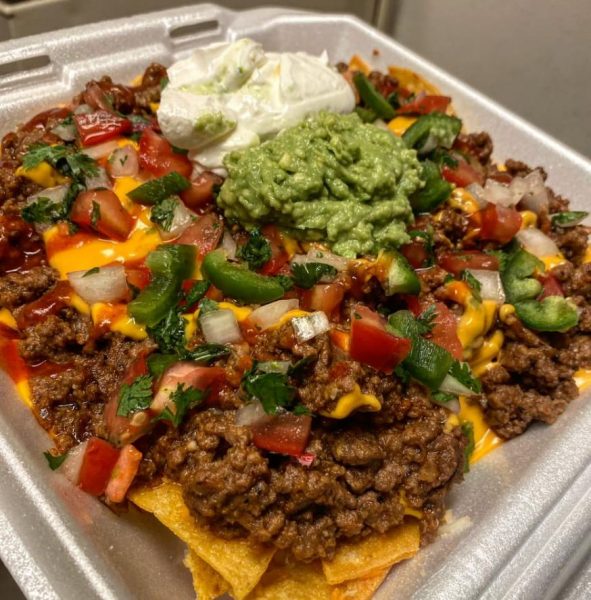
FOR THE NACHOS 1 tbsp. extra-virgin olive oil 1 large onion, chopped 1 lb. ground beef 2 garlic cloves, minced 1 tbsp. taco seasoning kosher salt 1 (15-oz.) can refried beans 1/4 c. water 1 large bag tortilla chips 2 c. shredded cheddar 2 c. Shredded Monterey jack 1 (15-oz.) can black beans, drained 1/2 c. pickled jalapeños
FOR TOPPING 1 large tomato, diced 1 avocado, diced 1/4 c. thinly sliced green onions 1/4 c. fresh cilantro leaves (optional) Sour cream, for drizzling Hot sauce, for drizzling
DIRECTIONS Preheat oven to 425º and line a large baking sheet with foil. In a large skillet over medium heat, heat oil. Add onion and cook until soft, 5 minutes, then add ground beef and cook until no longer pink, 6 minutes more. Drain fat. Add garlic and taco seasoning and season with salt. Cook until meat is well browned and slightly crispy, 5 minutes more. Add refried beans and water to skillet and stir until combined. Add half the tortilla chips and top with beef-bean mixture, half the cheese, half the black beans, and half the pickled jalapeños. Repeat one more layer. Bake until cheese is melty, 15 minutes. Scatter with tomato, avocado, green onions, and cilantro. Drizzle with sour cream and hot sauce and serve immediately.
Toll-house famous fudge is a perfect solution for situations when you are hosting guests because sometimes cooking the main course takes a lot of time and you run out of energy to make anything else, and also the oven is occupied but you still need the dessert.
Simple and easy ! My whole family loves this recipe so much. If it were for them, I’d be making this every day! Give it a shot, you’ll love it!To Make this Recipe You’ Will Need the following ingredients:
INGREDIENTS
1 1/2 cups granulated sugar 2/3 cup Evaporated Milk 2 tablespoons margarine or butter 1/4 teaspoon salt 1 teaspoon vanilla extract 2 cups miniature marshmallows 1 1/2 cups Semi-Sweet Chocolate Morsels 1/2 cup chopped pecans or walnuts
INSTRUCTIONS
Things first, get all the ingredients ready. Then prepare the form, I normally pick a small, around 9 inches, form and cover it with foil. Put sugar, butter, salt, and condensed milk into the medium-sized pot. Put the pot on the fire and make it boil while constantly stirring it. Boil it for 4 minutes, remember to occasionally stir it a little, the mass has to become smooth and indiscreet. Sugar must dissolve fully. Take the pot off the fire and add marshmallows, nuts, chocolate morsels, and vanilla extract. Mix the mass until marshmallow dissolves. Put the hot dessert into the form and put it into the fridge to cool down. The fudge should cool in the fridge for two hours, after that take it out and cut it into pieces.
1 can of sweetened condeensed milk (approx. 400 g)
2 tbsp. tablespoons corn syrup or Golden Syrup
1 C. Coffee vanilla extract
salt flakes
Preparation
1. For the dough; preheat the oven to 168 ° C. Line the bottom of a greased 22 x 33 cm rectangular mold with baking paper.
2. Mix the crackers with the pecans to obtain a shortbread. Add the melted butter and vanilla and continue to pulse the device to mix everything well. Tamp in the bottom of the mold.
3. For the garnish; whip the cream cheese with a mixer with the sugar and vanilla. Add the eggs 1 to 1, beating well each time, then finally the sour cream. Pour over the dough and bake for 50 min. Turn off the oven and open the door, leaving the cheesecake to stand for 15 minutes. Take it out of the oveen and let it cool for 1 hour.
4. For the caramel icing; put the whole sugar and the butter in a saucepan over medium heat and mix wiith a wooden spoon until the sugar dissolves. Add the condensed milk, corn syrup, vanilla and bring to a boil. Keep stirring constantly. Place a sugar thermometer and continue to cook at a boil until reaching 105 ° C. Remove from the heat and let cool for 6 minutes before pouring over the cheesecake.
5. Leave to set for 2 hours then cut squares with a large knife. Arrange on a plate and place a pinch of salt on each square.
Tip = you can replace corn syrup or Golden Syrup with honey.
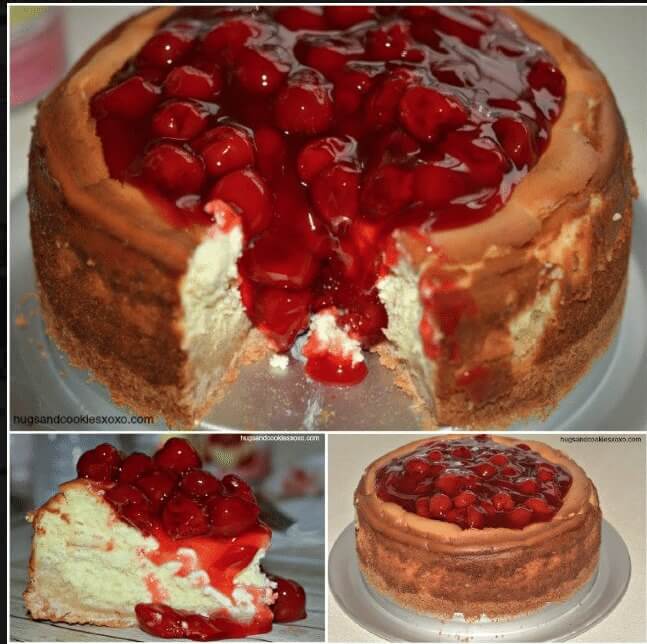
A sugar cookie crust, a thick cheesecake filling and cherries galore on top! A perfect dessert…that is, once you add some whipped cream of course!!! Try this cherry cheesecake soon! Thanks to the sugar cookie crust, this dessert comes together rather easily! The filling is simple, too! Just be sure to bring your cream cheese to room temp first for easier blending!
Ingredients
The Crust:
1-1lb of Pillsbury Sugar Cookie Dough, I used the mini cookie dough pieces
The Filling:
4-8oz. blocks of Cream Cheese..softened
4 Eggs
1 tablespoon Vanilla Extract
1 cup Granulated Sugar
Instructions
Press the cookie dough into the bottom of an 8 inch springform pan and bake at 350 about 15 minutes until almost done.
Let cool.
Meanwhile, beat cream cheese and sugar.
Add vanilla and one egg at a time, beating well.
Pour into crust.
Lower oven to 325 and bake 75-90 minutes until cooked through and browned.
Chill overnight in fridge and top with canned cherry pie filling.
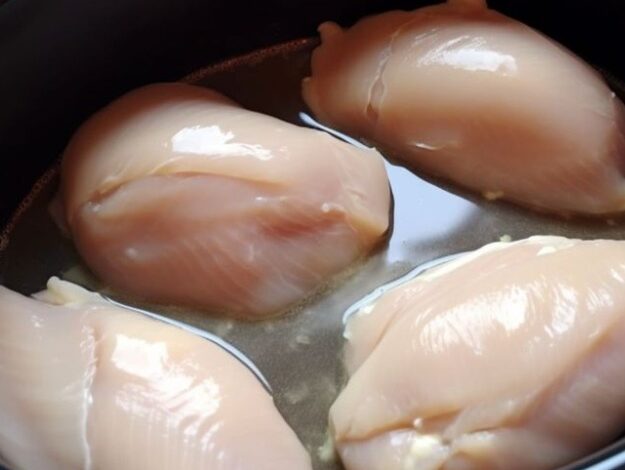
Imagine coming home to the aroma of a delicious dinner, effortlessly prepared. This article unveils the secret to creating the best dinner ever by putting chicken in a crock pot with minimal prep time. Let’s dive into the details of this mouthwatering recipe that will elevate your culinary skills.
Ingredients:
INGREDIENTS
QUANTITY
Chicken breast fillets
2 pounds
Small red potatoes
1 pound, quartered
Dutch/baby carrots
½ pound, trimmed & peeled
Green beans
½ pound, cleaned
Butter
⅓ cup
Fresh lemon juice
⅓ cup
Dried oregano
1 teaspoon
Onion powder
1 teaspoon
Crushed garlic
2 teaspoons
Salt and pepper
to your liking
Instructions:
1. Layering the Base:
Place the chicken fillets, potatoes, carrots, and green beans in the slow cooker.
Season the chicken with salt and pepper.
Adjust the vegetable quantity based on your preference.
2. Seasoning Mix:
In a mixing bowl, combine the butter, lemon juice, oregano, onion powder, and crushed garlic.
3. Drench & Cook:
Pour the flavor-packed mixture over the arranged ingredients in the slow cooker.
Set your cooker to either 4 hours on high or 8 hours on low.
If you prefer a crunchier texture for green beans, add them 4 hours into the low setting or 2 hours into the high setting.
Embark on a culinary adventure with our Baked Honey Garlic Chicken recipe. This mouthwatering dish combines the sweetness of honey, the richness of garlic, and the succulence of baked chicken. Follow this step-by-step guide to create a perfect blend of sweet and savory flavors in each bite.
Ingredients:
Ensure you have the following ingredients on hand:
INGREDIENTS
4 boneless, skinless chicken breasts or thighs
Salt and pepper, to taste
1/2 cup honey
1/4 cup soy sauce
6 cloves garlic, minced
2 tablespoons olive oil or vegetable oil
1 tablespoon apple cider vinegar or white vinegar
1 teaspoon onion powder
1/2 teaspoon crushed red pepper flakes (optional)
2 teaspoons cornstarch
3 tablespoons water
Fresh chopped parsley or sesame seeds (optional)
Instructions:
Preheat the Oven
Set the oven to 375°F (190°C) and lightly grease a baking dish.
Season the Chicken
Season the chicken pieces with salt and pepper, then place them in the prepared baking dish.
Prepare the Sauce
In a medium saucepan, combine honey, soy sauce, minced garlic, oil, vinegar, onion powder, and optional red pepper flakes.
Heat the mixture until well combined and simmering, stirring occasionally.
Create the Cornstarch Slurry
In a small bowl, whisk together cornstarch and water until fully dissolved.
Pour the slurry into the saucepan, stirring until the sauce thickens (1-2 minutes).
Coat the Chicken
Pour the honey garlic sauce over the chicken, ensuring each piece is well coated.
Bake
Bake in the preheated oven for 25-30 minutes or until the chicken reaches an internal temperature of 165°F (75°C).
Baste the chicken with the sauce halfway through cooking to retain moisture and enhance flavors.
Rest and Garnish
Once cooked, remove the chicken from the oven and let it rest for a few minutes.
Optionally, sprinkle with chopped parsley or sesame seeds for garnish.
Serve and Enjoy
Serve your baked honey garlic chicken hot with your favorite side dish and relish the perfect blend of sweet and savory flavors.
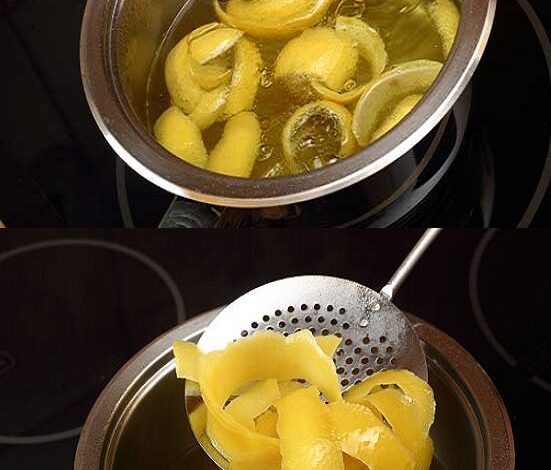
In the quest for holistic health, simple practices often wield remarkable benefits. Boiling lemons and consuming the liquid first thing in the morning is one such practice gaining popularity. This article explores the recipe, potential benefits, and essential precautions associated with this morning ritual.
Ingredients:
INGREDIENTS
QUANTITY
Lemons
6
Water
½ liter
Honey
As needed (optional)
Preparation:
Place 6 lemon slices in half a liter of water.
Boil the water for 3 minutes.
Allow it to cool for 10 to 15 minutes.
Drink the warm lemon water.
Optional: Add honey for improved taste.
Benefits of Drinking Lemon Water:
Enhances Your Immune System
Starting your day with lemon water provides a boost to your immune system, thanks to its rich vitamin C content.
Protects You from Colds
The powerful antioxidants in lemons help ward off common colds and infections.
Provides an Incredible Energy Boost
Experience a natural and sustained energy boost without the need for caffeine.
Aids Your Digestion and Controls Your Metabolism
Lemon water supports digestion and helps regulate metabolism, promoting overall digestive health.
Eliminates Many Toxins
The diuretic properties of lemons aid in flushing out toxins from your body.
Balances Your Body’s pH Levels
Despite their acidic nature, lemons have an alkalizing effect on the body, promoting pH balance.
Improves the Appearance of Your Skin
The combination of vitamin C and antioxidants contributes to healthier and radiant skin.
Enhances Your Breathing
Lemon-scented steam from the warm water can provide respiratory benefits and improve breathing.
Assists in Weight Loss
Lemon water can aid in weight management by promoting a feeling of fullness and boosting metabolism.
Improves Your Mood and Happiness, Avoiding Anxieties
The refreshing nature of lemon water may positively impact your mood and help reduce stress.
Hydrates Your Lymphatic System
Proper hydration supports the lymphatic system, crucial for immune function and detoxification.
Promotes Healing
The combination of nutrients in lemons contributes to overall healing and recovery.
1/2 cup plus 2 tablespoons (125g) granulated sugar, divided
2 tablespoons cornstarch
1 can (12 oz.) evaporated milk or 1 1/2 cups whole milk
2 eggs, lightly beaten
2 tablespoons unsalted butter
2 teaspoons vanilla extract
3-4 firm, ripe bananas
1/2 tablespoon lemon juice
1 1/4 cups (280g) heavy whipping cream
10 maraschino cherries
10 disposable Birchware spoons
DIRECTIONS:
Open each snack pack and pour half the contents of each bag into a large bowl. Stand the bags upright in a baking dish leaning against each other.Open each snack pack and pour half the contents of each bag into a large bowl. Stand the bags upright in a baking dish leaning against each other.
Place 1/2 cup sugar, cornstarch and milk into a medium saucepan and whisk until combined. Cook over medium-high heat until the mixture begins to bubble, whisking constantly. Remove the saucepan from the heat and gradually pour the eggs into the pan in a thin stream (tempering them) while whisking vigorously. Reduce the heat to medium and cook until thick and smooth, again whisking constantly.
When the mixture is thick, remove from the heat and stir in the unsalted butter and vanilla. Stir constantly until the butter is melted and well-incorporated. Pour the pudding in a separate bowl and set aside to cool slightly.
Chop the bananas into rounds and toss them in a bowl with the lemon juice until all of the bananas are covered. This will prevent them from browning. In the bowl of an electric mixer, beat the heavy cream on high speed until it starts to thicken. Gradually add in the remaining 2 tablespoons of granulated sugar. Beat until stiff peaks form. Transfer to a piping bag fitted with a fancy decorator tip, if desired. Otherwise just have a spoon ready for dolloping.
Assembly: Pour two rounded tablespoons of pudding over the wafers in each of the bags. Top with a few banana slices and more vanilla wafers. Layer one rounded tablespoon of pudding on top of the wafers, top with additional banana slices and wafers. Pipe or dollop whipped cream on top and garnish each bag with a maraschino cherry. Serve immediately or refrigerate for 1-2 hours so the wafers become soft. Place a disposable spoon in each bag before serving.