It wasn’t too long ago that Jennifer Lopez made waves at Elle’s Women in Hollywood event with her daring and avant-garde outfit, making a bold statement on the red carpet.
Her look, a striking blend of elegance and edginess, captured attention and sparked intense conversations.
Lopez donned a unique shiny silver-blue chest plate crafted by Grace Ling, an artist from Singapore renowned for her fusion of fashion and 3D technology to produce sustainable designs
The piece, tailored to fit Lopez’s chest, shoulders, and upper body, accentuated her sculpted abs from the front while featuring an entirely open back. Paired with a sleek, form-fitting black skirt, the ensemble highlighted Lopez’s timeless hourglass figure.
Credit: Charley Gallay / Getty.
The eye-catching breastplate trend has been embraced by celebrities like Zendaya and Rihanna because, beyond offering coverage, this style embodies a contemporary interpretation of feminine grace and empowerment.
Accepting her fifth Elle’s Icon Award, Lopez reflected on her journey, remarking: “Of all the things I thought I would grow up to be when I was a little girl, the last thing on my list was icon.”
Seizing the moment, Lopez championed the breaking of boundaries and the celebration of women’s resilience in Hollywood, stating (per Marie Claire): “The things that women are usually criticized for and kept out of rooms for, things like changing our minds, things like being emotional, and having our attention in several different places at once, are actually our superpowers and the essence of who we are. That is what it is to actually be a woman.”
While Lopez’s outfit garnered widespread admiration for its boldness, it also faced criticism from some quarters. Fashion, being subjective, elicited varied opinions, with not everyone admiring the intricate elements of her look.
Credit: Matt Winkelmeyer / Getty.
“This dress is horrible!!! Sorry Jen, I’m sincere,” one person wrote.
Another added: “She is a beautiful woman, but at 50 something — don’t think she needs to dress like a 20 yr old. Uncool.”
A further comment read: “Horrible, horrible top! Have more respect for yourself. We all know you have a wonderful body — now show us some class in the old Hollywood style with your clothes.
What did you think of this look? Let us know in the comments!
A Brazilian couple has spent the last 20 years transforming a barren ranch into a lush paradise for animals. Sebastião Salgado, a renowned photographer, and his wife Lélia Deluiz Wanick Salgado bought the land in 1994 and were shocked by the devastation caused by deforestation and commercial farming.
Determined to make a change, the couple set out to replant the land with native species of trees and vegetation, and over the years, their hard work has paid off. The once-barren landscape is now teeming with life, with over 2 million trees planted and thousands of animals returning to the area.
The couple’s project, known as Instituto Terra, has not only helped restore the local ecosystem but has also had a positive impact on the climate, with the regenerated forest acting as a carbon sink. In addition, the reforestation has created job opportunities for local communities and has provided a model for sustainable development.
The Salgados’ work has received international recognition, with Sebastião receiving the prestigious Prince of Asturias Award in 1998 and the Right Livelihood Award in 2019. Their story has inspired people around the world to take action to protect the environment and work towards a sustainable future.
The couple’s dedication to restoring the land is a testament to the power of human ingenuity and determination. Through their work, they have shown that even the most devastated landscapes can be transformed into thriving ecosystems with the right tools and commitment.
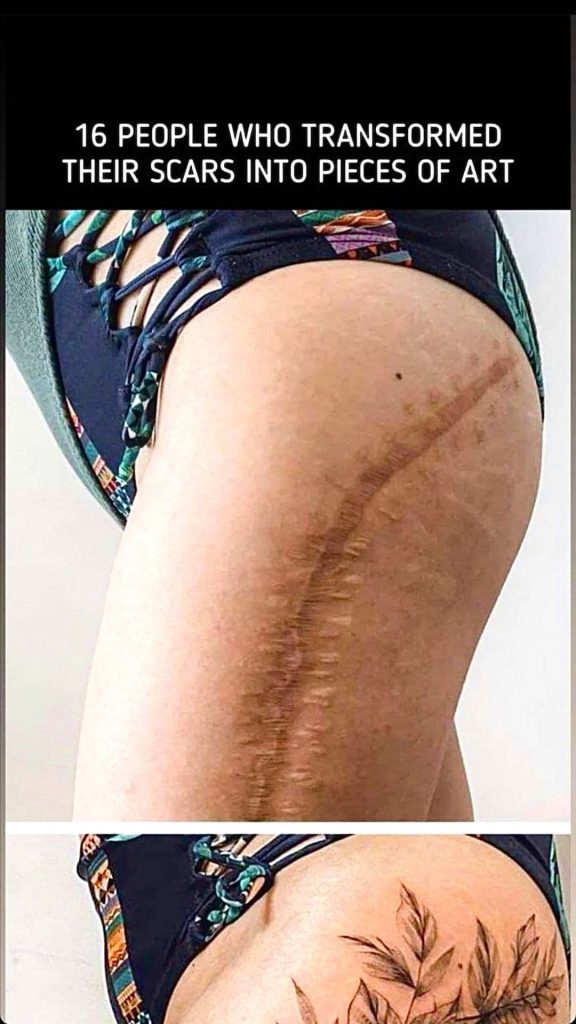
Some tattoos are more special than others. Scar tattoos are one such example as they represent healing, acceptance, and resilience. We all weather difficult situations in our lives and for many, that involves needing surgery to address a health issue. For others, scars from self-harm or even an attempt at taking their own life are lasting reminders of pain that has been overcome.
Scar tattoos serve as reminders of endurance and overcoming those tough times. They turn the pain that exists or existed near the scar into a beautiful work of art and statement of strength, grit, and determination. We wanted to get a better idea of the possibilities and limitations of scar tattoos or scar cover-up tattoos so we turned to social media to discover the latest and most dramatic designs. Now, we would like to share them with you. You are going to love the way these artists have transformed scars into gorgeous tattoos.
Modest Koi Cover-Up
Instagram
Let’s kick things off with a modest scar tattoo in the shape of a koi fish to help cover the unique shape of the scar. In the photo to the left, you can see that the scar is nearly impossible to see. For some, complete coverage is the goal, and for others, they want the scar to peek through. There’s no right or wrong way!
Straight Down the Line
Instagram
Here’s a rather long scar that starts at the upper thigh and extends down to the knee. A stylish Mandala-inspired design cleverly covers most of the scar. We love the bejeweled look of the decorative lotus at the top and the lightness of the feathers below.
Floral for the Win
Instagram
For deeper scars, scar tattoos that have elements that seem to dip in are a smart idea. In this example, we see the center of the flowers placed right into those deeper intentions on the skin, giving the tattoo a 3D feel.
Really, They Do the Work
Instagram
Florals are the name of the game when it comes to scar tattoos. They provide the most excellent coverage while also symbolizing life, growth, and inner beauty. For this large leg scar, the tattoo artist has used delicate lines to bring it to life.
Draped Over the Shoulder
Instagram
There’s a scar right beneath this person’s collar bone and the cascading florals create the perfect shape to mask it. Find yourself an artist with experience with scar tattoos and you could walk away with a piece that really camouflages the existing mark.
Feathers and Flowers
Instagram
In addition to flowers, feathers are also great candidates for scar tattoos. Anything with an organic shape that can be manipulated for more coverage is going to be your friend. We like the addition of white ink highlights to help brighten up this wrist tattoo.
A Positive Message
Instagram
“Love yourself,” this scar tattoo says to the left of a flower that is covering up a mark on the shoulder. We can think of no better excuse to get a positive affirmation than a scar tattoo. Messages of love, strength, and enduring are all welcome here.
Sweet Cherry Blossoms
Instagram
Cherry blossoms are mildly popular among scar tattoos (we will show you another example as this list continues). Take a look at how the artist has created a branch in the exact shape of the scar. It looks natural and organic and you would never know a scar was beneath it.
Floral Camo
Instagram
Where did it go? Placement is a huge deal when it comes to scar tattoos. It’s often a better idea to have a tattoo that extends beyond just the scar to help hide it (if that’s the goal). The artist who completed this design understood this by creating a tattoo that starts further to the left of the scar and that falls down a few inches beyond it as well.
Butterflies
Instagram
Here is a scar tattoo from France. We find scarring on the hip and thigh here that is perfectly covered by some beautifully colored butterflies. While black and grey ink are the standards for scar tattoos, they are not the only way to go. We encourage you to explore color options with your tattoo artist if you’re not married to the idea of just black ink.
Breathtaking Coverage
Instagram
We find a good deal of scarring on the abdomen in the above example but the scar tattoo turns it into a masterpiece. We find robust blooms, decorative elements, and even birds. They all look so natural even though we know each one was intentionally placed for coverage.
A Little Can Go a Long Way
Instagram
For small scars, you do not need to go huge to cover those little babies up. Small scar tattoos can get the job done without much commitment. You would never know these little, circular scars were there, would you?
With Tribute
Instagram
As promised, here’s another scar tattoo that uses cherry blossoms for coverage. What makes this one stand out to us is the addition of “Momma” among those flowers. The person who shared the image offered no explanation but we feel it’s likely that this could be a memorial tattoo that is related in some way to the scar.
Clever Shapes
Instagram
As we mentioned, placement is a big deal for scar tattoos. This artist understood the assignment and created a bird in a shape that mirrors that of the scar. The flowers follow that same C-shape making the scar all but disappear.
RELATED: Mind-Blowing Tattoo Cover-Ups You Need to See to Believe
A Big Bloom
Instagram
We must tell you that any tattoo is painful in the armpit. This person was a real trooper by getting this very bold flower design there. Like, this is some serious dedication. We think the end result is stunning and we hope it was well worth it for this individual who took a risk that really delivers.
Warm It Up
Instagram
There are two sorts of techniques that tattoo artists use for scar tattoos. One is to use delicate lines to disguise a scar underneath. Another way to go is to crank it up with bold, dark, colors that can perform the same take. These moody black flowers sure are handsome.
So Subtle
Instagram
We find the texture inside the botanical elements of this scar tattoo really covering the thin, long scars beneath. Bold black lines paired with those minute details really make this design dynamic.
Are you tired of the same old lasagna recipes? Looking to spice up your dinner routine with something truly indulgent and satisfying? Look no further than Chicken Alfredo Lasagna! This mouthwatering dish combines the classic flavors of lasagna with creamy Alfredo sauce and tender chicken for a meal that’s sure to become a family favorite. In this article, we’ll explore why Chicken Alfredo Lasagna deserves a spot in your recipe rotation and how to make it perfectly every time.
Ingredients:
Ingredient
Quantity
Lasagna noodles
10 noodles
Cooked chicken
3 cups
Ricotta cheese
16 ounces
Salt
1 teaspoon
Italian seasoning
1 teaspoon
Onion powder
½ teaspoon
Garlic powder
½ teaspoon
Alfredo sauce, chilled
1.5 cups
Mozzarella cheese
2 cups
Parmesan cheese
1 cup
Instructions:
Follow these step-by-step instructions to assemble your Chicken Alfredo Lasagna:
Preheat Oven: Begin by preheating your oven to 350°F (175°C). Grease a 9×13-inch baking dish with cooking spray or butter to prevent the lasagna from sticking.
Cook Lasagna Noodles: Cook the lasagna noodles according to package instructions until al dente. Once cooked, drain them and set aside.
Prepare Chicken Mixture: In a mixing bowl, combine the cooked and chopped chicken with ricotta cheese, salt, Italian seasoning, onion powder, and garlic powder. Mix well to ensure the seasonings are evenly distributed.
Assemble Layers: Spread a thin layer of Alfredo sauce on the bottom of the prepared baking dish. Place a layer of cooked lasagna noodles on top, followed by a layer of the chicken mixture. Repeat this layering process until all ingredients are used, finishing with a layer of Alfredo sauce on top.
Top with Cheese: Sprinkle mozzarella cheese and Parmesan cheese evenly over the top layer of Alfredo sauce. This cheesy topping will melt and bubble in the oven, creating a deliciously golden crust.
Bake: Cover the baking dish with aluminum foil and bake in the preheated oven for 30 minutes. Afterward, remove the foil and bake for an additional 10-15 minutes, or until the cheese is melted and bubbly.
Serve: Once baked, remove the Chicken Alfredo Lasagna from the oven and let it cool for a few minutes before slicing. Garnish with fresh parsley, if desired, and serve hot.
Form the meat into 3 flattened patties with roughly the same shape as your bread slices.
Season the meat on both sides with the onion powder, garlic powder and salt and pepper to taste.
Cook the patties over medium high heat on the stove until cooked through. Remove from the pan.
While the meat is cooking, mix together the ingredients for the sauce until well incorporated.
Wipe the skillet used to cook the meat clean and reduce the heat to medium.
Butter one side of each piece of bread well.
Place three pieces of bread buttered side down in the skillet.
Top each slice of bread with 2 slices of provolone cheese, a meat patty and 2 slices of cheddar cheese.
Put a little bit of the sauce on the non-buttered side of the remaining slices of bread, and place them sauce side down on top of the patty melts in the skillet.
Flip the patty melts over once the provolone has melted and the one side of the bread is well toasted.
Toast the other side of the bread well, and then serve.
Indulge in the delectable delight of Crispy Hashbrown Sausage Bites, a savory treat bursting with flavor and texture.
Mouthwatering Sausage and Hashbrown Fusion
Experience the perfect marriage of savory sausage and crispy hashbrowns with these delightful bites. Crafted with care and bursting with flavor, these bites are sure to tantalize your taste buds.
Easy Preparation for Any Occasion
Creating these savory sensations is a breeze. Simply mix together the two main ingredients, sausage, and hashbrowns, and bake them until they reach a delectable level of crispiness. Whether you’re hosting a brunch with friends or craving a satisfying breakfast, these bites are the perfect choice.
Versatile and Delicious
These bite-sized wonders are not only delicious but incredibly versatile as well. Whether served as a standalone snack or as part of a larger meal, they never fail to impress. Pair them with your favorite condiments such as ranch dressing, ketchup, or mustard for an added burst of flavor.
Ingredients:
INGREDIENT
QUANTITY
Breakfast sausage
1 pound
Cream cheese (softened)
8 ounces
Chopped onions
1/4 cup
Shredded, frozen hash browns
4 cups
Shredded Cheddar cheese
1 3/4 cups
Instructions:
Preheat the oven to 400 degrees Fahrenheit.
In a large bowl, combine all the ingredients and mix thoroughly.
Form the mixture into balls approximately 1 ½ inches in diameter.
Place the balls on a baking sheet lined with parchment paper.
Bake for 25-27 minutes or until golden brown and crispy.
Whether you’re looking for a satisfying breakfast option or a crowd-pleasing appetizer, these Crispy Hashbrown Sausage Bites are sure to impress. Enjoy the irresistible combination of savory sausage and crispy hashbrowns in every bite!
Chargers, even when not actively charging devices, draw a small amount of electricity. This standby power consumption may seem minimal, but over time, it can accumulate, impacting both energy bills and the environment. To address this, it’s crucial to unplug chargers when not in use, reducing electricity consumption and minimizing the environmental footprint.
1. Overheating: The Silent Culprit – Chargers at Risk
Chargers left plugged in for extended periods face the risk of overheating. The constant heat can lead to the deterioration of internal components like capacitors, ultimately shortening the lifespan of the charger. Regularly inspecting chargers for signs of damage or wear becomes imperative to identify potential overheating risks early on.
2. Risk of Fire: Unveiling the Rare but Serious Consequences
While the risk of fire from continuously plugged-in chargers is rare, it remains a serious concern. Sudden voltage spikes can lead to overheating, causing chargers to smoke or catch fire. Understanding this rare but potential danger emphasizes the importance of preventive measures to mitigate any fire-related risks.
3. Electrical Safety: Protecting Children and Pets from Hazards
For households with young children or pets, a plugged-in charger with a dangling cord poses a significant hazard. The risk of electric shock increases if the cord is tampered with or chewed on. Keeping chargers and their cords out of reach becomes a crucial aspect of ensuring the electrical safety of your home.
4. Preventive Measures: Ensuring Charger Safety – A Simple Guide
To create a safer environment in your home and extend the life of your chargers, adopt these simple preventive measures:
Unplug chargers when not in use: Reduce electricity consumption and minimize standby power draw.
Regularly inspect chargers: Check for any signs of damage or wear that may lead to overheating.
Keep chargers out of reach: Protect children and pets by ensuring chargers and cords are inaccessible.
In the realm of comfort foods, few dishes offer the same satisfaction as savory potato-cheese balls in rich tomato sauce. Combining the creamy goodness of potatoes and cheddar cheese with the tanginess of tomato sauce, this recipe elevates the ordinary into the extraordinary. Whether served as an appetizer, snack, or main course, these delectable balls are sure to palate.
Ingredients:
For the Dough:
Ingredients
Amount
Chicken breasts
Three 900-gram pieces
Onion
One
Fresh parsley
As needed
Green pepper
One
Red pepper
One
Garlic cloves
Three
Ground pepper
To taste
Ground red pepper
To taste
Cumin powder
To taste
Dried mint
To taste
Salt
To taste
Olive oil
One tablespoon
For the Filling:
Ingredients
Amount
Potatoes
Four
Cheddar cheese
Grated
Ground pepper
To taste
Dried mint
To taste
Salt
To taste
For the Sauce:
Ingredients
Amount
Tomato puree
One tablespoon
Water
One 200 ml glass
Extra cheddar cheese
To taste
Instructions:
Prepare the Potatoes:
Peel the potatoes and slice them thinly.
Boil the sliced potatoes in water until they are tender. Drain and set aside to cool.
Prepare the Dough Mixture:
Chop the onion, green and red peppers, garlic cloves, and fresh parsley coarsely.
In a bowl, mix together the chopped vegetables with ground pepper, ground red pepper, cumin powder, dried mint, salt, and olive oil. Set aside.
Prepare the Chicken:
Finely chop the chicken breasts into small pieces.
Mix the chopped chicken with the vegetable mixture prepared earlier. Ensure the chicken is well coated with the spices and olive oil.
Chill the chicken mixture in the refrigerator for at least 30 minutes.
Make the Filling:
Once the potatoes have cooled, mash them in a bowl.
Add grated cheddar cheese to the mashed potatoes and season with ground pepper, dried mint, and salt. Mix well to combine.
Shape the Balls:
Grease your palms lightly with olive oil.
Take a portion of the potato mixture and shape it into a ball.
Flatten the ball slightly and place a small amount of the chicken mixture in the center.
Wrap the potato mixture around the chicken filling and shape into a ball. Repeat this process with the remaining mixture.
Prepare the Sauce:
In a separate bowl, mix together the tomato puree and water to make the sauce.
Bake the Balls:
Preheat the oven to 220°C (425°F).
Place the shaped balls in a baking dish.
Pour the tomato sauce over the balls, ensuring they are well coated.
Bake in the preheated oven for about 40 minutes, or until the balls are brown and crisp on top.
Serve:
Once baked, sprinkle extra grated cheddar cheese over the balls.
Return the baking dish to the oven and bake for an additional 15 minutes, or until the cheese is melted and bubbly.
Serve the savory potato-cheese balls hot, accompanied by a side of your choice.
Welcome to the culinary delight known as Olivier Salad!This classic potato salad, rich with creamy textures and savory ingredients, is a beloved dish around the world. Originating from Russia, it has found its way into countless households, potlucks, and gatherings, pleasing palates with its irresistible taste and simplicity. In this article, we’ll explore the tantalizing recipe for Olivier Salad and uncover the secrets to creating a dish that’s both delicious and satisfying.
Ingredients:
Ingredients
Quantity
Potatoes
2
Egg
1
Sweet Onion, Cubed
1 green
Peas
150 g
Smoked Ham
150 g
Capers Mayonnaise
150 g
Carrots
2
Dill Pickles, Drained & Cubed
3
Instructions:
Prepare the Vegetables:
Peel and chop the ends off the carrots.
Peel and cube the potatoes.
Boil the potatoes and carrots separately until they’re tender.
Hard-boil the egg.
Assemble the Salad:
Once everything is cooked, cut the hard-boiled egg into cubes.
In a large bowl, combine the chopped ham, boiled potatoes, boiled carrots, egg cubes, drained and chopped pickles, and cubed sweet onion.
Add the capers mayonnaise and mix everything together until well combined.
Serve and Enjoy:
Once mixed, your Olivier Salad is ready to be served!
Enjoy the creamy and flavorful combination of ingredients in this delicious potato salad.
Sharing a home with some unwanted guests is a requirement of homeownership. We’re not talking about weird individuals hiding in your crawlspace, so don’t worry. Actually, we’re talking about bothersome insects that you may come across. Let me start by saying that, while I’m sure many of you feel the same way, I personally don’t like sharing my home with earwigs, spiders, or ants.
We are powerless to escape it, nevertheless. At least I hope not, these tiny creatures don’t perceive it as a premeditated house invasion. It’s simply where they belong. Ticks are one insect that I just cannot abide, even if I’ve learned to endure the most of the insects that have taken up residence in my walls.
I’m ready to wager that nobody enjoys ticks. They are genuinely repulsive organisms that spread illness rapidly. Because of this, it’s critical to understand how to spot tick egg clusters and what to do if you discover them in your lawn. Fortunately, we’ve compiled some helpful data to assist in addressing your urgent queries.
How to Spot Tick Eggs
Tick eggs are nearly invisible to the unaided eye due to their tiny size (about 0.5mm in diameter); they are about the size of a poppy seed. They often have an oblong or pear form and seem translucent. Usually, you can find them in groups affixed to foliage, plants, or other surfaces near the ground.
These eggs get smoother and more opaque as they get older. They might be light brown or pale yellow in color, and they have a glossy feel.
How to Proceed If Tick Eggs Are Found
When you discover what appears to be a clutch of tick eggs, panic sets in. Tick eggs are a big problem, though maybe that’s just me. It’s preferable to get rid of the eggs safely because ticks can spread diseases like Lyme disease and Rocky Mountain Spotted Fever.
For accurate identification and advice on what to do next, we strongly advise speaking with a local veterinarian or a professional pest control specialist.
Maintaining a Tick-Free Yard
It’s a fact that nobody likes to discover tick eggs in their backyard or any other yard. Therefore, it’s imperative to take action to reduce the likelihood of their presence.
Being proactive means getting rid of plants that draw deer, since ticks love to feed on them. Hostas, azaleas, and tulips are a few examples of these kinds of plants. Tick deterrent plants and herbs, such as chrysanthemums, mint, and rosemary, can also be planted.
Keeping your yard well-groomed and getting rid of any shrubbery where ticks could hide are also crucial. Moreover, keep wood piles off the ground since ticks prefer damp, dark areas to deposit their eggs.
Tick-free yards can also be achieved by using natural tick repellents and taking precautions to keep small mammals out of your garden, such as mice and rabbits. Insecticides are an option if necessary, but always use caution to save the habitat.
Were you aware about tick eggs? If you think your family and friends could benefit from this information, please share it with them.

 Credit: Charley Gallay / Getty.
 Credit: Matt Winkelmeyer / Getty.