Category Archives: Recipes

Don’t throw away the detergent caps, they could be worth gold reused this way

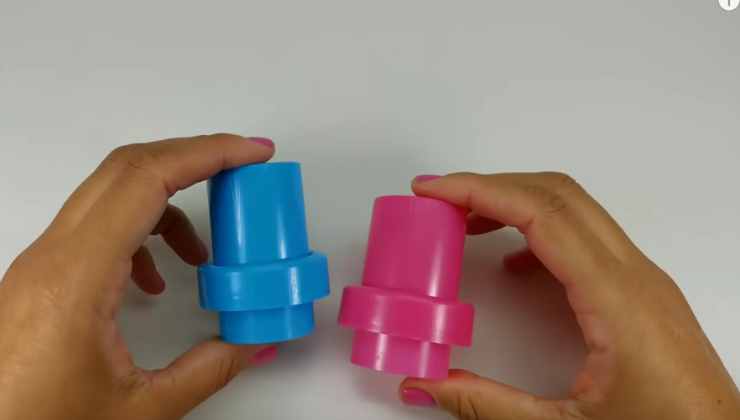
Don’t underestimate the potential of detergent caps; they hold the key to a world of creative possibilities that go beyond the trash bin. Discover innovative and practical ways to give these caps a second life, making them as valuable as gold in your crafting endeavors.

The Art of Creative Recycling

Reusing detergent caps isn’t just about reducing waste; it’s an art form that breathes new life into discarded materials. Engaging in this creative upcycling can be a rewarding family activity, instilling the values of recycling and sustainability in the younger generation.

Crafting Functional Desk Accessories

Vibrant Pen Holder

Transform a collection of detergent caps into a lively and robust pen holder. After a thorough wash and drying, skillfully attach them to form a colorful structure that adds flair to any workspace, be it a professional office or a child’s study area.

Cardboard Organizers

Turn kitchen paper rolls into practical storage solutions by cutting them into varying lengths, sealing one end, and painting them with acrylics or watercolors. Add a personal touch with stickers, sparkles, or sequins, creating versatile organizers for keys, coins, or small trinkets.

Toys for Tots: Detergent Cap Puppets

Unleash your creativity by transforming detergent caps into delightful DIY toys for children. Paint the caps with watercolors, craft expressive faces with eyes, noses, and mouths, and attach trimmed kitchen paper rolls as legs. Complete the ensemble with a bowtie and use a fabric softener cap as a charming hat. The result? Adorable puppets that are sure to captivate any child.

Environmental Responsibility: The Upcycling Philosophy

Beyond mere arts and crafts, creative upcycling is a philosophy that rejuvenates discarded items, pushing the boundaries of imagination and innovation. Whether crafting desk accessories or whimsical toys, the possibilities are endless with a touch of creativity.

Engaging in such projects isn’t just about personal satisfaction; it’s a meaningful family bonding experience. It nurtures creativity and imparts the significance of recycling and sustainable living to young minds. So, the next time you contemplate discarding a detergent cap, think again—it might be the beginning of your next extraordinary craft project!

Turkish Bread

Ingredients:

• 4 cups all-purpose flour

• 1 tablespoon sugar

• 1 tablespoon salt

• 2 teaspoons active dry yeast

• 1 ½ cups warm water

• 3 tablespoons olive oil

• 1 egg yolk (for brushing)

• Sesame seeds (optional)

Directions:

1. In a bowl, combine warm water, sugar, and active dry yeast. Let it sit for 5-10 minutes until it becomes frothy.

2. In a large mixing bowl, combine the flour and salt. Gradually add the yeast mixture and olive oil. Mix until it forms a dough.

3. Knead the dough on a floured surface for about 10 minutes until it becomes smooth and elastic.

4. Place the dough in a lightly oiled bowl, cover it with a damp cloth, and let it rise for 1-2 hours or until it has doubled in size.

5. Preheat your oven to 450°F (230°C) and place a pizza stone or an inverted baking sheet in the oven to heat.

6. Punch down the risen dough and divide it into two equal portions. Shape each portion into a round or oval flatbread.

7. Brush the top of each flatbread with egg yolk and sprinkle with sesame seeds if desired.

8. Carefully transfer the flatbreads onto the hot pizza stone or baking sheet in the oven.

9. Bake for 15-20 minutes or until the bread is golden brown and sounds hollow when tapped on the bottom.

10. Remove from the oven, let it cool for a few minutes, and serve your homemade Turkish bread warm.

Prep Time: 15 minutes + rising time | Cooking Time: 15-20 minutes | Total Time: 2-3 hours

Calories: Varies based on serving size | Servings: 2 loaves

Enjoy

Strawberry Cheesecake Cones

Ingredients :
Waffle cones
Fresh strawberries
Coolwhip 8 oz.

For the crumbs:
Crushed golden oreos
Butter
Strawberry jello 3 oz.

For the filling:
16 ounces cream cheese (softened)
½ cup granulated sugar
2 tablespoons all-purpose flour
1 teaspoon vanilla extract
Cool whip 8 oz
For the glaze:
1 1/2 cups powdered sugar
3-5 tablespoons heavy cream
1/2 teaspoon vanilla extract

Directions :
Step 1: Crush 16 -18 oreos and add 3-4 oz of butter. Bake for 5 minutes. Remove from heat. , crumbs should now be slightly pasty in consistency. Add 3 oz of strawberry jello to the paste and coat the waffle cones.

Step 2: In a large bowl using a hand mixer cream the cream cheese for 3-4 minutes until there are no lumps and it is completely smooth. Be sure to scrape the bowl at least 2 times during this time.

Step 3: Add in the sugar and flour and mix well until combined and fluffy. Scrape the sides and bottom of the bowl. Add in vanilla extract and Cool Whip and mix well until it’s nice and fluffy.

Step 4: Bake cones for 5 minutes. Remove from oven and allow to cool. Fill each cone with the cream cheese filling. Top each cone with chopped up fresh strawberries.

Step 5: Place the powdered sugar in a medium-size bowl.

Step 6: Add the heavy cream a tablespoon at a time until you reach the consistency you’d like your icing or drizzle to be. Add the vanilla extract, mix well and immediately drizzle over cones.

Enjoy!!!

Put a Sheet of Aluminum Foil in Boiling Water, Even Wealthy People Do This: The Reason

A straightforward household hack involving a sheet of aluminum foil proves to be a remarkable solution for revitalizing old cutlery. In the aftermath of a meal, the immediate washing of dishes is often preferable to avoid a daunting pile in the sink.

While dishwasher owners may escape this chore, those relying on hand washing, for various reasons, encounter the challenge of restoring old and seemingly irreversibly tarnished cutlery.

In response to this common woe, an ingenious method emerges, utilizing the transformative power of aluminum foil. The process begins by heating water in a pot, to which a spoon of sodium bicarbonate and half a spoon of sugar are added.

Once the mixture reaches a boil, a sheet of aluminum foil is cut in half, creating four equal parts. Each segment is then rolled into a ball, and these aluminum balls are introduced into the boiling pot.

Surprisingly, this method proves ideal for rejuvenating old cutlery. Spoons, forks, and knives that have lost their original luster are immersed in the pot for a mere ten minutes.

Following this brief treatment, the cutlery is removed, washed with water and soap, completing the revitalization process. The result is astonishing – the once-dull cutlery now shines brightly, almost as if brand new.

This cost-effective solution, utilizing the potential of aluminum foil and the cleansing properties of sodium bicarbonate, stands as an extraordinary alternative to discarding old cutlery and purchasing replacements.

By employing this simple yet effective method, individuals can breathe new life into their kitchen essentials, saving both money and resources. The brilliance and clarity reminiscent of the cutlery’s original state are restored through this ingenious combination of everyday items.

Mexican Chicken Casserole

Ingredients:

1/2 onion sliced
1 can diced green chilis
1.5 lb frozen, sliced, seasoned chicken breast
1/4 cup cream cheese
1 cup milk
1 cup chicken broth
1/4 cup green salsa
1 cup shredded Monterey jack cheese
8 flour tortillas
1 cup shredded cheddar or Monterey jack

Directions:

In a large skillet, cook onions and green chilis until tender. Add the chicken and heat through. Add milk, chicken broth, green salsa, cream cheese and first helping of cheese. Stir and cook until slightly thickened and all cheese is melted, which is about 10 minutes. Turn off and let sit while you prepare the dish. In a 2 quart baking dish, sprayed with Pam, lay out 4 tortillas. After the mixture has sat for about 10 minutes, spoon half of the mixture in dish and layer with the other 4 tortillas. Pour remaining mixture on and top with the rest of the cheese. Cook at 350 until browned and bubbly.

Enjoy

Don’t throw away tuna tins, they’re worth gold at home how to reuse them

Are you one of the millions who regularly enjoy the convenience and health benefits of canned tuna, packed with Omega-3 fatty acids? If so, you’re likely familiar with the routine of discarding the empty cans. But wait, there’s more to these cans than meets the eye!

Unlocking the Potential of Empty Tuna Cans

Empty tuna cans are not just trash; they’re hidden treasures waiting to be rediscovered and repurposed. Here’s how you can turn these everyday items into useful and decorative pieces for your home.

1. Trendy Plant Pots

Transform your empty tuna cans into chic plant pots. All you need are some clothespins and your favorite small plants, like succulents or mini cacti. Attach the clothespins around the can for a unique and eye-catching look. It’s an effortless way to add a touch of greenery to your space.

2. Charming Candle Holders

Create ambient lighting with tuna can candle holders. The process is similar to making plant pots. Simply place clothespins inside the can and insert a candle within a glass holder to prevent damage. These candle holders will bring a warm, cozy vibe to any room.

3. Innovative Kitchen Molds

In the kitchen, tuna cans find new life as molds for single-serving dishes or delightful desserts. Thoroughly cleaned and with the labels removed, they’re perfect for shaping everything from miniature stews to sweet treats. They even double as quirky pudding molds!

4. Fun and Educational Crafts for Kids

Get creative with your kids by using tuna cans for crafting. One idea is making a whimsical rattle to hang on a crib or door. Decorate the cans, make holes, thread them with hemp or sturdy rope, and let the gentle clinking sounds charm your little ones.

5. DIY Wall Clocks

For the crafty and adventurous, turn tuna cans into a unique wall clock. With a clock mechanism and some drilling, you can fashion a timepiece that’s both functional and a conversation starter.

Spicy Southern Chicken Spaghetti

Ingredients

1 lb pasta – cooked

1 lb chicken tenders

2 TBS butter

12-16 oz Velveeta (plus extra if you want to add more when you reheat it – see above notes – or if you like a wetter dish use the full 16oz.  Go less for a mac-n-cheese texture – more for an Alfredo kinda thing.)

1 cup milk

1 10 oz can Rotel (tomatoes & chilies)

1 10 oz can cream of chicken soup (or cream of mushroom or cream of celery)

1/2 tsp cumin

2 TBS sriracha or other hot sauce

1 cup Panko or other bread crumbs

1 cup grated cheese (I used a cheddar & mozzarella mix)

S&P to taste

Parsley and/or crushed red pepper as garnish

How to make it :

Cook & drain the pasta.

Spray a grill or frying pan with cooking spray & cook the chicken tenders & then cut them up.

Melt the butter in a deep stock pot sprayed with cooking spray, too.  The cooking spray seemed to make the inevitable browned/burned bits of cheese easier to clean off later.  Add the Velveeta, Rotel, soup, milk, hot sauce & cumin & melt it all together over med-high heat.  Add the chicken.  Toss it with the pasta.  I added about 1 TBS of black pepper here.  You add S&P to taste.

Spray a casserole dish with cooking spray & put the chicken spaghetti in it.  Top with grated cheese & bread crumbs.

Cook at 350 for about 30 minutes or until the cheese is bubbling & the bread crumbs brown a bit.

Garnish with parsley or crushed red pepper or more hot sauce.  Eat it up & promise to join a gym after the new year. Melt some more Velveeta in a pan with a bit of milk.  Reheat the leftover chicken spaghetti & toss it with the additional melted cheese.  Shove it your face.  Have some Fireball whiskey, too.

Enjoy

An Easy Homemade Bread Recipe — Just Five Ingredients

Ingredients:
2 Cups of Warm Water
2/3 Cup Honey
1 3/4 Tablespoons Active Dry Yeast
1 1/2 Teaspoons Salt
6 Cups Bread Flour

Directions:
*In a large mixing bowl, whisk together warm water and honey until honey is dissolved. Add yeast, and cover with a towel.
*In about 10-20 minutes, your mixture should look delightfully frothy.
*Mix in your salt, and then add the bread flour one cup at a time. (Use the whisk for the first three cups and then switch to a wooden spoon or silicone spatula for the last three cups.)
*Add a little extra flour to your hands and knead the dough, about 5 minutes. (Knead the dough right in the large mixing bowl. It keeps your counter cleaner.) Place kneaded dough in a large, greased bowl and cover with towel.
*After an hour, your dough should have risen significantly.
*Punch the dough for awhile then knead again for a couple of minutes. *Divide into two lightly-greased loaf pans and cover with your towel once more.
*After allowing the dough to rise for 30 minutes in the loaf pans, bake in a preheated oven at 325 for 30-35 minutes.
*A lot of bread recipes use an oven at 350, 325 works better if you use honey.

Enjoy

Chicken Roll Ups

These stuffed chicken breasts will add a touch of elegance to your meals.

* Ingredients:

° 4 chicken cutlets

° 2 onions

° 50 g of flaked almonds

° 400 g fresh spinach

° Pepper

° Salt

° Olive oil

* Preparation:

Brown the sliced onions in a little oil, add the rinsed and drained spinach.

Let melt for a few minutes, then add the almonds.

To put out the fire.

Place the chicken cutlets flat on the work surface (very clean!).

If necessary cut them lightly to obtain a regular surface.

Organize  spinach blending on top.

Roll the cutlets tightly, and hold the rolls so formed with string.

It is normal for the spinach juice to come out of the roll a little.

Brown the rolls for a few minutes in the spinach pan, then finish cooking for 10 minutes in the oven at 180 ° C

ENJOY !!

Bourbon Chicken

Named Bourbon Chicken because it was supposedly created by a Chinese cook who worked in a restaurant on Bourbon Street.

INGREDIENTS
2 lbs boneless chicken breasts, cut into bite-size pieces
1 -2 tablespoon olive oil…
1 garlic clove, crushed
1⁄4 teaspoon ginger
3⁄4 teaspoon crushed red pepper flakes
1⁄4 cup apple juice
1⁄3 cup light brown sugar
2 tablespoons ketchup
1 tablespoon cider vinegar
1⁄2 cup water
1⁄3 cup soy sauce


DIRECTIONS
Heat oil in a large skillet.
Add chicken pieces and cook until lightly browned.
Remove chicken.
Add remaining ingredients, heating over medium Heat until well mixed and dissolved.
Add chicken and bring to a hard boil.
Reduce heat and simmer for 20 minutes.
Serve over hot rice.

ENJOY.