INGREDIENTS: 1 head cabbage, chopped 4 ribs celery, chopped 5 large onions, chopped 1 large green bell pepper, chopped 1 clove garlic, chopped 1 (14.5 oz) can stewed tomatoes 1 (1 oz) envelope onion soup mix 1 (46 oz) can vegetable juice
DIRECTIONS: Combine all ingredients in a large soup pot. Bring to a simmer; simmer 1 hour or until vegetables are tender. Makes 15 (1 Cup Servings) Nutritional Info Per Serving: Calories: 60; Sat. Fat: 0 g; Carbs: 14 g; Fiber: 3 g; Sugars: 8 g; Protein: 2 g 3 SmartPoints Per Serving
Scrambled, hard-boiled, boiled or boiled, eggs are part of our diet and are very popular with young and old for their pleasant taste.
Some health benefits of eggs:
Rich in nutrients: Containing significant amounts of proteins, vitamins (A, B2, B6, B12, D, E), minerals (zinc, phosphorus, selenium, iron, magnesium, etc.) and fatty acids, eggs represent an important source of nutrients for the body, which helps to ensure the proper functioning of its organs and various tissues.
High choline content Choline is an essential nutrient, considered to be part of the B-complex vitamins. Main constituent of acetylcholine, a neurotransmitter that plays an important role in the central and autonomic nervous systems, it contributes to the proper development of the brain, to the improved memory and learning. It is also beneficial for pregnant women, given its ability to reduce the risk of malformation in the fetus.
Choline deficiency increases the risk of anencephaly and spina bifida 2.4 times, according to a Stanford University study.
Good for the eyes Lutein and Zeaxanthin are powerful antioxidant carotenoids that help reduce the risk of age-related macular degeneration, protect the eyes from the damaging effects of sunlight, and significantly reduce the chances of developing cataracts.
Nourish the muscles When our body lacks protein, it draws it from muscle mass, which melts it. Thanks to their concentration in these nutrients, eggs help prevent this phenomenon, nourish and strengthen the various muscle tissues of the body. Even though egg white is known for its high protein content, egg yolk should not be excluded because it also contains a significant amount of it
Flavorful chunks of Italian sausage are combined with diced tomatoes, garlic, oregano, basil, lots of red and green bell pepper and onion for an easy weeknight meal.
Ingredients 2 tablespoons Vegetable oil 1 package Johnsonville Naturals Mild Italian Sausage 1 green pepper, thinly sliced 1 red pepper, thinly sliced 2 sweet onions, thinly sliced 2 cloves garlic, minced 1 tablespoon tomato paste 1 (14.5-ounce) can diced tomatoes 1/2 teaspoon salt 1/2 teaspoon dried oregano 1/2 teaspoon dried basil 1/4 teaspoon black pepper 1/4 teaspoon red pepper flakes
Instructions Add vegetable oil to a large pan and heat over medium-high heat. Add sausages and cook until browned on all sides. Remove sausage from pan and set aside (Note: You do not need to cook it through at this point.)
Add onion and peppers to grease left in pan and cook over medium heat until softened. Add garlic and cook for 1 minute. Slice sausage into 1 to 1 1/2-inch pieces. Return sausage to pan along with all other ingredients.
Cook for 5 to 10 minutes, until sausage is cooked through and sauce is thickened. Serve on hoagie rolls if desired.
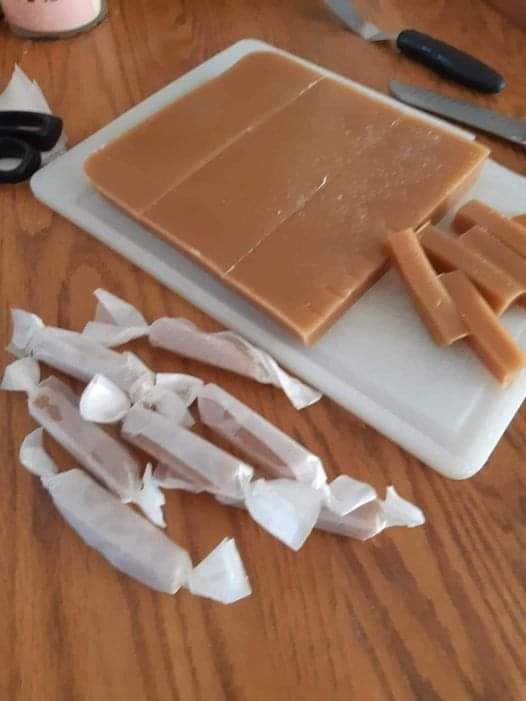
In the world of delectable treats, there are few things as indulgent as caramels. Those chewy, rich, and sweet bites that can transport you to a world of culinary bliss. But what if we told you that you could make your own batch of mouthwatering caramels in just six minutes? Yes, you read that right! In this article, we’re going to delve into the magical realm of Six Minute Caramels.
Ingredients:
Before we embark on this delightful caramel-making journey, let’s gather our ingredients.
INGREDIENTS
1/4 cup butter
1/2 cup white sugar
1/2 cup brown sugar
1/2 cup light Karo syrup
1/2 cup sweetened condensed milk
These simple ingredients are the building blocks of our sweet creation. Now, let’s move on to the step-by-step instructions for crafting your very own Six Minute Caramels.
Instructions:
Gather Your ArsenalBefore you start, ensure you have all your ingredients and equipment ready. A suitable cooking vessel, a wooden spoon for stirring, and a dish lightly greased to prevent sticking are essential.
Mix It UpBegin by combining all the ingredients – butter, white sugar, brown sugar, light Karo syrup, and sweetened condensed milk – in your cooking vessel.
Heat and StirPlace the vessel on medium heat and start the timer. You’ll want to cook the mixture for six minutes in total. But here’s the trick: stir it at two-minute intervals. This stirring ensures a smooth consistency and prevents any burning.
Golden Brown PerfectionAs you continue to stir, watch as the mixture transforms into a beautiful golden brown caramel. It’s a sight to behold and a scent that will make your mouth water.
Pour and CoolOnce the six minutes are up, pour the caramel blend into your pre-greased dish. Be careful; it’s hot! Now, the waiting game begins. Allow it to cool down to room temperature.
Shape and StoreFinally, the moment you’ve been waiting for! Cut the solidified caramel into your desired shapes. Wrap each piece individually in wax paper to maintain its freshness, and store them in an airtight container.
Add 4 tablespoons of olive oil to pan and cook sliced potatoes until tender. Remove from oil and add minced garlic to remaining oil and allow to infuse then add thinly sliced steak (cook until all the juice is released from meat and remove meat from pan. Add 1 tablespoon olive oil and add sliced onions and Serrano peppers until onion is translucent then add in sliced tomatoes (cook for about 1 min). Add tomato sauce and 2 bay leaves and allow to bubble. Add steak and potatoes and give it a good stir. Cover and let cook on low heat for 10 min.
Bake one of our moist and fruity apple cakes for afternoon tea. Choose from rustic country apple traybakes, toffee apple squares, loaf cakes and more.
Apples have always been the undisputed stars of the homemade dessert, including our very own apple cake:
Tasty, soft, and full of flavor, it really is the ultimate comfort food! After all, anyone who has tried one knows just how comforting a homemade apple cake can be, with its simple sweetness, soft texture, and unmistakable aroma; timeless flavors that conjure up memories of time spent with family, each with its own recipe to be closely guarded like the most precious of treasure.
This recipe is for our own version of apple cake, perfect for an indulgent and mouth-watering treat to be shared with loved ones, though there are many variations of this dessert, from one with sliced apples to a light version, without butter or with mascarpone cheese!
For the caramel: 100g (1/2 cup) sugar 3 tbsp water
Directions In the pan add sugar and water, cook on medium heat until turns into caramel, and top apples with prepared caramel. In another pan cook butter for 6 minutes on medium heat, mix with honey, buttermilk, eggs, sugar, and vanilla extract, sift in the flour, baking powder, cinnamon, and nutmeg, and add in salt. Pour onto the apples and caramel. Bake at 170°C (340°F) for 1 hour. Let it cool for 15 minutes and serve.
I wanted to create an epic side dish for a Game Day Party. I combined the elements of a casserole and a dip together to create this Jalapeno Popper Casserole Recipe. There are many reasons why you might love Jalapeno Popper Chicken Casserole from Pioneer Woman:
Flavorful and spicy: The jalapeno peppers and cream cheese give this casserole a spicy and creamy flavor that is sure to be a hit with anyone who enjoys spicy food. Easy to make: This casserole is easy to make and requires minimal prep time. Simply mix the ingredients together and bake for a delicious and satisfying meal. Versatile: Jalapeno Popper Chicken Casserole is a versatile dish that can be served as a main course or as a side dish. It pairs well with a variety of sides, such as rice, potatoes, or a simple salad. Great for leftovers: This casserole tastes even better the next day, making it a great choice for leftovers. Simply store it in the refrigerator or freezer and reheat it when you’re ready to eat. Perfect for potlucks and parties: Jalapeno Popper Chicken Casserole is a great dish to bring to potlucks or parties because it’s easy to transport and serves a crowd.
Ingredients 2 lb Tater tots 16 oz Cream cheese, softened 2 Chicken breasts, Boneless, skinless, shredded 1 c Sour cream 1 lb Bacon, cooked and crumbled 2 c Mexican blend cheese 6 Green onions , chopped 6 Jalapeno peppers, deseeded and finely chopped
How To Make Jalapeno Popper Casserole Heat the oven to 425 degrees, and grease a 9×13 baking dish well. Layer the tater tots into the bottom of the casserole dish and bake for 15 minutes. In the meantime, cook the bacon until crispy and crumble it. Combine the sour cream, ¾ of the bacon pieces, 1 ½ cups of the cheese, ½ of the green onions and the Jalapeno peppers in a mixing bowl. Stir to mix well. Fold the chicken into the mixture. Spread the mixture over the tater tots, and sprinkle with the remaining cheese, green onions and bacon. Bake for 20 minutes longer.
Dust is a common nuisance that settles on various surfaces, making cleaning a continuous task. Fortunately, there are several simple and effective methods to clear dust from different areas of your home. In this comprehensive guide, we’ll explore 10 expert-recommended dust cleaning methods to help you maintain a clean and comfortable living environment. Say goodbye to dust issues and keep your furniture and surfaces looking pristine.
1. Leather Furniture
Cleaning leather furniture requires special care. To remove dust from leather surfaces, avoid using dry cloths. Instead, use a vacuum cleaner with a crevice tool to clean the crevices and corners of the furniture effectively.
Leather furniture exudes elegance and luxury, but it’s also susceptible to dust accumulation. To keep your leather furniture looking its best, follow these steps:
Grab a clean dryer sheet, preferably unused.
Gently wipe the screen with the dryer sheet to remove dust and smudges.
The anti-static properties of the dryer sheet will help repel future dust buildup.
2. Electronics
Delicate electronic screens and surfaces require gentle cleaning. Use a clean dryer sheet to wipe down screens on devices like computers, phones, tablets, and TVs. This method effectively removes dust without scratching the screens.
Electronics are an integral part of our daily lives, and keeping their screens clean can enhance your viewing experience. Here’s how to do it:
Grab a clean dryer sheet, preferably unused.
Gently wipe the screen with the dryer sheet to remove dust and smudges.
The anti-static properties of the dryer sheet will help repel future dust buildup.
3. Baseboards
Before sweeping or vacuuming the floor, use a clean paintbrush to dust baseboards. This prevents the dust from falling onto the freshly cleaned floor.
Baseboards often go unnoticed during regular cleaning, but they can accumulate a significant amount of dust. Follow these steps to maintain clean baseboards:
Take a clean, dry paintbrush.
Gently brush the paintbrush along the baseboards, collecting dust as you go.
Regularly cleaning baseboards will prevent dust from settling on the floor.
4. Candles
Candles can collect dust over time, making them less appealing and reducing their light’s quality. To clean them, take an old pair of pantyhose, bunch it up, and rub it over the surface of the candle to remove dust and debris.
If you love using candles to create a cozy atmosphere, it’s essential to keep them clean. Here’s how to remove dust from candles effectively:
Take an old pair of pantyhose.
Gently bunch it up to create a textured surface.
Rub the pantyhose over the candle surface to remove dust and debris.
5. Deep Clean Your Broom
After dusting, your broom can become dirty and clogged with dust and debris. Regularly clean your broom to maintain its efficiency and prolong its lifespan.
A clean broom is more effective at dusting and sweeping. Follow these steps to deep clean your broom:
Fill a bucket with warm, soapy water.
Submerge the bristles of the broom in the water.
Use a brush or your hand to remove dust and debris from the bristles.
Rinse the broom thoroughly and let it dry before using it again.
6. Car Vents
Car vents often accumulate dust, which can get blown into the car when the air conditioner is turned on. Use a foam brush to clean the vents and remove dust effectively.
Clean car vents not only improve air quality but also enhance the overall driving experience. Here’s how to clean your car vents:
Get a foam brush or a small, soft brush.
Gently insert the brush into the car vents to remove dust and debris.
You can also use a vacuum cleaner with a small nozzle attachment for a more thorough clean.
7.Light Fixtures
Different types of light fixtures require specific cleaning methods. For chandeliers, hanging or standing light fixtures, use a lamb wool duster. For recessed can lights, use a damp cloth to dust the fixtures.
Clean light fixtures provide better illumination and add to the aesthetic appeal of your space. Here’s how to clean different types of light fixtures:
For chandeliers and hanging light fixtures, use a lamb wool duster with an extendable handle for high places.
For standing light fixtures, you can use the same lamb wool duster or a damp cloth to wipe them clean.
Recessed can lights can be cleaned using a damp cloth to avoid disrupting the wiring.
8. Wood Furniture
Wood furniture can be easily cleaned using various materials. Old T-shirts, lamb wool dusters, feather dusters, or dust cloths can all effectively remove dust from wood surfaces. Dampen the cloth slightly if there is a lot of dust to avoid scattering it.
Wood furniture adds a warm and inviting touch to your home. Here’s how to maintain the cleanliness of your wooden pieces:
Choose a soft cloth or duster suitable for wood surfaces.
Gently wipe the furniture to remove dust.
If there’s a substantial amount of dust, dampen the cloth slightly and wipe again.
9.Clean Dust and Gunk from the Windshield
The interior of your car’s windshield can accumulate dust, smoking residue, oils, and other debris. Regularly clean the interior windshield to ensure clear visibility. Use appropriate glass cleaners and microfiber cloths to achieve a streak-free result.
A clean car windshield is crucial for safe driving. Follow these steps to clean your car’s interior windshield:
Use a quality glass cleaner that’s safe for automotive use.
Spray the cleaner onto the interior windshield.
Wipe the windshield using a microfiber cloth, ensuring there are no streaks or smudges.
Make sure to clean the entire windshield, including the edges and corners.
10. Maintain Air Quality
Preventing excessive dust buildup starts with maintaining good air quality. Use high-quality air filters in your HVAC system and consider using air purifiers to reduce dust particles in your home.
Maintaining good air quality is essential for your health and comfort. Here’s how to achieve it:
Use high-quality air filters in your HVAC system and change them regularly.
Consider using air purifiers with HEPA filters to reduce airborne dust particles.
Keep your living space well-ventilated to allow for better air circulation.
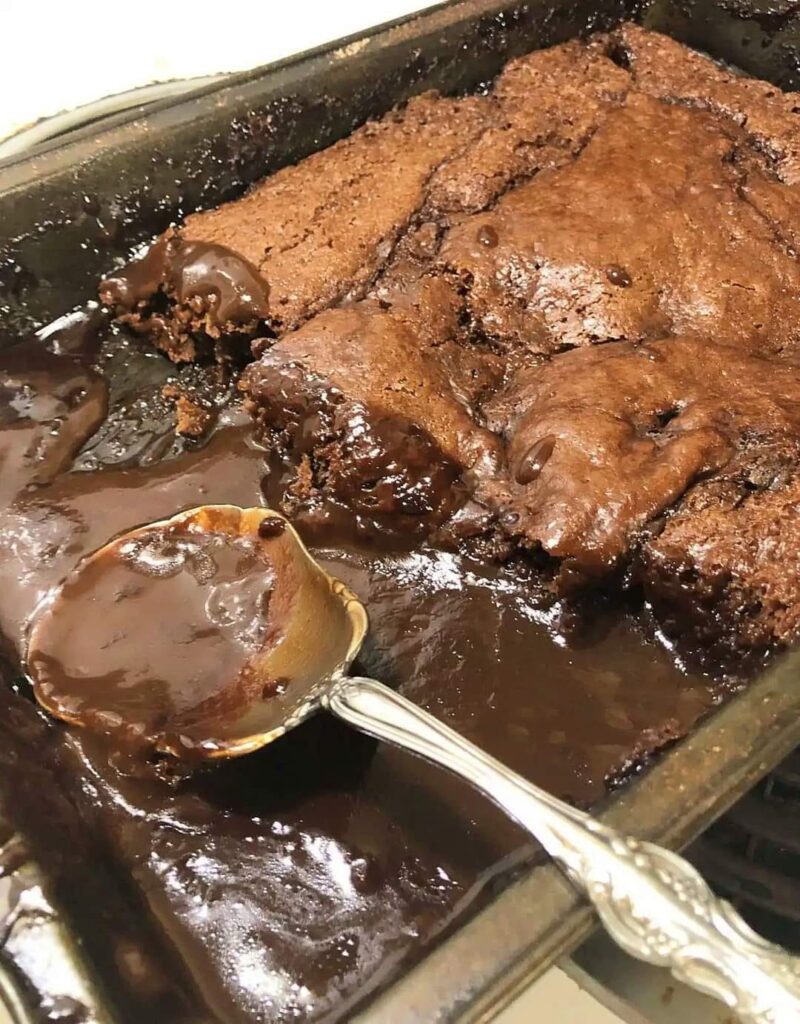
This old-time chocolate cobbler is rich and wonderful! It’s great for potlucks and get-togethers. It’s fast, easy, and always a hit.
Rich, hot, gooey, fluffy chocolatey goodness is how I’d describe old-fashioned chocolate cobbler.
If you love molten lava cakes, then you are going to flip your wig over chocolate cobbler! Not only is it pretty much fail-proof, but it’s casual enough to serve after a weekday dinner and decadent enough for special occasions.
Ingredients
For the batter: 1/2 cup unsalted butter 1 1/2 cups granulated sugar 4 tablespoons unsweetened cocoa powder 2 cups all-purpose flour 2 teaspoons baking powder 1/4 teaspoon salt 1 cup milk 2 teaspoons vanilla extract
For the topping: 2 cups granulated sugar 1/2 cup unsweetened cocoa powder 3 cups boiling water Vanilla ice cream, for serving
How To Make Southern Chocolate Cobbler
Preheat oven to 350°F. Place butter in a 9×13-inch baking dish and put in oven. Once butter has melted, remove and set aside. Stir together the 1 1/2 cups sugar, 4 tablespoons cocoa powder, flour, milk, baking powder, salt, and vanilla extract. Spoon into baking dish over melted butter, but do not stir.
In a separate bowl, mix together the 2 cups sugar and 1/2 cup cocoa powder. Sprinkle over batter in pan. Pour boiling water over topping, but again do not stir. Bake until top has set, 35-40 minutes. The bottom will be loose and a bit gooey. Let cool 15 minutes before serving. Enjoy!
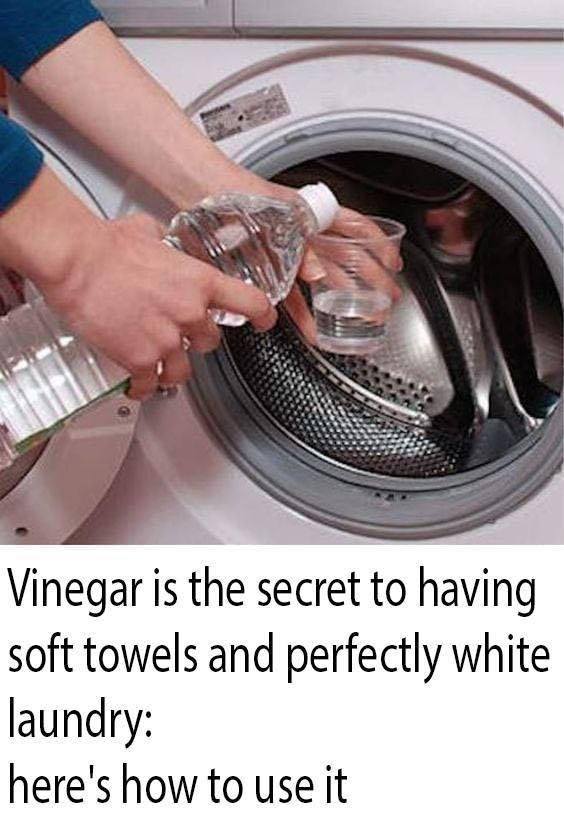
Our washing machines work tirelessly to keep our clothes clean, but we often overlook the fact that they need a good cleaning themselves from time to time. Over months or years of use, washing machines can accumulate soap scum, mineral deposits, and dirt that can affect their performance and even lead to unpleasant odors. Fortunately, there’s a simple and natural solution to effectively clean your washing machine, and that solution is vinegar.
Why Use Vinegar to Clean Your Washing Machine?
Vinegar is a versatile and natural cleaning agent that can effectively break down mineral buildup, eliminate odors, and sanitize surfaces. When used to clean your washing machine, vinegar can help remove residues, bacteria, and mold that may be lurking in hidden corners.
Cleaning the Inside of Your Washing Machine
Here’s a step-by-step guide on how to clean the inside of your washing machine using vinegar:
Materials You’ll Need:
Distilled white vinegar
A microfiber cloth or sponge
A small bowl
Warm water
Step 1: Empty the Drum
Make sure the washing machine is completely empty. Remove any clothes or items that may be inside.
Step 2: Wipe Down the Seal and Door
Using a microfiber cloth or sponge, wipe down the rubber seal around the door. This is an area where mold and grime tend to accumulate. Be thorough in your cleaning to prevent unpleasant odors.
Step 3: Make a Vinegar Solution
In a small bowl, mix equal parts distilled white vinegar and warm water. This solution will be used to clean the detergent and fabric softener compartments.
Step 4: Clean the Detergent Compartments
Remove the detergent and fabric softener compartments from the washing machine. Soak them in the vinegar and water solution to break down any residue or buildup. Use a sponge or cloth to scrub the compartments clean.
Step 5: Clean the Drum
Pour 2 cups of distilled white vinegar directly into the drum of your washing machine. Use a microfiber cloth or sponge to wipe down the drum, paying special attention to any visible stains, soap scum, or mineral deposits.
Step 6: Run a Hot Cycle
Close the washing machine door and set the machine to run a hot cycle with no clothes inside. The hot water will help rinse away the vinegar and any loosened dirt or grime.
Step 7: Wipe Down the Exterior
While the machine is running, take the time to wipe down the exterior of the washing machine, including the control panel and any knobs or buttons.
Step 8: Final Rinse
After the hot cycle has finished, open the door and inspect the interior. It should be clean and odor-free. If you notice any remaining vinegar smell, run a short rinse cycle with plain water.
Regular Maintenance
To keep your washing machine in top condition, consider doing a vinegar clean every few months or whenever you notice an unpleasant odor or buildup. Regular maintenance will help extend the life of your machine and ensure your clothes come out clean and fresh every time.
Vinegar is a household staple that can work wonders when it comes to cleaning your washing machine. With minimal effort and natural ingredients, you can keep your machine in excellent condition and enjoy the benefits of freshly laundered clothes without any unpleasant surprises.