Category Archives: Recipes

Homemade Smoked Ham

Ingredients

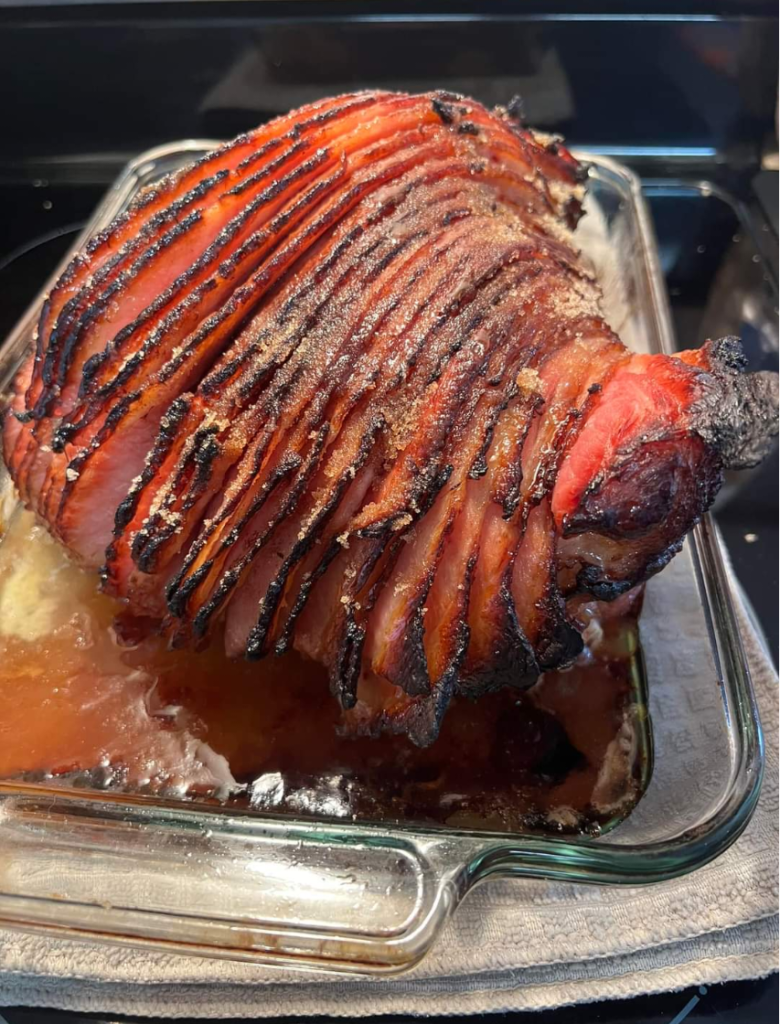
7 pound fresh bone-in ham , rinsed under cold water (see blog section above: “Select a Ham”) NOTE: If selecting a ham with the skin on, cut a criss-cross pattern into the skin about 1/2 inch deep

  • For The Brine:
  • 6 quarts cold water , divided in half
  • 2 cups brown sugar
  • 1 cup kosher salt
  • 1 1/2 tablespoons Prague powder (curing salt #1)
  • 2 teaspoons black peppercorns
  • 2 bay leaves
  • For The Glaze:
  • 1 batch Brown Sugar Glaze (click link for recipe)
  • FOR THE RUB (Optional – see NOTE):
  • 1/4 cup packed brown sugar
  • 1 tablespoon paprika
  • 1 1/2 teaspoons salt
  • 1 teaspoon freshly ground black pepper
  • 1 teaspoon garlic powder
  • 1 teaspoon onion powder
  • 1/2 teaspoon ground mustard
  • wood chips (popular choices included maple, pecan, hickory, and apple)

INSTRUCTIONS

  • To make the brine: Place half of the water and the remaining brine ingredients in a large stockpot that’s big enough to fit your ham and deep enough to allow the ham to be fully covered by the brine.  Alternatively you can use any clean bucket.Bring the brine to a boil and stir until the sugar and salt is dissolved.  Turn off the heat.  Pour in the remaining water to cool down the brine and then let it cool completely.Place it in the brine and ensure that it is completely submerged under the brine.  If it keeps floating to the top, weigh it down.  Cover and refrigerate.  Let the ham cure for 7 days.Once the curing period is over, remove the ham from the brine, thoroughly rinse it under water, then blot the ham with paper towels and place on a rack to continue drying in the fridge for at least a couple of hours or overnight.Optional:  At this point you can apply the rub to the ham if you wish.

Prepare your smoker according to manufacturer instructions and get it to a temperature of 250 degrees F.Place the ham in the smoker.  Plan on about 4-5 hours but start checking for doneness sooner.  Add about one cup of wood chips roughly every 45 minutes throughout the smoking process or less frequently for a milder smoke flavor.Smoke the ham until it reaches an internal temperature between 130-140F (use an instant read thermometer). It’s now time to apply the glaze.Once the ham reaches an internal temp between 130-140 degrees, apply some of the glaze.Brush the ham all over with a coating of the glaze.After 20-30 minutes brush the ham all over with some more of the glaze until the internal temperature reaches 165 F Periodically check the internal temperature towards the end so that you do not exceed 165 F.

  • As soon as the internal temperature reaches 165 F, remove the ham from the smoker and wrap it in aluminum foil.Place the wrapped ham in a warm place to let rest until ready to serve.  At this point you can also let it cool completely, refrigerate, and then gently reheat in the foil when ready to serve.Slice the ham against the grain in 1/4 inch slices and serve with the remaining glaze.

Mounds Cake

Ingredients:

1 box of white or yellow cake mix

½ cup cocoa powder

½ cup granulated sugar

2 cups semisweet chocolate chips

1 cup chocolate syrup

1 (8 oz.) container of whipped topping (such as Cool Whip)

2 cups shredded coconut

Directions:

Begin by preheating your oven to 350°F (175°C). While the oven warms, lovingly grease a 9×13 inch baking dish.

Embrace the cake mix in a large bowl, just as it is, but with a twist. Whisk in cocoa and sugar until you’re met with a harmonious blend.

Pour the batter into your greased vessel. Now, scatter your chocolate chips across the surface as if sowing seeds of chocolatey joy.

Bake for 30 heavenly minutes. Upon removing, gently puncture the cake with a fork, allowing it to become a canvas for the chocolate syrup that you’ll lovingly cascade over it.

Show patience as the cake rests overnight, covered, transforming in the cool darkness.

The following day, unite whipped cream and coconut to create a frosting that speaks of clouds and tropical breezes. Adorn your cake with this mixture.

Chill the cake. When the moment feels right, slice and serve this irresistible masterpiece.

Enjoy

This is my grandma’s fave recipe ever. The best part It just takes 7 mins!

Are you ready to embark on a delightful journey of creating Classic 7-Minute Frosting? This ethereal icing promises to make your baked treats both a gastronomic and visual delight. In this article, we will take you through the process step by step, providing you with tips and tricks to master the art of making this delectable frosting. Let’s get started!

Classic 7-Minute Frosting Ingredients

Before we dive into the preparation steps, it’s essential to have a clear understanding of the ingredients you’ll need to make Classic 7-Minute Frosting. The right ingredients make all the difference in achieving the desired fluffy consistency and flavor. Here’s what you’ll need:

INGREDIENTSQUANTITY
Fresh egg whites5
Granulated sugar1 2/3 cups
Vanilla extract1 teaspoon
Cream of tartar1/2 teaspoon

Note: Freshly separated egg whites from whole eggs yield the best results compared to carton variants.

Steps to Create Classic 7-Minute Frosting

Now that you have your ingredients ready, let’s walk through the steps to create Classic 7-Minute Frosting. Follow these instructions carefully to ensure a perfect outcome:

Preparation

The first step is crucial to the success of your frosting. Ensure that the mixer bowl and whisks are squeaky clean. Wipe them with lemon juice or vinegar. This step is essential as any hint of grease can inhibit the egg whites from achieving the desired fluffy consistency.

Mixing

In the bowl, blend the egg whites, sugar, and cream of tartar. This is the beginning of the magic that will transform these simple ingredients into a luscious frosting.

Heating

Set the bowl over gently simmering water. Continuously stir until the mixture is hot to touch, feels smooth, and reaches a temperature of 160°F (about 2-3 minutes). This step ensures that your frosting is safe to consume.

Whipping

Shift the bowl to the stand mixer and whip on a medium-high setting until it forms stiff peaks, roughly around 6 minutes. This is where the frosting gets its signature fluffy texture.

Flavoring

As the finale, drizzle in the vanilla extract as you continue whipping. Adjust to your preference. The vanilla adds a delightful aroma and flavor to your frosting.

To Serve

Dollop the freshly made 7 Minute Frosting over your choice of cake or cupcakes. Remember, any leftover frosting should be refrigerated. Bring it to room temperature before reusing. This ethereal icing promises to make your baked treats both a gastronomic and visual delight. Enjoy!

With your frosting ready, let’s delve into some frequently asked questions and answers to help you perfect your Classic 7-Minute Frosting.

Classic 7-Minute Frosting is a delightful addition to your baking repertoire. With a handful of ingredients and a few simple steps, you can create a fluffy, sweet frosting that will elevate your desserts to the next level. Whether you’re a baking enthusiast or a novice, this frosting is a must-try. Enjoy the process, experiment with flavors, and watch as your treats become both a gastronomic and visual delight. Happy baking!

NO-BAKE WOOLWORTH ICEBOX CHEESECAKE

If you’re looking for a delicious and easy-to-make dessert, look no further than the no-bake Woolworth Icebox Cheesecake. This classic recipe has been a favorite among dessert enthusiasts for decades. In this article, we will guide you through the step-by-step process of creating this delectable treat. So, put on your apron and let’s get started!

Ingredients

To create the perfect No-Bake Woolworth Icebox Cheesecake, you will need the following ingredients:

  • 2 cups of graham cracker crumbs
  • 1/2 cup of unsalted butter, melted
  • 1 cup of granulated sugar
  • 2 (8-ounce) packages of cream cheese, softened
  • 1 teaspoon of vanilla extract
  • 1 (8-ounce) container of frozen whipped topping, thawed
  • 1 can of cherry pie filling (optional)

Instructions

Step 1: Prepare the Crust

  1. In a medium-sized bowl, combine the graham cracker crumbs and melted butter. Mix well until the crumbs are evenly coated with butter.
  2. Press the crumb mixture into the bottom of a 9×13-inch baking dish, forming an even layer. Use the back of a spoon or a flat-bottomed glass to press the crumbs firmly.
  3. Place the baking dish in the refrigerator to chill while you prepare the filling.

Step 2: Make the Cheesecake Filling

  1. In a large mixing bowl, beat the cream cheese until smooth and creamy.
  2. Add the granulated sugar and vanilla extract to the cream cheese. Continue beating until the mixture is well combined and smooth.
  3. Gently fold in the thawed whipped topping until fully incorporated.

Step 3: Assemble the Cheesecake

  1. Remove the chilled crust from the refrigerator.
  2. Pour the prepared cheesecake filling over the crust, spreading it evenly with a spatula.
  3. If desired, top the cheesecake with a layer of cherry pie filling or any other fruit topping of your choice.

Step 4: Chill and Serve

  1. Cover the baking dish with plastic wrap and refrigerate the cheesecake for at least 4 hours, or preferably overnight. This allows the flavors to meld together and the cheesecake to set.
  2. Once fully chilled and set, remove the cheesecake from the refrigerator.
  3. Cut the cheesecake into squares or slices, depending on your preference.
  4. Serve chilled and enjoy!

The No-Bake Woolworth Icebox Cheesecake is a timeless dessert that never fails to impress. With its creamy texture and delightful flavors, it’s a treat that will have your taste buds dancing with joy. Whether you’re hosting a dinner party or simply craving a sweet indulgence, this recipe is sure to satisfy. So, gather your ingredients, follow the simple steps, and treat yourself to a slice of heaven.

Garlic Basil Scalloped Potatoes

This flavor happens to be my favorite one. it’s super garlicky, and super fresh tasting from the basil, and i’m pretty sure i could eat a whole block of it in one sitting.

i’m not sure why, but i’ve been really craving cheesy and potatoey things lately. like, giant bowls of carbs with cheese oozing out of them. i may or may not have made tater tots from scratch in the middle of the night last week and then eaten the entire batch at once. that’s normal, right?

so… when i was thinking about what kind of flavors to pair this garlic basil cheese with, scalloped potatoes seemed like a really good idea. the potatoes are hearty and starchy, and the combination of half and half and cheese makes them super rich and creamy. and all that heaviness balances perfectly with the bright basil flavor that is very present throughout – both in the cheese and freshly chopped. then the cheese on top makes for a partially crispy, partially gooey crust that adds the perfect amount of texture. put it all together, and that makes an amazingly comforting side dish that packs a huge punch of flavor.

Garlic Basil Scalloped Potatoes

Servings: 6

Ingredients

  • 1½ cups half and half
  • 3 cloves garlic, peeled and smashed with the back of a knife
  • 1 bay leaf
  • 1 pound russet potatoes, peeled and sliced very thin (use a mandolin slicer if you’ve got one)
  • 1 cup loosely packed fresh basil, chopped
  • salt and pepper
  • 7 ounces Sincerely, Brigitte™ garlic basil cheese, grated.

Instructions

  • over medium heat, heat the half and half, garlic, and bay leaf in a medium pot. add a pinch of salt and pepper, lower the heat to low, and let the pot simmer for 5 minutes. use a slotted spoon to remove the bay leaf and garlic cloves.
  • spray an 8×8-inch baking pan with nonstick spray and preheat the oven to 375 degrees F.
  • pour about ¼ cup of the cream into the bottom of the dish. next, put down a layer of potato slices (slightly overlapping), then about 2 tablespoons of chopped basil. top the basil with about 2 tablespoons of the grated cheese, and sprinkle a bit of salt and pepper over everything. repeat this layering process–cream, potatoes, basil, cheese, salt, and pepper–at least two more times, until you have used up all of the potatoes. you should be left with at least a couple tablespoons of cheese, which you should save for broiling later.
  • put the baking dish into the oven and bake it for 35-40 minutes, until the potatoes are completely cooked through and the top is golden. put the rest of your cheese over the top, then put the dish under the broiler for another 5 minutes, until the cheese is bubbly and brown.
  • serve immediately with more fresh basil over the top.

One Pot Cheeseburger Casserole

This Cheeseburger Casserole takes just 30 minutes to make in a single skillet! Your family will love this homemade hamburger helper!

I think my family has been eating this cheesy, beefy macaroni at least every two weeks ever since I started making Instant Pot Hamburger Helper. But now that I can make this Cheeseburger Casserole in just one pot, I’m even more hooked.

PLUS, this is a perfect freezer meal. Read on for everything you need to know about this fabulous recipe.

Cook and crumble the ground beef and the onions. Drain any excess grease. Add the minced garlic, cook for 1 minuet. Add the Worcestershire sauce, and tomato paste and stir until combined.

Add the beef broth and uncooked macaroni. Stir to combine.

Cover and heat for 5 minutes. Uncover, stir, then cover again and cook for 5 more minutes, until just al dente.

Ingredients
3 ½ cups shredded cheddar cheese, at room temp. Separated.
1 lb. Ground Beef, 85% lean
Salt/Pepper, to taste
1 small yellow onion, diced
2 cloves garlic, minced
2 teaspoons Worcestershire sauce
2 Tablespoon tomato paste
4 cups beef broth
1 (16 oz.) box elbow macaroni, *uncooked*
¾ cup sour cream, at room temp
½ cup whole milk, at room temp
Chopped Parsley, to garnish

Instructions
Shred the cheese and set it aside. It should be at room temperature when added to the pasta later.
Season the ground beef with desired amount of salt and pepper.
In a large pot over medium heat, cook and crumble the ground beef along with the onions. Drain any excess grease.
Add the minced garlic and cook for an additional minute.
Add the Worcestershire sauce and the tomato paste and stir until well-combined.
Add the beef broth and the uncooked macaroni, stir to combine. Bring to a gentle simmer over medium or medium/low.
Cover the pot and heat for 5 minutes. Uncover, stir briefly, replace the cover, and heat for 5 more minutes, or until just al dente.
Reduce the heat to low.
Stir in the room temperature sour cream and half of the milk. Only add the other half if desired.
Gradually sprinkle in 2 ½ cups of the shredded cheddar, stirring as you do so.
Once the cheese is melted and you have a uniform consistency, top with the remaining cheese.
Replace the lid and heat for an additional 2-3 minutes, until the cheese is melted.
Top with parsley and serve! -optional

Enjoy

One pot Mexican Rice Casserole

Ingredients:

1 lb. minced meat
1 small onion, diced
Salt and pepper to taste
2 tablespoons of taco seasoning
1 teaspoon garlic powder
1 cup long grain white rice
1 1/2 cups beef broth
1 can (15 ounces) corn, drained
8 ounces of tomato sauce
1/2 cup of sauce
1 cup grated cheese

Directions:

Cook the ground beef and onions with salt and pepper to taste in a large skillet over medium-high heat until the beef is no longer pink. Drain the grease if necessary.
Return skillet to stove and sprinkle beef with garlic powder and taco seasoning.
Add rice, broth, corn, tomato sauce, and ketchup.
Bring the mixture to boil. Cover, reduce heat, and simmer 18 to 20 minutes, until rice is tender.
Cover with cheese and place the lid back on the skillet for 2-3 minutes until the cheese melts.I await your comments!

Enjoy!

Chile Colorado Burritos

Makes 5-7 burritos, depending on how full you make them.

Ingredients :
1 1/2 to 2 pounds stew meat or other beef cubed (top sirloin is great)
1 large can mild (red) enchilada sauce* (at least 19 oz.)
2 beef bouillon cubes (or just one–or none–if you want it less salty AND you do NOT add water, just the bouillon)
1/2 can refried beans (optional)
5-7 burrito size flour tortillas
1 cup or so of shredded cheddar cheese


Directions :

Put beef, whole bouillon cubes (do NOT add water), and enchilada sauce*** into a crock pot and cook on low for 7-8 hours**, or until meat is very tender. (Can also cook on high for maybe 3-4 hours.) I’ve also cooked it in a dutch oven for about 4 hours at 325 degrees. More meat, more time. A third option is to cook it in a large heavy saucepan–bring it to a boil on high heat, reduce heat to low, cover, and simmer for 1 1/2 to 2 hours, or until the meat is tender. If you go with a method other than the crock pot, make sure the pot is covered and pretty well sealed to minimize evaporation of the liquid.
When beef is done (very tender and flakes off when stirred), taste and add more salt, if desired. Heat up refried beans in the microwave (covered and in a microwave-proof dish, of course)and put your oven on broil. On an oven-proof plate, or cookie sheet even, lay out a tortilla. Place on tortilla about 1/2 cup of the meat, drained by using a slotted spoon, and a spoonful or two of beans. Roll into a burrito (hopefully you know how to roll these). Pour some of the remaining enchilada sauce from the crock pot over the burrito to cover it. Sprinkle with some cheddar cheese. Broil until cheese is bubbly, about 2-4 minutes.

Enjoy

Buttermilk Texas Sheet Cake

Ingredients

Cake

  • 2-1/2 cups all-purpose flour
  • 2 cups sugar
  • 1/2 cup oil
  • 1 cup water
  • 1 stick butter
  • 2 eggs
  • 2 tsp. vanilla
  • 1 tsp. cinnamon
  • 1-1/2 tsp. baking soda
  • 2/3 cup buttermilk

Frosting

  • 6 Tbsp. butter
  • 1 cup light brown sugar (packed)
  • 1/2 cup milk
  • 4 to 5 cups powdered sugar

Instructions

Preheat oven to 350-degrees. Grease jelly-roll pan and set aside.

Cake

  1. Add the flour and sugar to a large bowl. Mix it up and set it aside.
  2. Add the oil, butter, and water to a saucepan, turn it on medium-high, and bring it to a boil.
  3. Pour the boiling oil mixture over the flour and mix until well blended.
  4. Add the eggs, cinnamon, baking soda, vanilla, and buttermilk and mix with a beater until well blended.
  5. Pour into the jelly-roll pan and bake for 20-25 minutes until cake tester comes out clean.
  6. Allow cake to cool for at least 30 minutes.

Frosting

  1. Add the butter and brown sugar to a sauce pan and cook on medium-high.
  2. Bring the mixture to a boil and cook until it begins to thicken and the brown sugar dissolves.
  3. Remove from heat and let it cool for a minute or two.
  4. Add the milk and mix it in.
  5. Add the powdered sugar and mix with a beater until it is smooth.
  6. Pour over the cake and let cool.

Enjoy

How to prepare ginger water for weight loss?

Ginger and lemon, both rich in health benefits, combine to create a powerful detox drink that can aid in weight loss and improve digestion. Here’s a simple recipe and its potential benefits:

Ingredients:

Grated ginger – 5 tablespoons (50g)

Juice of 2 lemons

Water – 6 cups (1.5 liters)

Preparation Steps:

Boil the water and add the grated ginger.

Infuse for 1-2 minutes, then remove from heat.

After 10 minutes, strain and add the lemon juice.

For optimal results, drink on an empty stomach.

Regular consumption of this ginger-lemon detox drink is recommended for its long-term effects. While immediate results might not be noticeable, consistent intake can lead to significant benefits. It’s best consumed in the morning, but you can also carry it in a thermos and drink throughout the day.

Ginger, originating from Asia and known for over 5,000 years in both culinary and medicinal contexts, has gained popularity in Western countries due to its health benefits. It’s often associated with aphrodisiac, anti-emetic properties, and aiding in weight loss.

Lemon, a citrus fruit revered as the “fruit of the Sun,” thrives in warm regions like India, the Middle East, and the Iberian Peninsula. Despite its high water content, lemon is packed with essential nutrients, including a significant amount of vitamins like Vitamin C and B9 (folic acid), as well as trace elements such as phosphorus, calcium, magnesium, and potassium. It also contains natural antioxidants called polyphenols and is known for its slimming and antioxidant properties.

When ginger and lemon are combined, their individual effects are amplified, offering an even more beneficial health impact. This drink not only supports weight loss and digestion but also leverages the extensive health properties of both ingredients.