Welcome to the delightful world of LAURA BUSH’S COWBOY COOKIES! In this comprehensive guide, we’ll explore the origins, ingredients, baking process, and more. Get ready for a culinary adventure that combines the rich flavors of chocolate, oats, coconut, and pecans.
Ingredients:
QUANTITY
INGREDIENT
3 cups
All-purpose flour
1 tablespoon
Baking powder
1 tablespoon
Baking soda
1 tablespoon
Ground cinnamon
1 teaspoon
Salt
1 1/2 cups (3 sticks)
Butter, room temperature
1 1/2 cups
Granulated sugar
1 1/2 cups
Light-brown sugar, packed
3
Eggs
1 tablespoon
Vanilla extract
3 cups
Semisweet chocolate chips
3 cups
Old-fashioned rolled oats
2 cups
Sweetened flake coconut
2 cups
Chopped pecans
Instructions:
Preheat your oven to 350°F (175°C).
In a medium bowl, combine the all-purpose flour, baking powder, baking soda, ground cinnamon, and salt. Mix well and set aside.
In a separate very large bowl, use an electric mixer to beat the butter until creamy. Gradually add the granulated sugar and light-brown sugar, mixing until thoroughly combined.
Add the eggs one at a time, beating after each addition. Mix in the vanilla extract.
Gradually add the flour mixture to the wet ingredients, beating on low until just combined.
Stir in the semisweet chocolate chips, old-fashioned rolled oats, sweetened flake coconut, and chopped pecans until evenly distributed.
Drop portions of dough, approximately 1/4 cup each, onto an ungreased baking sheet, spacing them 3 inches apart.
Bake in the preheated oven for 15-17 minutes, rotating the baking sheets halfway through the baking time. The edges of the cookies should be lightly browned.
Remove the cookies from the oven and transfer them to a wire rack to cool.
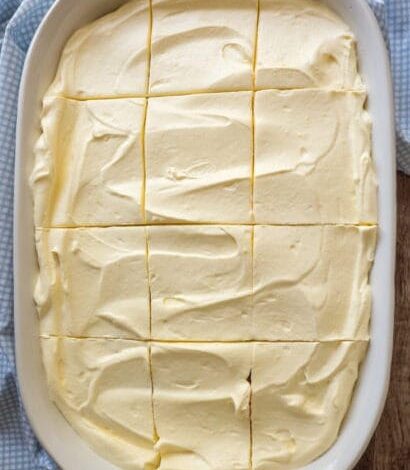
Indulge your taste buds in a heavenly experience with our Strawberry Shortcake Poke Cake. This easy-to-follow recipe promises a moist, flavorful cake infused with the goodness of fresh strawberries, topped with a luscious whipped cream layer. Let’s embark on this culinary journey and create a dessert sensation that will leave everyone craving for more.
Ingredients:
Cake:
INGREDIENTS
QUANTITY
White cake mix
1 box
Eggs
As per cake mix instructions
Oil
As per cake mix instructions
Whole milk
1 cup
Strawberry Filling:
INGREDIENTS
QUANTITY
Fresh strawberries
2 cups, hulled and sliced
Granulated sugar
1/4 cup
Strawberry Jello Mixture:
INGREDIENTS
QUANTITY
Strawberry-flavored gelatin
1 box
Boiling water
1 cup
Cold water
1/2 cup
Whipped Topping:
INGREDIENTS
QUANTITY
Heavy whipping cream
2 cups
Powdered sugar
1/2 cup
Vanilla extract
1 teaspoon
Garnish:
INGREDIENTS
QUANTITY
Fresh strawberries (sliced)
–
Mint leaves for decoration
Optional
Instructions:
1. Bake the Cake:
Prepare the white cake mix according to package instructions, substituting 1 cup of whole milk for water. Bake in a 9×13-inch pan as directed. Allow the cake to cool completely.
2. Prepare the Strawberry Filling:
In a bowl, combine sliced strawberries and granulated sugar. Gently stir and let it sit for at least 15 minutes to allow the strawberries to release their juices.
3. Poke Holes in the Cake:
Once the cake is cool, use the handle of a wooden spoon to poke holes evenly across the entire cake.
4. Make the Strawberry Jello Mixture:
In a separate bowl, dissolve the strawberry gelatin in 1 cup of boiling water. Add 1/2 cup of cold water and stir until well combined.
5. Fill the Holes:
Pour the strawberry gelatin mixture over the poked cake, ensuring it seeps into the holes. Refrigerate the cake for at least 2 hours to allow the gelatin to set.
6. Whip the Cream:
In a chilled bowl, whip the heavy whipping cream, powdered sugar, and vanilla extract until stiff peaks form.
7. Assemble the Cake:
Once the gelatin has set, spread the strawberry filling over the cake. Top with a generous layer of whipped cream, spreading it evenly.
8. Garnish and Chill:
Garnish the Strawberry Shortcake Poke Cake with fresh strawberry slices and mint leaves if desired. Refrigerate for an additional 2-3 hours to allow the flavors to meld.
When it comes to iconic Alaskan cuisine, the Kenai Alaska Cheese Dip stands out as a true testament to the flavors of the Last Frontier. This article takes you on a gastronomic journey, unraveling the secrets behind crafting this delectable dip that combines the richness of king crab, the smokiness of salmon, and the creaminess of cheeses. Let’s dive into the details of this mouthwatering recipe.
Ingredients:
INGREDIENTS
QUANTITY
Alaska king crab meat, cooked and shredded
2 cups
Smoked salmon, flaked
1 cup
Sharp cheddar cheese, shredded
1 cup
Mozzarella cheese, shredded
1 cup
Mayonnaise
1/2 cup
Sour cream
1/2 cup
Cream cheese, softened
1/4 cup
Chopped fresh dill
1/4 cup
Chopped green onions
2 tablespoons
Lemon juice
1 tablespoon
Dijon mustard
1 teaspoon
Garlic powder
1/2 teaspoon
Salt and pepper
To taste
Crackers or sliced baguette
For serving
Instructions:
1. Oceanic Ensemble:
In a large mixing bowl, combine the shredded king crab meat and flaked smoked salmon.
These star ingredients bring the essence of the Alaskan waters to your dip.
2. Cheese Cascade:
Introduce the shredded sharp cheddar and mozzarella cheeses to the bowl.
Create a creamy and indulgent base by blending the cheeses with the seafood.
3. Creamy Harmony:
In a separate bowl, whisk together mayonnaise, sour cream, softened cream cheese, lemon juice, Dijon mustard, and garlic powder.
Ensure a well-blended, creamy harmony of flavors.
4. Dill Infusion:
Fold in the chopped fresh dill and green onions.
Infuse the dip with herbaceous and aromatic notes.
5. Seasonal Symphony:
Season the mixture with salt and pepper to taste.
Adjust according to the salty element from the smoked salmon.
Serving Suggestions:
6. Chill and Mingle:
Allow the Kenai Alaska Cheese Dip to chill in the refrigerator for at least 1 hour.
This enhances the flavors and lets them mingle for a better taste.
7. Presentation Brilliance:
Before serving, garnish with additional dill and green onions.
Enhance the visual appeal for a delightful presentation.
8. Pair and Enjoy:
Serve the dip with an assortment of crackers or thinly sliced baguette.
Create the perfect bite and savor the deliciousness
Delve into the world of French cuisine with our mouth-watering recipe for a Delicious French Treat. This delightful casserole combines the richness of béchamel sauce, the heartiness of meatballs, and the comfort of potatoes, creating a cheesy masterpiece that your family will adore. Let’s embark on this culinary adventure together!
Main Dish Ingredients: QUANTITY INGREDIENT 3 potatoes Peeled and boiled 1 white onion Finely chopped 1 package Ground beef 1 tsp Chopped parsley 1 pinch Paprika 1 large bag Shredded mozzarella cheese Salt and pepper To taste Béchamel Sauce Ingredients: QUANTITY INGREDIENT 5 tbsp Butter 4 tbsp Flour 4 cups Milk 2 tsp Salt 1/2 tsp Nutmeg Instructions: Making the Béchamel Sauce: In a medium saucepan, melt butter over medium-low heat. Add flour, stirring until smooth and golden (6-7 minutes). In a separate pan, heat milk almost to a boil. Gradually add hot milk to the butter, whisking until smooth. Bring the mixture to a boil, cooking for 10 minutes, stirring constantly. Season with salt and nutmeg. Preparing the Meat Mixture: Preheat the oven to 400 degrees. In a large bowl, combine ground beef, chopped parsley, paprika, salt, and pepper. Mix ingredients until evenly combined. Assembling the Casserole: Peel and boil three potatoes until semi-soft (around 7 minutes). Slice the potatoes and arrange them at the bottom and around the sides of a round glass baking dish. Form meatballs and place them on the potato slices. Use remaining potato slices as walls between meatballs. Pour béchamel sauce into each “compartment” until relatively full. Top the dish with a thin layer of shredded mozzarella. Baking: Place the dish in the preheated oven for 15 minutes. Once done, savor the cheesy and creamy French casserole-style dish!
Homemade biscuits add a warm and comforting touch to any meal. My grandmother makes these tender biscuits to go with her seafood chowder. These buttermilk biscuits are flaky on the outside and light and fluffy on the inside- which equals perfection in my book. My grandma’s flaky buttermilk biscuits makes the perfect side to any meal. This recipe makes literally theeeeee perfect buttermilk biscuits every single time. These little gems are flaky, buttery, and fluffy all at the same time. My grandma’s flaky buttermilk biscuits are awesome for any occasion. In any weather. It will literally even impress your in-laws . I always get the question “how did your grandma become so good at making southern buttermilk biscuits?” And really it comes down to fast food. She wanted to make them at home and not have to traveling miles to fix her biscuit cravings. She has aserious biscuit addiction. This is my grandmother’s biscuit recipe. It is my all-time favorite and has a really good flavor to it. Be sure not to roll out too thin, you want high biscuits! I usually just pat out the dough to the desired thickness, usually 1/2 inch. In a few days, I’ll be going to visit my grandma Barb. I haven’t seen her since Thanksgiving, so she is well overdue for a dose of my loud singing throughout her house, trying to convince her to get a boo-thang, and raiding her cookbook collection. This simple but great recipe for biscuits has been passed along to me, I have tried others, but always come back to this one. An eggless recipe! I believe the secret to my grandmother Grace’s biscuits is that she would talk to them, saying, “Rise, Mr. Biscuit, rise!” And they would. Her buttermilk biscuits were quite similar to these, made with whole milk, but sometimes she’d substitute buttermilk and use baking soda instead of baking powder.
Ingredients 2 cups all-purpose flour 1 tablespoon baking powder 1 teaspoon salt 1 tablespoon white sugar ⅓ cup shortening 1 cup milk
Instructions Preheat oven to 425 degrees F (220 degrees C). In a large bowl, whisk together the flour, baking powder, salt, and sugar. Cut in the shortening until the mixture resembles coarse meal. Gradually stir in milk until dough pulls away from the side of the bowl. You May Like Domestic Goddess Cake Turn out onto a floured surface, and knead 15 to 20 times. Pat or roll dough out to 1 inch thick. Cut biscuits with a large cutter or juice glass dipped in flour. Repeat until all dough is used. Brush off the excess flour, and place biscuits onto an ungreased baking sheet. You May Like Domestic Goddess Cake Bake for 13 to 15 minutes in the preheated oven, or until edges begin to brown.
Crispy and tender…My fav of all time !! These simply scrumptious FRIED POTATOES AND ONIONS are perfect for breakfast, lunch or dinner !!! The picture alone will make your stomach growl LOL !!
INGREDIENTS
– Peanut oil : enough to wet the entire bottom of your pan
– Unsalted sweet cream butter: 2 tbs
– Idaho Russet or Red potatoes: 1 lb (I always use Reds, but it’s up to you)
– Salted water
– Sweet onion like Vidalia: ½ medium sized
– Salt and Pepper to taste
– Paprika and fresh basil: For Garnishing
INSTRUCTIONS
1. Over medium heat (just a little more than medium on my electric stove), place a heavy 9” cast iron skillet. And please pour into oil and add the butter as well.
2. Make sure to let it heat until the oil is shimmery on the surface (not smoking). And please pull it off the heat and allow to cool some until it is shimmery again in case it starts to smoke.
3. The potatoes should be cut up into pieces that are the same size – chips or cubes – as desired.
4. In the meantime, you may place into 4 cups of water that has 2 Tbs of salt mixed in.
5. Onion should be cut up into bigger chunks than you cut the potato.
6. You’ll want to drain the potato VERY WELL and dry with paper towels after 5 minutes.
7. Now that the oil is ready (shimmery), put the potato and the onion into the oil, making sure not to crowd the potatoes. Always remember to to lay them side by side, then let some cook, remove them to drain on a paper towel and then cook the rest if there isn’t enough room for them.
8. Once done, cook for about 4 minutes per one side then flip and cook for 2 to 4 minutes more on the other side.
9. To finish, drain on a paper towel and salt and pepper as soon as you remove from the oil. Garnish and serve hot &
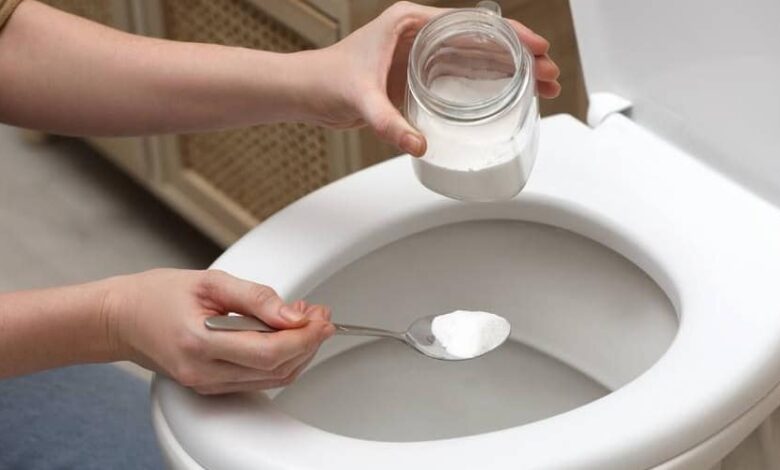
Have you ever wondered if there’s a way to keep your toilet clean, fresh, and trouble-free without resorting to harsh chemicals or expensive cleaning solutions? Well, there’s a simple yet effective trick that not many people know about—putting salt in the toilet bowl! Yes, you read that right. Salt, a common household item, can work wonders for your toilet’s cleanliness and maintenance.
In this comprehensive article, we’ll explore the various benefits of using salt in your toilet and why it’s a good idea that most plumbers won’t readily share. Whether you’re looking to save money on plumbing repairs or seeking an eco-friendly cleaning solution, this article will provide you with all the information you need to make an informed decision.
Why It Is A Good Idea To Put Salt In The Toilet? This Is Something That Plumbers Will Never Tell You
Let’s dive into the fascinating reasons why incorporating salt into your toilet cleaning routine can be a game-changer.
1. Natural Cleaning Power of Salt
Salt is a powerful natural cleaner with excellent antibacterial properties. When you put salt in your toilet bowl, it can effectively break down stains, mineral deposits, and grime. Unlike harsh chemical cleaners, salt is gentle on the environment and poses no threat to your septic system.
2. Eliminates Odors
One of the most unpleasant experiences in any home is dealing with foul odors emanating from the toilet. Salt comes to the rescue here as well. Its deodorizing properties can neutralize bad smells, leaving your bathroom fresh and inviting.
3. Prevents Clogs
Clogged toilets are a common headache that can lead to expensive plumbing repairs. By regularly adding salt to your toilet, you can help prevent clogs by breaking down organic matter and preventing its accumulation.
4. Reduces Mineral Build-Up
If you live in an area with hard water, you’re probably familiar with the unsightly mineral stains that can form in the toilet bowl. Salt can help minimize mineral build-up and keep your toilet looking clean and pristine.
5. Environmentally Friendly Option
Using salt to clean your toilet is an eco-friendly alternative to chemical-laden cleaners. By choosing this method, you contribute to a greener environment and reduce your carbon footprint.
6. Cost-Effective Cleaning Solution
Salt is incredibly affordable and readily available in most households. Switching to salt-based cleaning can save you money on expensive commercial cleaning products.
7. Easy Application
Applying salt to your toilet bowl is a breeze. It requires no special tools or equipment, making it a convenient and time-saving cleaning method.
8. Safe for Children and Pets
Since salt is a natural product, it’s safe for your children and pets. You can have peace of mind knowing that your loved ones won’t be exposed to harmful chemicals.
9. Prolongs the Life of Your Toilet
Regular maintenance with salt can extend the lifespan of your toilet by preventing the accumulation of stubborn stains and clogs.
10. Effective Rust Remover
Salt’s mild abrasive properties make it an excellent rust remover for your toilet bowl. Bid farewell to those rusty stains with this simple solution.
How to Use Salt for Toilet Cleaning (Step-by-Step Guide)
Now that you understand the incredible benefits of using salt in your toilet, let’s walk through the step-by-step process of applying it for optimal results.
Gather Your Supplies:
Salt (preferably coarse or Epsom salt)
Toilet brush
Flush the Toilet: Before applying salt, flush the toilet to wet the inner surface slightly.
Sprinkle Salt in the Bowl: Generously sprinkle salt around the interior of the toilet bowl, paying extra attention to areas with stains or mineral build-up.
Scrub the Bowl: Use a toilet brush to scrub the bowl, ensuring the salt reaches all the nooks and crannies. The gentle abrasive action of the salt will help break down stains and dirt.
Let it Sit: Allow the salt to sit in the bowl for at least 15 minutes. During this time, the salt will work its magic on tough stains and odors.
Scrub Again and Flush: Give the bowl another gentle scrub with the toilet brush, and then flush the toilet to rinse away the salt and reveal a clean, fresh toilet bowl.
Repeat Regularly: For best results, repeat this process once a week or as needed to maintain a sparkling clean toilet.
FAQ’s
Is using salt safe for all types of toilets? Yes, salt is safe for use in all types of toilets, including porcelain, ceramic, and stainless steel.
Can I use table salt for toilet cleaning? While table salt can work, coarse salt or Epsom salt is more effective due to their slightly abrasive nature.
Will salt damage my septic system? No, salt is non-toxic and will not harm your septic system when used in moderation.
Can salt completely replace commercial toilet cleaners? Yes, salt can be an effective replacement for most commercial cleaners. However, for heavily stained toilets, you may use a combination of salt and vinegar.
How often should I use salt in my toilet? It’s recommended to use salt in your toilet once a week to maintain cleanliness and prevent build-up.
Will salt remove stubborn rust stains? Yes, salt’s mild abrasive properties can help remove rust stains over time.
Conclusion
In conclusion, putting salt in the toilet is an ingenious and underrated cleaning hack that offers a multitude of benefits. From its natural cleaning power to its ability to prevent clogs and eliminate odors, salt proves to be a cost-effective and eco-friendly solution for toilet maintenance. Not only does it extend the life of your toilet, but it also ensures a fresh and inviting bathroom environment for your family.
So the next time you reach for harsh chemical cleaners, think twice and opt for the simple yet powerful cleaning abilities of salt. Remember, this is something that plumbers rarely share with homeowners, making it a secret weapon for a sparkling clean toilet. Try it out today and see the magic of salt unfold in your bathroom!
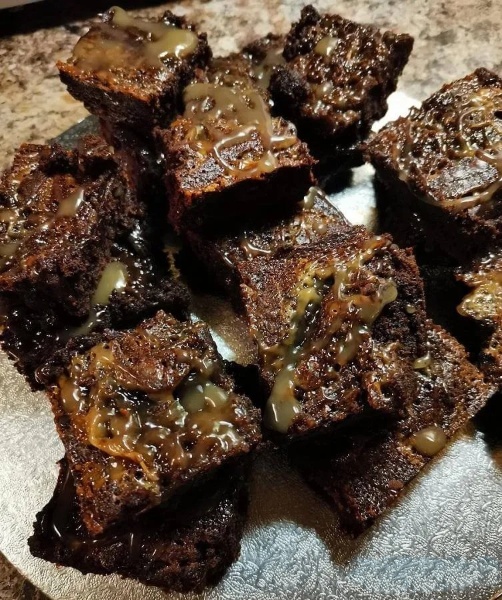
To prepare brownies, combine flour, sugar, cocoa, brown sugar, and baking powder in a large bowl. Stir well. Combine butter and eggs. Add butter mixture to flour mixture; stir to combine. Pour batter into a 9-inch square metal baking pan lightly coated with cooking spray. Bake at 350° for 19 minutes or until a wooden pick inserted in center comes out with moist crumbs clinging. Cool in pan.
To prepare topping, melt butter in a saucepan over medium heat. Add brown sugar and 1 1/2 tablespoons milk; cook 2 minutes. Remove from heat. Add powdered sugar; stir until smooth. Spread mixture evenly over cooled brownies. Let stand 20 minutes or until set.
To prepare drizzle, combine 2 tablespoons milk and chocolate in a microwave-safe bowl; microwave at high for 45 seconds or until melted, stirring after 20 seconds. Stir just until smooth; drizzle over caramel. Sprinkle with sea salt; let stand until set.
Soup lovers, rejoice! If you’re in the mood for a hearty and satisfying bowl of comfort, Slow Cooker Creamy Potato Bacon Soup is your answer. This delightful soup is a perfect blend of creamy goodness, tender potatoes, and the smoky richness of bacon. Whether it’s a chilly winter evening or you simply crave a comforting meal, this recipe will not disappoint.
In this article, we’ll guide you through the process of making Slow Cooker Creamy Potato Bacon Soup, step by step. But first, let’s take a look at the ingredients you’ll need to create this culinary masterpiece.
Ingredients:
To create this sumptuous Slow Cooker Creamy Potato Bacon Soup, gather the following ingredients:
INGREDIENTS
AMOUNT
Chicken broth
3.5 cups
Russet potatoes, peeled and diced
4 cups
Diced tomatoes (14-ounce can)
1 can
Yellow onion, diced
1
Shredded carrots
1 cup
Diced celery
1 cup
Dried parsley
1 tablespoon
Garlic powder
1/2 tablespoon
Dried basil
1 teaspoon
Salt
1 teaspoon
Black pepper
1/2 teaspoon
Ground beef
1 pound
Bacon, cooked and chopped
1 package (12 ounces)
Butter
3 tablespoons
Flour (gluten-free 1:1)
1/4 cup
Half and half
2 cups
Shredded cheddar cheese or pepper jack cheese
2 cups
To garnish: green onions, reserved chopped bacon
As desired
Instructions:
Now that you have your ingredients ready, let’s dive into the step-by-step instructions to create this delicious Slow Cooker Creamy Potato Bacon Soup.
Step 1: Prepare the Base
In your slow cooker, combine the chicken broth, diced tomatoes, peeled and diced potatoes, diced yellow onion, shredded carrots, diced celery, dried parsley, garlic powder, dried basil, salt, and black pepper.
Cover the slow cooker with the lid and cook on low for 6 to 8 hours, or if you’re in a hurry, you can cook it on high for 3 to 4 hours. This will allow the flavors to meld and the potatoes to become tender.
Step 2: Brown the Beef and Prepare the Bacon
About 30 minutes before serving, it’s time to prepare the meat. In a separate pan, brown the ground beef. Make sure to drain any excess grease before adding it to the slow cooker.
Fry or bake the bacon until it’s crispy and delicious. Once done, chop it into small pieces and transfer them to the slow cooker as well.
Step 3: Create a Creamy Roux
Wipe out the pan used for the ground beef, removing any excess grease.
In the same pan, melt the butter over medium heat.
Gradually whisk in the flour until it forms a smooth paste.
Slowly pour in the half and half, continuing to whisk vigorously for about 2-3 minutes, until the mixture thickens.
Step 4: Add Creaminess to the Soup
Carefully pour the creamy mixture (roux and half and half) into the slow cooker, stirring to combine it with the rest of the soup.
Now, add the shredded cheddar cheese or pepper jack cheese and stir again. Cover the slow cooker and let the cheese melt for a few minutes.
Just before serving, give the soup a final good stir or two to ensure that the cheese is fully incorporated.
Step 5: Garnish and Serve
Ladle the piping hot Slow Cooker Creamy Potato Bacon Soup into bowls.
Garnish each serving with green onions and reserved chopped bacon.
It’s time to savor the irresistible flavors of your homemade creamy potato bacon soup. Enjoy!