All posts by worldsss

SLICED BAKED POTATOES – Just 4 Ingredient

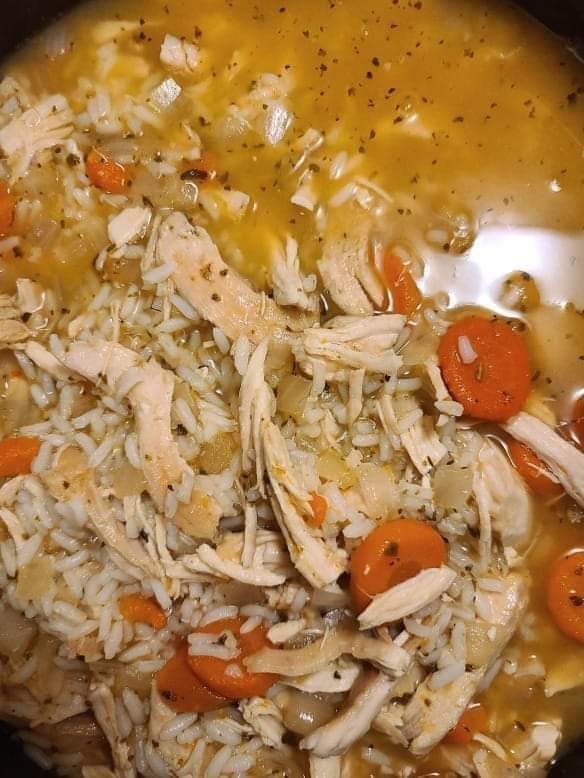
In the world of comfort food, few dishes can match the sheer satisfaction of a well-prepared plate of Sliced Baked Potatoes. This simple yet indulgent dish combines the earthy goodness of potatoes with the richness of cheese and bacon, all crowned with a dollop of sour cream. It’s a culinary delight that’s easy to make and even easier to enjoy. In this article, we’ll walk you through the process of creating these delectable Sliced Baked Potatoes and explore why they’re a favorite among food lovers.

Ingredients:

Before we dive into the cooking process, let’s gather the ingredients you’ll need

INGREDIENTS
Baking potatoes
Cheddar cheese, grated
Bacon, cooked and crumbled
Green onions, sliced
Sour cream

These five simple ingredients are the building blocks of your Sliced Baked Potatoes. Now, let’s move on to the directions.

Instructions:

  1. Preheat your oven to 400°F.
  2. Brush both sides of potato slices with butter.
  3. Place the potato slices on a cookie sheet.
  4. Bake for 30 to 40 minutes, or until the slices are lightly browned on both sides, turning them once during the process.
  5. When the potatoes are ready, top them with crumbled bacon, grated cheddar cheese, and sliced green onions.
  6. Return the cookie sheet to the oven and continue baking until the cheese has melted.
  7. Add a generous dollop of sour cream when done.
  8. Your Sliced Baked Potatoes are now ready to be served and savored!

Tips for Perfect Sliced Baked Potatoes

To ensure your Sliced Baked Potatoes turn out perfectly every time, consider these tips:

  • Uniform Slicing: Aim for uniform potato slices to ensure even cooking.
  • Baking Temperature: Maintain the recommended baking temperature for that perfect golden brown color.
  • Microwave Shortcut: If you’re short on time, you can microwave the potatoes for six minutes instead of baking them.
  • Experiment: Feel free to add your own twists, like a sprinkle of herbs or a dash of hot sauce, to customize the flavor to your liking.

PEACHES & CREAM CHEESE LOAF

Are you craving a delicious and moist loaf that combines the sweet and juicy flavors of peaches with the creamy goodness of cream cheese? Look no further! In this article, we’ll dive into the wonderful world of Peaches & Cream Cheese Loaf and explore a delightful recipe that will leave your taste buds begging for more. From the rich combination of ingredients to the step-by-step instructions, we’ll guide you through the process of creating this delectable treat. So, let’s get started and indulge in the irresistible flavors of Peaches & Cream Cheese Loaf!

Ingredients:

To create this mouthwatering treat, you’ll need the following ingredients:

INGREDIENTSAMOUNT
All-purpose flour2 cups
Baking powder1 teaspoon
Baking soda1/2 teaspoon
Salt1/2 teaspoon
Unsalted butter, softened1/2 cup
Granulated sugar1 cup
Large eggs2
Vanilla extract1 teaspoon
Sour cream1 cup
Fresh or canned peaches, diced1 cup
Cream cheese, softened4 ounces
Powdered sugar1/4 cup
Lemon juice1 tablespoon
Lemon zest1/2 teaspoon

Instructions:

Step 1: Preheat and Prepare

Preheat your oven to 350°F (175°C). Grease a loaf pan and set it aside for later use.

Step 2: Combine Dry Ingredients

In a medium-sized bowl, whisk together the all-purpose flour, baking powder, baking soda, and salt. Set the mixture

Step 3: Cream the Butter and Sugar

In a large mixing bowl, cream together the softened butter and granulated sugar until light and fluffy. This can be easily done with an electric mixer.

Step 4: Add Eggs and Vanilla

Beat in the eggs, one at a time, ensuring each egg is fully incorporated before adding the next. Then, stir in the vanilla extract.

Step 5: Alternate the Flour Mixture and Sour Cream

Gradually add the flour mixture to the butter and sugar mixture, alternating with the sour cream. Begin and end with the flour mixture, stirring well after each addition. This will ensure a well-blended batter.

Step 6: Fold in the Peaches

Gently fold in the diced peaches, ensuring they are evenly distributed throughout the batter.

Step 7: Prepare the Cream Cheese Filling

In a separate bowl, combine the softened cream cheese, powdered sugar, lemon juice, and lemon zest. Mix until smooth and creamy.

Step 8: Layer the Batter and Cream Cheese Filling

Pour half of the batter into the greased loaf pan. Spread the cream cheese filling evenly over the batter. Top with the remaining batter, making sure to cover the filling completely.

Step 9: Bake to Perfection

Place the loaf pan in the preheated oven and bake for approximately 55-60 minutes, or until a toothpick inserted into the center comes out clean. The top of the loaf should be golden brown.

Step 10: Cool and Serve

Remove the loaf from the oven and let it cool in the pan for about 10 minutes. Then, transfer it to a wire rack to cool completely. Once cooled, slice the Peaches & Cream Cheese Loaf and serve it to your eager guests.

DIY Bar Cart

Are you enchanted by the allure of bar carts but find the price tags a little too steep? Well, you’re in luck! This article will guide you through the process of crafting your very own DIY bar cart that exudes both style and functionality, all without breaking the bank. Follow along as we take you step by step through the process of repurposing and transforming an old cart into a chic mobile bar that’s sure to be the envy of your guests.

Unveiling the Hidden Treasures: Finding the Perfect Cart

diy bar cart, painted furniture, repurposing upcycling

Embarking on your DIY bar cart journey requires a keen eye for hidden gems. Often, thrift stores, garage sales, or even forgotten corners of your own home hold the potential to house your future bar cart. As a bar cart aficionado, my own journey began when I stumbled upon a rust-covered cart at a garage sale, priced at a mere $2.00! A diamond in the rough, this cart was destined for a glamorous transformation.

Rust Be Gone: Preparing Your Canvas

diy bar cart, painted furniture, repurposing upcycling

Before the magic happens, a little elbow grease is required. Rust removal is the first order of business. Armed with an electric drill and a wire brush attachment, the majority of the rust was removed, revealing the cart’s underlying potential. While a few bumpy spots remained, they posed no challenge that couldn’t be handled.

Priming and Painting: A Palette of Possibilities

diy bar cart, painted furniture, repurposing upcycling

With the rust banished, it’s time to give your cart a fresh new look. Start by priming the surfaces, ensuring the paint will adhere smoothly. A quick spray paint session on the handles and trays follows, and here is where your creativity takes center stage. My personal touch involved adding a herringbone pattern to the trays using a gold paint pen.

Adding a pop of color further elevates the cart’s charm. Splashes of gold, pink, and mint were painted onto select spaces, embracing an eclectic and whimsical aesthetic. Remember, there’s no right or wrong way to approach this step – let your personal taste guide you.

The Grand Assembly: Bringing Your Bar Cart to Life

diy bar cart, painted furniture, repurposing upcycling

With the paint dried and the colors harmonizing beautifully, it’s time to put the pieces together. Assemble the cart with a sense of excitement and anticipation, knowing that each element has been lovingly curated to create a masterpiece. And voila! In a few simple steps, your DIY bar cart is complete, exuding sophistication and style.

Chicken and Rice soup

Ingredients

1 tbsp olive oil

1 tbsp butter (or more oil)

2 garlic cloves , minced

1 onion , chopped

3 carrots , halved then cut into 1cm / 2/5″ slices (quarter if really thick)

3 celery ribs , cut into 1 cm / 2/5″ slices

3 tsp Vegeta stock powder , or 2 x vegetable or chicken bouillon cube, or 2 tsp powder (Note 2)

1/2 tsp dried parsley

1/2 tsp dried thyme, optional

1/4 tsp black pepper , finely ground

4 cups (1 litre) chicken broth , low sodium

4 cups (1 litre) water

600 g (1.2 lb) bone in , skinless chicken thighs, 4 x 150g/5oz (Note 1)

1 cup (180g) long grain white rice , uncooked (Note 3)

Salt, adjust to taste

1 tbsp finely chopped parsley (optional)


Instructions :

Place oil and butter in a large pot over medium high heat. Add onion and garlic, cook for 5 minutes until onion is translucent.

Add carrots and celery, stir for 1 minute.

Add stock powder, dried parsley, thyme (if using), pepper, chicken broth, water. Stir, then add chicken.

Cover with lid, simmer on medium low for 30 minutes. Adjust heat so it’s bubbling a nice amount, but not crazy energetically or super slowly. Skim off excess foam build up once or twice (not critical, just makes broth clearer).

Remove lid, add rice. Stir, cover, simmer 15 minutes.

Remove soup from stove.

Remove chicken into large bowl. Shred with 2 forks, discard bones then stir into soup.

Stir in half the parsley, taste for salt and add if required. Serve, then garnish with extra parsley.

Enjoy

Macaroni and Beef with Cheese

INGREDIENTS:

1 medium onion, diced

1 tablespoon canola oil

salt to taste

black pepper, oregano, chopped garlic to taste

2 28-ounce cans pureed tomatoes (the original recipe called for one so I think this is what made mine more “tomatoey”)

2 pounds lean ground beef

1/2 box macaroni

1 cup each grated cheddar and mozzarella cheeses

DIRECTIONS:

Sweat the onions in the oil with salt.

Add the beef to the onions and cook.

Add salt oregano, black pepper and garlic.

Add the tomatoes and bring to a simmer, then reduce the heat to low and cook for an hour. (This is where I added the second can of tomatoes because if I had let the thick meat paste simmer for an hour it would have burned dry within 10-15 minutes. So I added the tomatoes here.)

Cook the macaroni in boiling water till it’s half done.

Drain it and add it to the tomatoes. Remove pasta from heat. Add more salt and other seasonings as needed, and cover.

When it’s cooled, about 20 minutes to 30 minutes and the pasta has absorbed the tomato juices, transfer it to a large baking dish and cover it with foil. It can sit out for several hours like this, be refrigerated for up to two days, or frozen a few weeks.

Bake it in a 400 degree oven till it’s piping hot (about 45 minutes if it’s cold to room temperature). Just before you’re ready to eat, remove the foil, cover macaroni with the cheese and broil till it looks beautiful.

Please make sure to Like and share this Recipe with your friends on Facebook  to get our latest Yummy Recipes.

ENJOY!

Slow Cooker Barbequed Beef Ribs

“This recipe came out terrific. I seasoned the ribs with salt and pepper then seared them on all sides before adding them to the Slow Cooker. The searing made for a nice, caramelized crust on the outside of the ribs. Cooked these for 7 hours on Low. There was some grease so I simply absorbed it off the top using tongs and a paper towel. Super!”

To Make this Recipe You’ll Need the following

Ingredients :
1 cup water
1 cup ketchup
1 (6 ounce) can tomato paste
3/4 cup brown sugar
1/2 cup vinegar
2 tablespoons prepared mustard
1 tablespoon salt
2 pounds beef back ribs

Directions :
1. Mix water, ketchup, tomato paste, brown sugar, vinegar, mustard, and salt in a slow cooker, stirring to dissolve brown sugar and salt.
2. Place short ribs into the sauce and stir to coat. Set cooker on Low, cover, and cook for 8 hours.

Enjoy

Homemade Smoked Ham

Ingredients

7 pound fresh bone-in ham , rinsed under cold water (see blog section above: “Select a Ham”) NOTE: If selecting a ham with the skin on, cut a criss-cross pattern into the skin about 1/2 inch deep

  • For The Brine:
  • 6 quarts cold water , divided in half
  • 2 cups brown sugar
  • 1 cup kosher salt
  • 1 1/2 tablespoons Prague powder (curing salt #1)
  • 2 teaspoons black peppercorns
  • 2 bay leaves
  • For The Glaze:
  • 1 batch Brown Sugar Glaze (click link for recipe)
  • FOR THE RUB (Optional – see NOTE):
  • 1/4 cup packed brown sugar
  • 1 tablespoon paprika
  • 1 1/2 teaspoons salt
  • 1 teaspoon freshly ground black pepper
  • 1 teaspoon garlic powder
  • 1 teaspoon onion powder
  • 1/2 teaspoon ground mustard
  • wood chips (popular choices included maple, pecan, hickory, and apple)

INSTRUCTIONS

  • To make the brine: Place half of the water and the remaining brine ingredients in a large stockpot that’s big enough to fit your ham and deep enough to allow the ham to be fully covered by the brine.  Alternatively you can use any clean bucket.Bring the brine to a boil and stir until the sugar and salt is dissolved.  Turn off the heat.  Pour in the remaining water to cool down the brine and then let it cool completely.Place it in the brine and ensure that it is completely submerged under the brine.  If it keeps floating to the top, weigh it down.  Cover and refrigerate.  Let the ham cure for 7 days.Once the curing period is over, remove the ham from the brine, thoroughly rinse it under water, then blot the ham with paper towels and place on a rack to continue drying in the fridge for at least a couple of hours or overnight.Optional:  At this point you can apply the rub to the ham if you wish.

Prepare your smoker according to manufacturer instructions and get it to a temperature of 250 degrees F.Place the ham in the smoker.  Plan on about 4-5 hours but start checking for doneness sooner.  Add about one cup of wood chips roughly every 45 minutes throughout the smoking process or less frequently for a milder smoke flavor.Smoke the ham until it reaches an internal temperature between 130-140F (use an instant read thermometer). It’s now time to apply the glaze.Once the ham reaches an internal temp between 130-140 degrees, apply some of the glaze.Brush the ham all over with a coating of the glaze.After 20-30 minutes brush the ham all over with some more of the glaze until the internal temperature reaches 165 F Periodically check the internal temperature towards the end so that you do not exceed 165 F.

  • As soon as the internal temperature reaches 165 F, remove the ham from the smoker and wrap it in aluminum foil.Place the wrapped ham in a warm place to let rest until ready to serve.  At this point you can also let it cool completely, refrigerate, and then gently reheat in the foil when ready to serve.Slice the ham against the grain in 1/4 inch slices and serve with the remaining glaze.

Mounds Cake

Ingredients:

1 box of white or yellow cake mix

½ cup cocoa powder

½ cup granulated sugar

2 cups semisweet chocolate chips

1 cup chocolate syrup

1 (8 oz.) container of whipped topping (such as Cool Whip)

2 cups shredded coconut

Directions:

Begin by preheating your oven to 350°F (175°C). While the oven warms, lovingly grease a 9×13 inch baking dish.

Embrace the cake mix in a large bowl, just as it is, but with a twist. Whisk in cocoa and sugar until you’re met with a harmonious blend.

Pour the batter into your greased vessel. Now, scatter your chocolate chips across the surface as if sowing seeds of chocolatey joy.

Bake for 30 heavenly minutes. Upon removing, gently puncture the cake with a fork, allowing it to become a canvas for the chocolate syrup that you’ll lovingly cascade over it.

Show patience as the cake rests overnight, covered, transforming in the cool darkness.

The following day, unite whipped cream and coconut to create a frosting that speaks of clouds and tropical breezes. Adorn your cake with this mixture.

Chill the cake. When the moment feels right, slice and serve this irresistible masterpiece.

Enjoy

This is my grandma’s fave recipe ever. The best part It just takes 7 mins!

Are you ready to embark on a delightful journey of creating Classic 7-Minute Frosting? This ethereal icing promises to make your baked treats both a gastronomic and visual delight. In this article, we will take you through the process step by step, providing you with tips and tricks to master the art of making this delectable frosting. Let’s get started!

Classic 7-Minute Frosting Ingredients

Before we dive into the preparation steps, it’s essential to have a clear understanding of the ingredients you’ll need to make Classic 7-Minute Frosting. The right ingredients make all the difference in achieving the desired fluffy consistency and flavor. Here’s what you’ll need:

INGREDIENTSQUANTITY
Fresh egg whites5
Granulated sugar1 2/3 cups
Vanilla extract1 teaspoon
Cream of tartar1/2 teaspoon

Note: Freshly separated egg whites from whole eggs yield the best results compared to carton variants.

Steps to Create Classic 7-Minute Frosting

Now that you have your ingredients ready, let’s walk through the steps to create Classic 7-Minute Frosting. Follow these instructions carefully to ensure a perfect outcome:

Preparation

The first step is crucial to the success of your frosting. Ensure that the mixer bowl and whisks are squeaky clean. Wipe them with lemon juice or vinegar. This step is essential as any hint of grease can inhibit the egg whites from achieving the desired fluffy consistency.

Mixing

In the bowl, blend the egg whites, sugar, and cream of tartar. This is the beginning of the magic that will transform these simple ingredients into a luscious frosting.

Heating

Set the bowl over gently simmering water. Continuously stir until the mixture is hot to touch, feels smooth, and reaches a temperature of 160°F (about 2-3 minutes). This step ensures that your frosting is safe to consume.

Whipping

Shift the bowl to the stand mixer and whip on a medium-high setting until it forms stiff peaks, roughly around 6 minutes. This is where the frosting gets its signature fluffy texture.

Flavoring

As the finale, drizzle in the vanilla extract as you continue whipping. Adjust to your preference. The vanilla adds a delightful aroma and flavor to your frosting.

To Serve

Dollop the freshly made 7 Minute Frosting over your choice of cake or cupcakes. Remember, any leftover frosting should be refrigerated. Bring it to room temperature before reusing. This ethereal icing promises to make your baked treats both a gastronomic and visual delight. Enjoy!

With your frosting ready, let’s delve into some frequently asked questions and answers to help you perfect your Classic 7-Minute Frosting.

Classic 7-Minute Frosting is a delightful addition to your baking repertoire. With a handful of ingredients and a few simple steps, you can create a fluffy, sweet frosting that will elevate your desserts to the next level. Whether you’re a baking enthusiast or a novice, this frosting is a must-try. Enjoy the process, experiment with flavors, and watch as your treats become both a gastronomic and visual delight. Happy baking!

NO-BAKE WOOLWORTH ICEBOX CHEESECAKE

If you’re looking for a delicious and easy-to-make dessert, look no further than the no-bake Woolworth Icebox Cheesecake. This classic recipe has been a favorite among dessert enthusiasts for decades. In this article, we will guide you through the step-by-step process of creating this delectable treat. So, put on your apron and let’s get started!

Ingredients

To create the perfect No-Bake Woolworth Icebox Cheesecake, you will need the following ingredients:

  • 2 cups of graham cracker crumbs
  • 1/2 cup of unsalted butter, melted
  • 1 cup of granulated sugar
  • 2 (8-ounce) packages of cream cheese, softened
  • 1 teaspoon of vanilla extract
  • 1 (8-ounce) container of frozen whipped topping, thawed
  • 1 can of cherry pie filling (optional)

Instructions

Step 1: Prepare the Crust

  1. In a medium-sized bowl, combine the graham cracker crumbs and melted butter. Mix well until the crumbs are evenly coated with butter.
  2. Press the crumb mixture into the bottom of a 9×13-inch baking dish, forming an even layer. Use the back of a spoon or a flat-bottomed glass to press the crumbs firmly.
  3. Place the baking dish in the refrigerator to chill while you prepare the filling.

Step 2: Make the Cheesecake Filling

  1. In a large mixing bowl, beat the cream cheese until smooth and creamy.
  2. Add the granulated sugar and vanilla extract to the cream cheese. Continue beating until the mixture is well combined and smooth.
  3. Gently fold in the thawed whipped topping until fully incorporated.

Step 3: Assemble the Cheesecake

  1. Remove the chilled crust from the refrigerator.
  2. Pour the prepared cheesecake filling over the crust, spreading it evenly with a spatula.
  3. If desired, top the cheesecake with a layer of cherry pie filling or any other fruit topping of your choice.

Step 4: Chill and Serve

  1. Cover the baking dish with plastic wrap and refrigerate the cheesecake for at least 4 hours, or preferably overnight. This allows the flavors to meld together and the cheesecake to set.
  2. Once fully chilled and set, remove the cheesecake from the refrigerator.
  3. Cut the cheesecake into squares or slices, depending on your preference.
  4. Serve chilled and enjoy!

The No-Bake Woolworth Icebox Cheesecake is a timeless dessert that never fails to impress. With its creamy texture and delightful flavors, it’s a treat that will have your taste buds dancing with joy. Whether you’re hosting a dinner party or simply craving a sweet indulgence, this recipe is sure to satisfy. So, gather your ingredients, follow the simple steps, and treat yourself to a slice of heaven.