Depression Era Water Pie

ADVERTISEMENT

In the midst of the Great Depression, when resources were scarce and creativity was essential, a humble yet delicious dessert emerged – Depression Era Water Pie. This simple yet scrumptious pie has stood the test of time, offering a taste of history with every bite. Join us on a journey to discover the secrets of this delightful treat, complete with a detailed recipe and intriguing insights.

Depression Era Water Pie takes us back to a time when people had to make the most of what they had. It’s a pie that embodies resourcefulness and the ability to find joy in simplicity. Let’s delve into the details of this intriguing dessert.

Ingredients:

For the Crust:

INGREDIENTAMOUNT
All-purpose flour1 ½ cups
Vegetable shortening½ cup
Salt1 tsp
Ice-cold water3-4 tbsp

For the Filling:

INGREDIENTAMOUNT
Granulated sugar1 cup
All-purpose flour2 tbsp
Salt1 pinch
Water2 cups
Vanilla extract1 tsp
Butter1 tbsp
Ground nutmegA pinch

Instructions:

Prepare the Crust

  1. In a mixing bowl, combine the flour and salt.
  2. Cut in the vegetable shortening with a pastry cutter or fork until the mixture resembles coarse crumbs.
  3. Gradually add the ice-cold water, 1 tablespoon at a time, mixing until the dough comes together.
  4. Form the dough into a ball, wrap it in plastic wrap, and refrigerate for at least 30 minutes.

Roll Out the Crust

  1. Preheat your oven to 425°F (220°C).
  2. On a floured surface, roll out the chilled dough into a circle to fit your pie dish.
  3. Gently place the dough in the pie dish, trimming any excess and crimping the edges decoratively.

Prepare the Filling

  1. In a saucepan, combine sugar, flour, and a pinch of salt.
  2. Gradually stir in the water.
  3. Cook the mixture over medium heat, stirring constantly until it thickens and comes to a boil.
  4. Remove from heat and stir in the vanilla extract and butter.
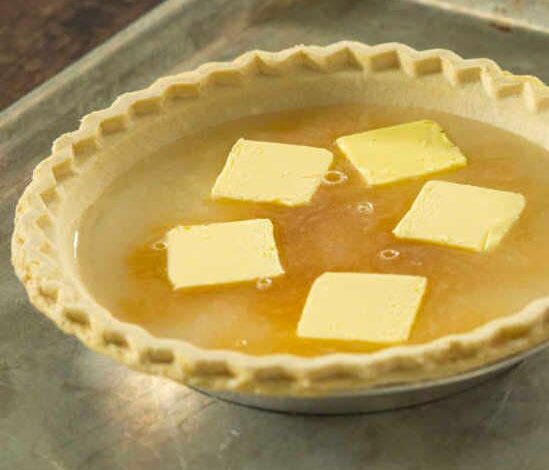
Assemble and Bake

  1. Pour the hot filling into the prepared pie crust.
  2. Sprinkle a pinch of ground nutmeg over the top.

Bake

  1. Place the pie in the preheated oven.
  2. Bake for 10 minutes at 425°F (220°C), then reduce the temperature to 350°F (175°C).
  3. Continue baking for an additional 30-35 minutes or until the pie is set and the crust is golden brown.

Very clean toilets: 3 foolproof tips with white vinegar

ADVERTISEMENT

Maintaining a clean toilet is essential for a fresh and hygienic bathroom. White vinegar, with its natural cleaning properties, can be a powerful ally in achieving spotless and odor-free toilets. Here are three foolproof tips using white vinegar for very clean toilets:

Tip 1: White Vinegar Toilet Bowl Cleaner

Ingredients:

  • 1 cup white vinegar
  • 1 cup baking soda
  • 10 drops tea tree oil (optional, for added disinfectant properties)

Instructions:

  1. Empty the Bowl:
    • Flush the toilet to wet the sides of the bowl, and then turn off the water supply to the toilet.
  2. Add Baking Soda:
    • Sprinkle 1 cup of baking soda into the toilet bowl.
  3. Pour White Vinegar:
    • Pour 1 cup of white vinegar into the bowl over the baking soda.
  4. Scrub Gently:
    • Allow the fizzing reaction to occur, and then scrub the bowl with a toilet brush, paying extra attention to stains and under the rim.
  5. Let it Sit:
    • Let the mixture sit for 10-15 minutes to maximize cleaning.
  6. Flush and Rinse:
    • Turn the water supply back on and flush the toilet. Rinse the brush and flush again.

Tip 2: White Vinegar and Lemon Deodorizer

Ingredients:

  • 1 cup white vinegar
  • 1 lemon, sliced
  • 1/2 cup baking soda

Instructions:

  1. Pour White Vinegar:
    • Pour 1 cup of white vinegar into the toilet bowl.
  2. Add Lemon Slices:
    • Drop in slices of one lemon.
  3. Sprinkle Baking Soda:
    • Sprinkle 1/2 cup of baking soda over the mixture.
  4. Let it Sit:
    • Allow the mixture to sit for at least 15-20 minutes. The acid in the vinegar and the citrus in the lemon work as a natural deodorizer.
  5. Scrub and Flush:
    • Scrub the bowl with a brush and flush the toilet.

Tip 3: White Vinegar and Borax Stain Remover

Ingredients:

  • 1 cup white vinegar
  • 1/2 cup borax
  • Toilet brush

Instructions:

  1. Sprinkle Borax:
    • Sprinkle 1/2 cup of borax into the toilet bowl, concentrating on stained areas.
  2. Pour White Vinegar:
    • Pour 1 cup of white vinegar over the borax.
  3. Let it Soak:
    • Allow the mixture to soak for at least 30 minutes or overnight for stubborn stains.
  4. Scrub Gently:
    • Use a toilet brush to scrub away the stains. The borax acts as a gentle abrasive, and the vinegar helps break down mineral deposits.
  5. Flush:
    • Flush the toilet to rinse away the residue.

Additional Tips:

  • Regular Maintenance:
    • Repeat these cleaning methods regularly to prevent buildup and maintain a consistently clean toilet.
  • Ventilation:
    • Ensure proper ventilation in the bathroom to prevent mold and mildew.
  • Safety Precautions:
    • Always follow safety guidelines when handling cleaning agents. Keep the bathroom well-ventilated.

Achieve sparkling clean toilets with these foolproof white vinegar tips, keeping your bathroom fresh and sanitary.

Texas “Trash” Dip

ADVERTISEMENT

Welcome to the world of Texas Trash Dip, where comfort food meets culinary delight. In this article, we’ll guide you through the steps to create this delectable dish that’s perfect for gatherings, parties, or just a cozy night in. Let’s dive into the ingredients and instructions, ensuring you master the art of making this cheesy delight.

INGREDIENTSQUANTITY
Refried Beans32 ounces
Cream Cheese8 ounces
Sour Cream1 cup
Taco Seasoning1 packet
Shredded Cheddar Cheese2 cups
Shredded Monterey Jack Cheese2 cups

Preparing the Texas Trash Dip

Preheat and Mix

Begin by preheating your oven to 350°F (175°C). In a mixing bowl, combine refried beans, cream cheese, sour cream, and taco seasoning until a smooth and flavorful mixture is achieved.

Even Spread

Gently spread this bean mixture into a 9×13-inch baking dish, ensuring an even distribution for the perfect balance of flavors in every bite.

Cheesy Finish

Sprinkle both shredded cheddar and Monterey Jack cheeses over the bean mixture, creating a layer of gooey, melted goodness.

Baking Bliss

Bake in the preheated oven for 25-30 minutes, or until the dip is hot, bubbly, and the cheese is beautifully melted and lightly browned.

Cool and Serve

Allow the Texas Trash Dip to cool slightly before serving. Enjoy it with tortilla chips, crackers, or your favorite dippers!

Personal Touch and Experience

Bringing people together over a shared love for good food is a joy, and Texas Trash Dip has been a star in my culinary adventures. The creamy texture, combined with the savory richness of the beans and the delightful blend of cheeses, makes it a consistent hit at gatherings.

In conclusion, Texas Trash Dip is more than a recipe; it’s a culinary experience that brings people together. With its simplicity and versatility, this cheesy delight is sure to become a favorite in your repertoire. Embrace the joy of creating and sharing good food with Texas Trash Dip as your go-to recipe.

TACO CROCK POT HASHBROWN CASSEROLE

ADVERTISEMENT

Welcome to the world of savory delights! In this article, we delve into the art of crafting the perfect TACO CROCK POT HASHBROWN CASSEROLE. Whether you’re a seasoned chef or a kitchen novice, this guide promises to unravel the secrets behind a dish that marries the flavors of tacos and the comfort of hashbrowns.

Ingredients:

INGREDIENTQUANTITY
Ground beef1 lb
Garlic minced
Cheddar cheese soup
Frozen shredded hashbrowns
Shredded taco style cheese2 cups (divided)

Instructions:

  1. Cook the Hamburger:
    • In a skillet, cook 1 lb of ground beef with taco seasoning, minced garlic, and diced onion until the beef is browned.
  2. Combine Ingredients:
    • In a bowl, mix the cooked hamburger with diced tomatoes and green chiles, cheddar cheese soup, sour cream, and half of the shredded taco style cheese.
  3. Add Hashbrowns:
    • Incorporate the frozen shredded hashbrowns into the mixture, ensuring an even distribution.
  4. Transfer to Crock Pot:
    • Place the combined ingredients into a crock pot.
  5. Cooking Time:
    • Set the crock pot to high for 2 hours or low for 4 hours. Allow the flavors to meld together, creating a delicious casserole.
  6. Serve:
    • Once cooked, serve the TACO CROCK POT HASHBROWN CASSEROLE hot, garnished with the remaining shredded taco style cheese.

Outback Steakhouse Alice Springs Chicken

ADVERTISEMENT

If you’ve ever dined at Outback Steakhouse, chances are you’ve fallen in love with their scrumptious Alice Springs Chicken. This delightful dish boasts tender grilled chicken topped with sautéed mushrooms, crispy bacon, melted cheese, and a honey mustard sauce that perfectly complements its flavors. In this article, we will present the complete Outback Steakhouse Alice Springs Chicken recipe along with a comprehensive table sheet format of the ingredients. Prepare to tantalize your taste buds and impress your family and friends with this delectable homemade version.

INGREDIENTSQUANTITY
Boneless, skinless chicken breasts4 pieces
Honey mustard sauce1/2 cup
Sliced mushrooms1 cup
Crispy cooked bacon8 slices
Colby Jack cheese1 cup
Cheddar cheese1 cup
Dijon mustard2 tablespoons
Worcestershire sauce1 tablespoon
Paprika1 teaspoon
Salt and pepperTo taste
Olive oil2 tablespoons
Fresh parsley (optional)For garnish

Cooking Instructions

  1. Preheat your grill or stovetop pan over medium-high heat.
  2. Season the chicken breasts with salt, pepper, and paprika on both sides.
  3. In a small bowl, mix the honey mustard sauce, Dijon mustard, and Worcestershire sauce.
  4. Brush the chicken breasts with the honey mustard mixture on both sides.
  5. Place the chicken on the grill or pan and cook for about 6-7 minutes on each side, or until the chicken is cooked through and no longer pink in the center.
  6. In a separate pan, sauté the sliced mushrooms with olive oil until they are tender and slightly browned.
  7. Once the chicken is cooked, remove it from the grill or pan and set aside.
  8. Preheat your broiler.
  9. On each chicken breast, layer a generous amount of sautéed mushrooms, followed by two slices of crispy bacon.
  10. Top the chicken with a mixture of Colby Jack and cheddar cheese.
  11. Place the chicken under the broiler for about 2 minutes or until the cheese is melted and bubbly.
  12. Garnish with fresh parsley if desired, and serve the OUTBACK STEAKHOUSE ALICE SPRINGS CHICKEN hot with your favorite side dishes.

Tips for a Perfect Outback Steakhouse Alice Springs Chicken

  • For the honey mustard sauce, you can use store-bought or make your own by combining equal parts of honey and Dijon mustard.
  • Marinating the chicken in the honey mustard mixture for a few hours before cooking will enhance its flavor.
  • Use thinly sliced chicken breasts for faster and more even cooking.
  • You can substitute the Colby Jack and cheddar cheese with your favorite cheese blend.
  • To ensure the bacon is crispy, cook it separately in a pan until it reaches your desired crispiness.

FAQs

Q: Can I use different types of cheese for this recipe? A: Absolutely! While the combination of Colby Jack and cheddar cheese is traditional, you can experiment with other cheeses like Swiss, provolone, or even pepper jack for a unique twist.

Q: Can I grill the chicken outdoors instead of using a stovetop pan? A: Yes, grilling the chicken outdoors will infuse it with a smoky flavor that adds an extra layer of deliciousness to the dish.

Q: How can I make the honey mustard sauce spicier? A: If you prefer a spicier sauce, add a pinch of cayenne pepper or a few dashes of hot sauce to the honey mustard mixture.

Crockpot Christmas Crack

ADVERTISEMENT

The holiday season is synonymous with delicious treats, and nothing says festive indulgence like Crockpot Christmas Crack. In this article, we’ll guide you through crafting this mouthwatering delight step by step. Get ready to elevate your holiday celebrations with a treat that’s easy to make and impossible to resist.

Ingredients:

INGREDIENTSQUANTITY
Unsalted Peanuts16 oz
Salted Peanuts16 oz
Semi-sweet Chocolate Chips1 Bag
Milk Chocolate Chips1 Bag
Peanut Butter Chips2 Bags
White Chocolate Bark or Wafers2 Packages

Instructions:

  1. Prepare the Base:
    • Place the unsalted and salted peanuts into the bottom of the slow cooker.
  2. Layering the Goodness:
    • Cover the peanuts with the peanut butter chips.
    • Add the semi-sweet and milk chocolate chips.
  3. Finishing Touch:
    • Layer the white chocolate bark or wafers on top.
    • Place the lid on the crockpot and cook on low for 1 hour.
  4. Stirring and Setting:
    • Remove the lid, stir the mixture well, and place the lid back on to cook on low for an additional 30 minutes.
  5. Cluster Creation:
    • Stir the mixture again and use a tablespoon to drop clusters onto pieces of parchment paper.
  6. Final Touch:
    • Allow the candy clusters to harden and set for several hours.
    • Serve immediately or store in an airtight container. Candies can also be frozen for future use.

Enjoy

Say Goodbye To Fruit Flies And Gnats For Good – The Paper Towel Trick Changes Everything

ADVERTISEMENT

Are you finding yourself dealing with fruit flies invading your kitchen every summer? These pesky insects can quickly become a nuisance, as they lay eggs on the surfaces of bananas, mangoes, pineapples, and other ripe fruits. Within 5-6 days, these eggs turn into flies, leading to a rapid increase in their population and the potential to spread to other fruits. With the summer heat causing fruits to ripen faster, fruit flies find the perfect breeding ground. Did you know that each fly can lay up to 350 eggs per week? It’s no wonder that you can end up with a colony of fruit flies in no time!

However, fear not, for there is a plan to prevent their appearance and get rid of these unwanted roommates. Here are some effective steps you can take:

  1. Store Fruits in the Fridge: To prevent fruit flies from laying eggs on your fruits, store most of your fruit in the refrigerator. The cold temperature will halt the hatching of eggs, keeping your fruits free from infestation.
  2. Clean Kitchen Surfaces Regularly: Clean your kitchen counters, garbage cans, and sink often. Rinse your plates as soon as the meal is finished, as fruit flies are attracted to leftover food and often lay eggs in such areas. Additionally, they have a weakness for sugary liquids and alcoholic drinks, so make sure to clean up spills promptly.
  3. Inspect and Clean Fruits: For fruits that you leave on the counter, such as bananas, make it a habit to rub them under water as soon as you bring them home from the grocery store. Dry them well with a clean cloth to eliminate any potential eggs.
  4. Empty Compost Regularly: If you have a compost bin, make sure to empty it regularly and place the compost outside. If your compost bin is small, you can also keep it in the fridge or freezer.
  5. Keep Kitchen Towels and Sponges Dry: After every use, ensure that your kitchen towels and sponges are dried properly. Moist places like these can serve as perfect nests for fruit flies, so washing them frequently is essential.

Trap the Flies: If you already have a fruit fly infestation, don’t panic. You can easily make a homemade trap to get rid of them:

  1. In a bowl or glass, pour a small amount of beer, wine, or vinegar (balsamic, wine, or cider).
  2. Cover the bowl or glass with plastic wrap and poke small holes in it to allow the fruit flies to enter.
  3. Fruit flies will be attracted by the smell of the liquid, which resembles the scent of very ripe fruit they adore, and they will get trapped inside the container.
  4. You can add a few drops of dish soap to the liquid to make it viscous and ensure that the flies remain trapped.
  5. Empty the trap daily and repeat the process until there are no more flies inside. It may take about 1-2 weeks, but with perseverance, you can successfully get rid of fruit flies.

Once you have eradicated the fruit flies, continue following the prevention measures mentioned above to ensure they don’t return. With these tips, you’ll be fully equipped to face the fruit fly challenge this summer!

FAQs (Frequently Asked Questions)

  1. Why do fruit flies appear in my kitchen every summer? Fruit flies are attracted to ripe fruits and vegetables, especially in warm and humid conditions. During the summer, the heat accelerates the ripening process of fruits, making them more appealing to fruit flies. These insects lay eggs on the surfaces of fruits, leading to a rapid increase in their population.
  2. How can I prevent fruit flies from infesting my kitchen? To prevent fruit flies, store most of your fruits in the refrigerator, clean your kitchen surfaces regularly, and rinse fruits under water and dry them well to remove any potential eggs. Additionally, keep your kitchen towels and sponges dry, and promptly empty your compost outside.
  3. Are fruit flies harmful to health? Fruit flies are not known to transmit diseases to humans, but they can contaminate food with bacteria and other microorganisms. It’s best to get rid of fruit flies to maintain a clean and hygienic kitchen environment.
  4. Can I use pesticides to eliminate fruit flies? While pesticides can be effective in getting rid of fruit flies, it’s essential to avoid using harmful chemicals in areas where food is prepared. Instead, opt for natural and non-toxic methods, such as homemade traps using beer, wine, vinegar, or dish soap.
  5. How long does it take to get rid of fruit flies using traps? It may take about 1-2 weeks to significantly reduce the fruit fly population using traps. Regularly emptying the traps and maintaining clean kitchen practices will hasten the process.
  6. What if I don’t have plastic wrap for the fruit fly trap? If you don’t have plastic wrap, you can reuse the plastic wrap from a package of mushrooms or another vegetable you bought at the grocery store. Alternatively, you can use a small container with a lid and poke small holes in it for the fruit flies to enter.
  7. Can fruit flies be attracted to other types of liquids besides beer, wine, and vinegar? Yes, fruit flies are attracted to various sweet and fermenting liquids. Besides beer, wine, and vinegar, you can use ripe fruit juice, fruit syrup, or a mixture of fruit and water in the trap.
  8. What if I still have fruit flies after using traps and prevention methods? If fruit flies persist, reevaluate your kitchen practices and ensure that all fruits are stored properly in the fridge or cleaned thoroughly. Continue using traps and maintain cleanliness to reduce their population further.
  9. Can fruit flies infest other areas of the house besides the kitchen? While fruit flies are most commonly found in the kitchen due to the presence of ripe fruits and food, they can infest other areas where organic matter is present. Be cautious and apply preventive measures throughout the house.
  10. Are there any natural repellents to deter fruit flies from entering the kitchen? Yes, certain natural repellents like citrus essential oils or cloves can help deter fruit flies from entering the kitchen. Placing citrus peels or cloves near fruit bowls and kitchen entrances may discourage them from lingering.

Remember, consistency is key when dealing with fruit flies. By implementing preventive measures and using traps, you can successfully get rid of these pesky insects and enjoy a fruit fly-free kitchen throughout the summer!

Mandarin Orange Salad

ADVERTISEMENT

Indulge in the delightful combination of vanilla pudding, crushed pineapple, and mandarin oranges with this Mandarin Orange Salad recipe. Discover a simple, yet flavorful dish that can be enjoyed as a side or dessert. Make it your own by opting for healthier alternatives. Try it today!

Ingredients:

INGREDIENTQUANTITY/DESCRIPTION
Vanilla Instant Pudding Mix (sugar-free)1 package (dry)
Crushed Pineapple (undrained)1 large can
Mandarin Oranges (drained)2 medium/large cans
Cool Whip 8 oz (fat-free recommended)1 package

Instructions:

  1. Prepare the Base:
    • In a mixing bowl, combine the Cool Whip and dry Vanilla Instant Pudding Mix. Do not prepare the pudding; use it dry.
  2. Add Fruits:
    • Incorporate the undrained Crushed Pineapple into the mixture.
  3. Include Mandarin Oranges:
    • Add the drained Mandarin Oranges to the bowl. Adjust the quantity based on your preference.
  4. Mix Thoroughly:
    • Gently mix all the ingredients until well combined, ensuring an even distribution of flavors.
  5. Refrigerate:
    • Cover the bowl and refrigerate the salad for a couple of hours. This allows it to thicken and enhances the overall texture.
  6. Serve and Decorate:
    • Once chilled and thickened, your Mandarin Orange Salad is ready to be served. Save a few Mandarin Oranges to decorate the top for an appealing presentation.
  7. Versatile Serving:
    • Enjoy the salad as a delightful side dish with your meal or elevate it to a dessert by serving it alongside ice cream.
  8. Healthier Options:
    • For a healthier version, choose sugar-free Instant Pudding Mix, opt for fat-free Cool Whip, and use fresh mandarins.
  9. Personalize Your Salad:
    • Experiment with the recipe to find your preferred balance of ingredients. Consider using whipped Cool Whip for a lighter texture.
  10. Try and Explore:
    • Give this Mandarin Orange Salad a few tries to discover the combination that suits your taste buds best. Whether it’s a family meal or a special occasion, this salad is a versatile and delightful addition.

Christmas Breakfast Casserole

ADVERTISEMENT

In the hustle and bustle of the holiday season, a Christmas Breakfast Casserole emerges as a lifesaver. Its versatility, time-saving benefits, and crowd-pleasing flavors make it a perfect choice for a festive morning. Whether you’re hosting a family gathering or enjoying a cozy Christmas with loved ones, this dish ticks all the boxes.

Ingredients:

INGREDIENTSQUANTITY
Ground sausage1 lb
Mustard powder1 tsp
Kosher salt½ tsp
Large eggs, beaten4
Whole milk2 C
White bread, toasted & cubed6 slices
Mild Cheddar cheese, shredded1 C

Instructions:

  1. Crumble Sausage:
    • In a medium skillet, crumble the ground sausage.
    • Cook over medium heat until evenly browned; drain any excess fat.
  2. Prepare Flavor Base:
    • In a medium bowl, combine mustard powder, kosher salt, beaten eggs, and whole milk.
  3. Mix Ingredients:
    • Add the browned sausage, toasted bread cubes, and shredded Cheddar cheese to the bowl.
    • Stir well to coat all ingredients evenly.
  4. Transfer to Baking Dish:
    • Pour the mixture into a greased 9×13 inch baking dish, creating a uniform layer.
  5. Chill in Refrigerator:
    • Cover the baking dish and chill in the refrigerator for 8 hours or overnight.
  6. Preheat Oven:
    • Preheat the oven to 350 degrees Fahrenheit.
  7. Bake Covered:
    • Cover the baking dish and bake for 45 to 60 minutes until a golden-brown crust forms.
  8. Uncover and Reduce Temperature:
    • Uncover the dish and reduce the oven temperature to 325 degrees Fahrenheit.
  9. Bake Uncovered:
    • Continue baking for an additional 30 minutes or until the casserole is set.
  10. Cut and Serve:
    • Once baked to perfection, cut the Christmas Breakfast Casserole into portions and serve.

Enjoy

Christmas Crack

ADVERTISEMENT

‘Tis the season for festive treats, and what better way to indulge your taste buds than with a delightful Christmas Crack? This sweet-salty confection combines the buttery crunch of Ritz crackers with a luscious layer of caramel and a generous topping of chocolate and candies. In this article, we’ll guide you through the steps of creating this delectable treat that is sure to be a hit at your holiday celebrations.

Unwrapping the Ingredients

Let’s dive into the key players that make Christmas Crack an irresistible delight.

INGREDIENTSQUANTITY
Ritz crackers1 sleeve
Unsalted butter1/2 cup
Packed brown sugar1/2 cup
Chocolate chips1 cup
Your choice of candy toppingAs desired

Baking Magic: Step-by-Step Instructions

Follow these steps to transform simple ingredients into a Christmas Crack masterpiece.

  1. Preheat and Prep
    • Preheat your oven to 425°F (220°C).
    • Line an 8×8 inch baking dish with parchment paper.
  2. Cracker Canvas
    • Lay the Ritz crackers in a single layer in the prepared dish.
  3. Caramel Creation
    • In a saucepan, melt butter and brown sugar, bringing it to a boil.
    • Boil for 3 minutes without stirring.
  4. Caramel Cascade
    • Evenly pour the caramel mixture over the crackers.
    • Bake for 5 minutes to set the caramel.
  5. Chocolate Charm
    • Remove from the oven, scatter chocolate chips over the top.
    • Return to the oven for 2 minutes to soften the chocolate.
  6. Even Spread
    • Spread the melted chocolate evenly across the cracker surface.
  7. Topping Temptation
    • Add your choice of candy topping, embracing creativity.
  8. Chill and Break
    • Let it cool and then break into smaller, delightful pieces.
    • For quicker cooling, refrigerate it.
  9. Savor the Flavor
    • Enjoy this delectable Christmas Crack, a perfect sweet-salty treat to brighten your holiday celebrations.

Insights and Experiences

As someone who has experienced the joy of creating Christmas Crack, I can attest to its simplicity and crowd-pleasing qualities. The combination of buttery crackers, rich caramel, and luscious chocolate creates a harmony of flavors that is simply irresistible. It’s a treat that sparks joy and brings people together during the festive season.

In conclusion, Christmas Crack is more than just a treat; it’s a symbol of joy and togetherness during the holiday season. With a straightforward recipe and room for creative customization, it’s a delightful addition to your festive table. So, gather your ingredients, follow the simple steps, and indulge in the magic of Christmas Crack this holiday season.